• Home
  • About
    • Contact
    • Terms & Conditions
  • Shop
  • Go to Cart

Roxy's Kitchen

Follow Roxy on: FacebookFollow Roxy on: PinterestFollow Roxy on: E-mailFollow Roxy on: YouTubeFollow Roxy on: Instagram
  • Holidays & Events
    • Themed Parties
      • Beach / Nautical
      • Cars
      • Characters
      • For Her
      • For Him
      • Love, Marriage & Family
      • Puppy / Dog
      • Robots
      • Soccer
      • Safari / Jungle
      • Superheros
      • Trains
    • Christmas
    • Easter
    • Halloween
    • Thanksgiving
    • Valentine’s Day
  • How To’s
    • Fondant, Chocolate & Icing Decorations
    • Cake Flavours
    • Cake Frosting & Fillings
    • Breads
    • Pie & Pasta Dough
    • Canning & Preserving
    • AI-Powered Apps & Virtual Assistants
    • Others / Tips & Tricks
  • Recipes by Category
    • 5licious
    • Appetizers & Snacks
    • Breakfast
    • Bites on Boards
    • Cakes
    • Desserts
    • Drinks
    • Kid Friendly & Funny
    • Main Course
    • Salads
    • Side Dishes
    • Soups & Stews
  • Roxy’s Cakes
  • FREE & Cheap Printables

Racing Car Cakesicles for Rocket League Fans

September 26, 2024 by Roxy

Racing Car Cakesicles for Rocket League Fans - Free printable design included!

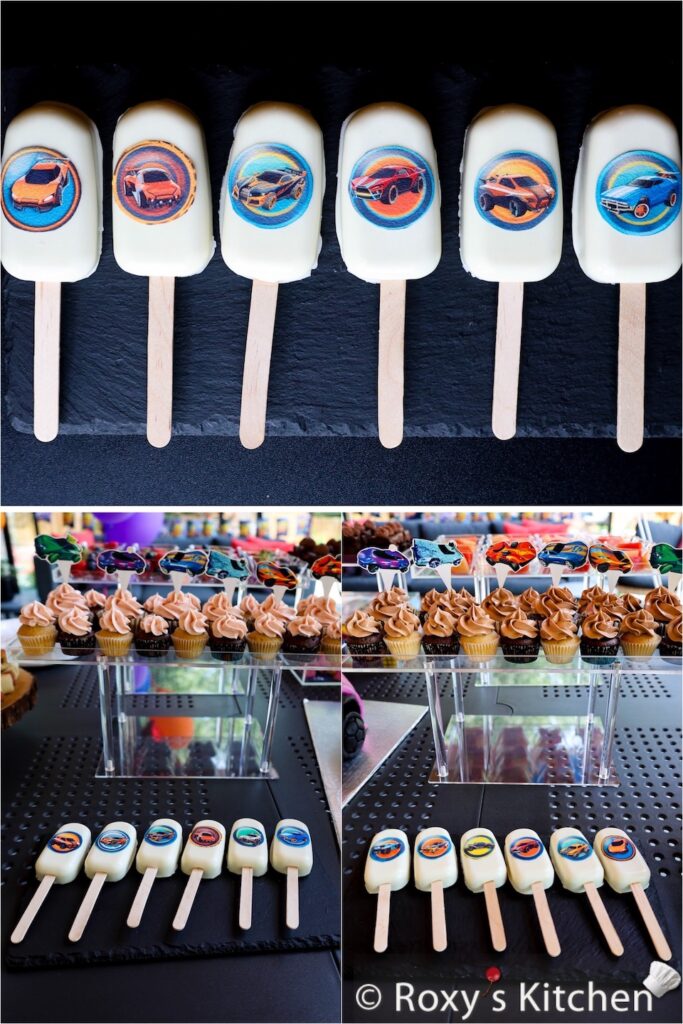
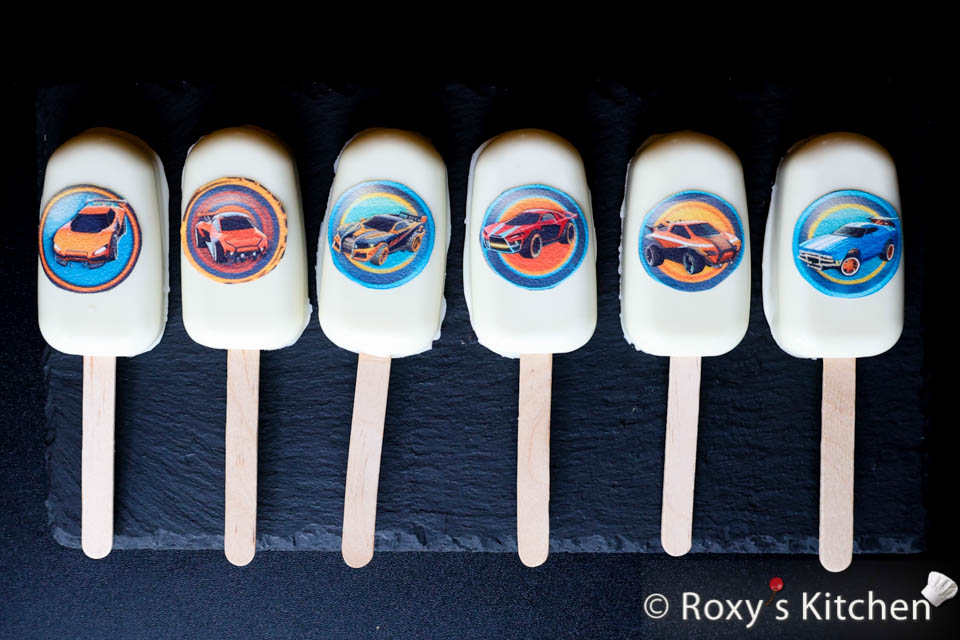
Get ready to rev up the fun with these Racing Car Cakesicles, perfect for any Rocket League fan! In this post, I’ll show you how to create these exciting treats that will bring a taste of the game to your dessert table. Just like the cakesicles and cake pops we made for our soccer-themed birthday parties, these Racing Car Cakesicles are sure to be a hit—they were the first treats to “disappear” at the parties! Cakesicles are a fun and creative dessert that combine the deliciousness of cake with the playful shape of popsicles. Made by molding cake crumbs and frosting into popsicle-shaped molds, these treats are not only visually appealing but also incredibly easy to eat, making them a favourite among kids.

Make sure to check out my posts from this Birthday Party for Rocket League Fans series to see lots of dessert ideas, party games, snacks, decorations and much more!

Ingredients/Supplies (30-35 cakesicles)

  • 750 g (1.7 lbs) moist chocolate cake / cake scraps; follow the directions in this Moist Chocolate Cake recipe to make your cake (use half of the ingredients listed in the recipe) 
  • 250 g (~ 1 cup / 0.5 lbs) frosting; I used raspberry cream cheese buttercream 
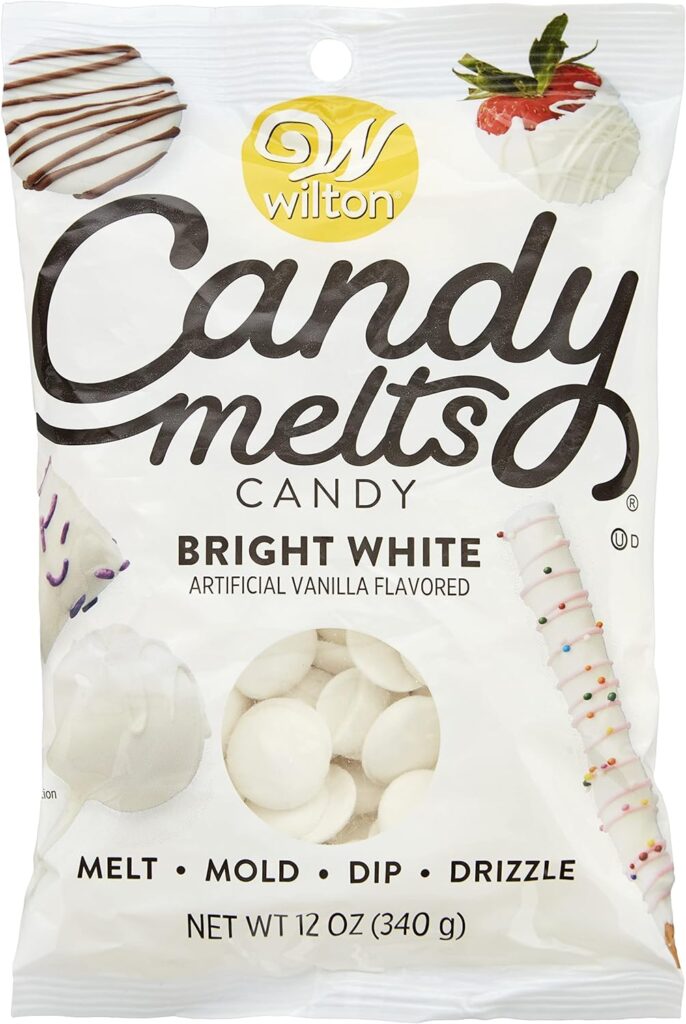
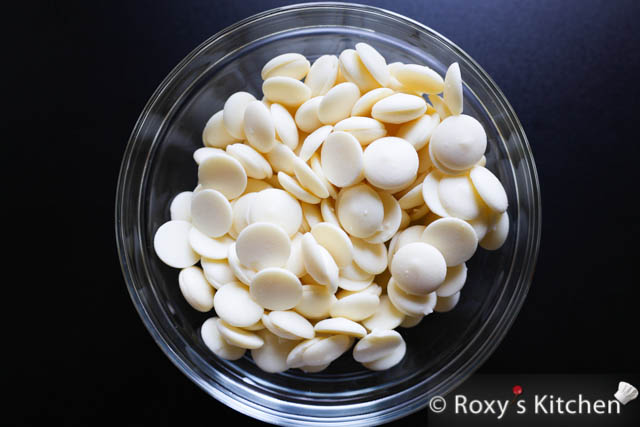
  • 600 g (1.3 lbs) white candy melts 
  • for the racing car decorations: 
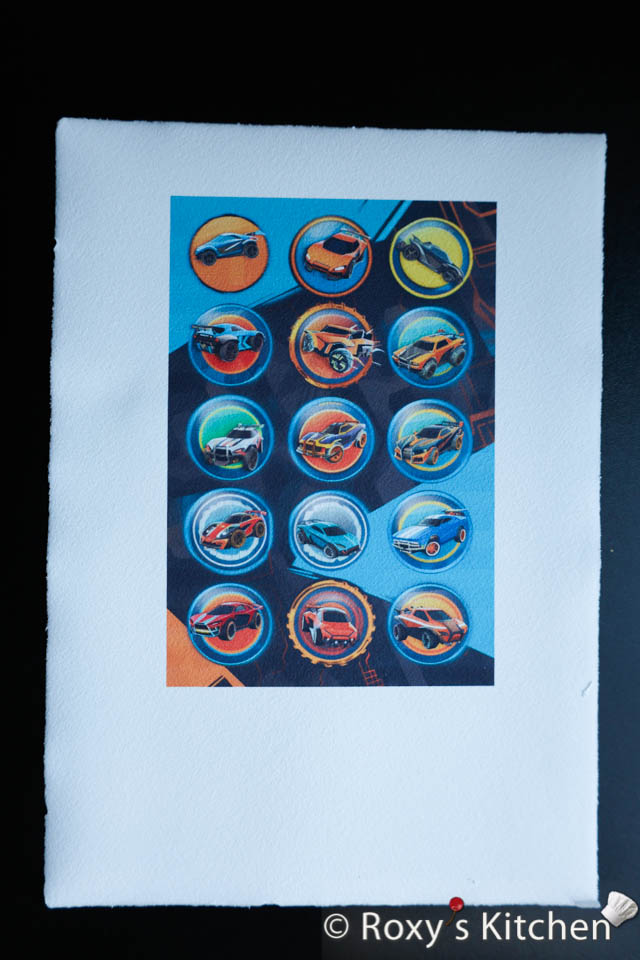
    • the 1.25” or 1” round racing car designs which you can download here, 
    • edible paper and printer with edible ink; alternatively, you can find a cake shop that provides edible printing services and print the image there
  • Race Car Cake & Cupcake Toppers (1'' to 6'') for Rocket League Fans
    Race Car Cake & Cupcake Toppers (1” to 6”) for Rocket League Fans
    $2.99
    Add to cart
  • Race Car Party Printables for Rocket League Fans
    Race Car Party Package Printables for Rocket League Fans
    $3.99
    Add to cart
  • Race car cupcake toppers
    Race Car Cupcake Toppers (2”) for Rocket League Fans
    $1.19
    Add to cart
  • Sale Product on sale
    Race car mini cupcake toppers
    FREE! Race Car Mini Cupcake Toppers (1.25”) for Rocket League Fans
    $1.19 Original price was: $1.19.$0.00Current price is: $0.00.
    Add to cart
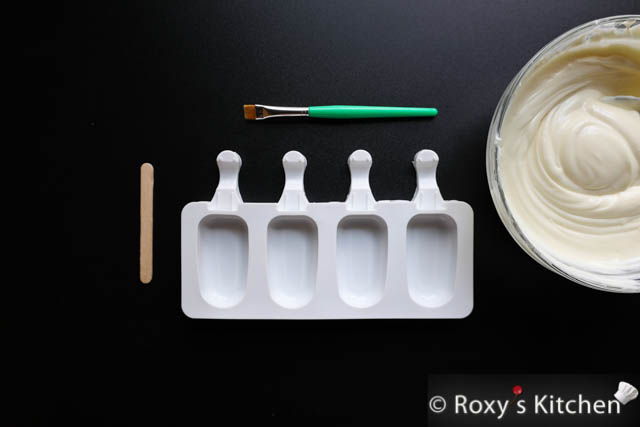
  • a small flat paint brush 
  • edible glue
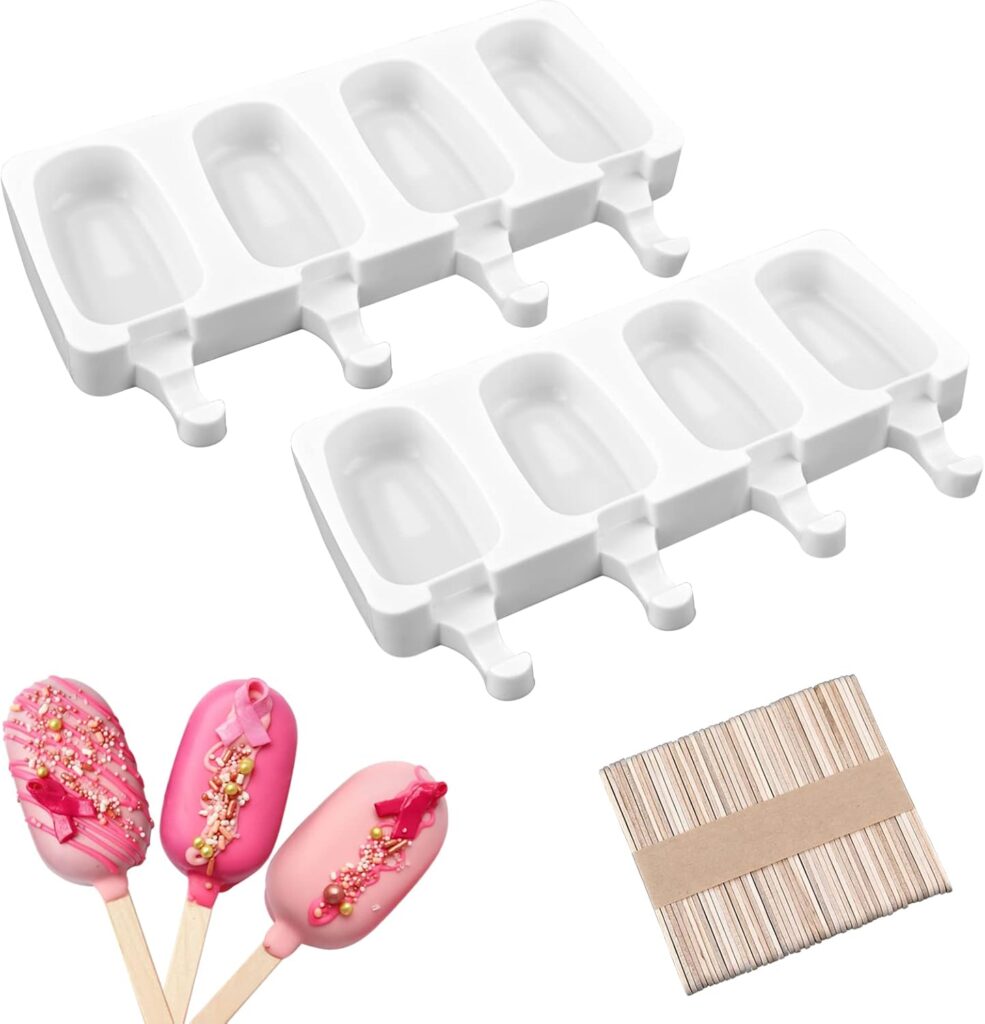
  • popsicle silicone molds – I used  4.5 cm x 6.9 cm (1.5’’ x 2.7’’ ) popsicle molds for the white cakesicles with the hexagon pattern and 4.7 cm x 9 cm (1.85’’ x 3.55’’ ) molds for the green & white marbled cakesicles 
  • 30-35 wooden sticks, for smaller-sized cakesicles

Directions

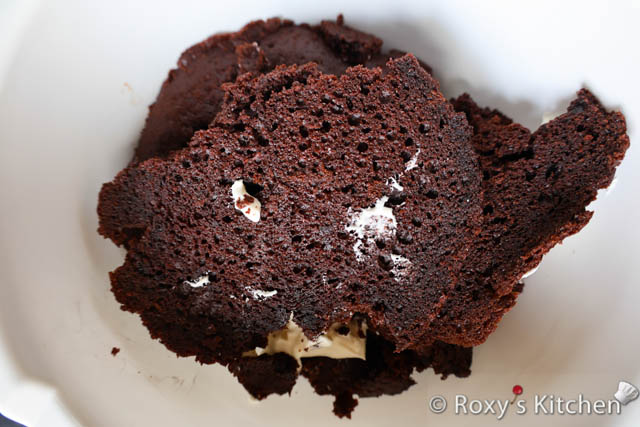
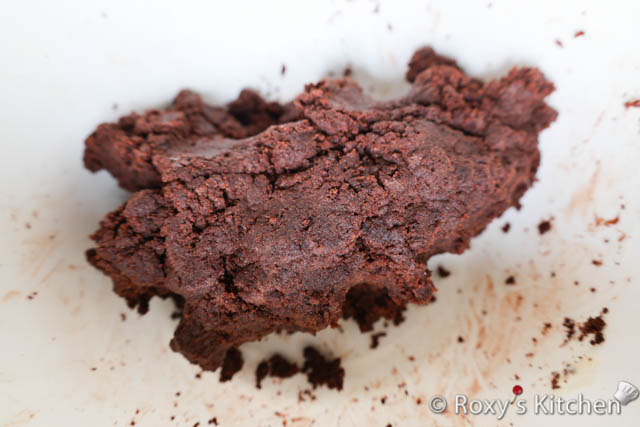
Crumble the moist chocolate cake into a bowl. Add the frosting and mix to combine. The easiest way to blend everything together is to use your hands but a mixer can be used as well. 

To make the chocolate shell we’ll use the candy melts (i.e. chocolate that is already tempered), the silicone molds and the flat paint brush. 

Start by melting the candy melts in a microwave-safe bowl. Melt it in three 30-second increments, stirring after each; then reduce the time to 10-second increments, stirring after each, until the candy melts reach a temperature of 42°C (107°F). 

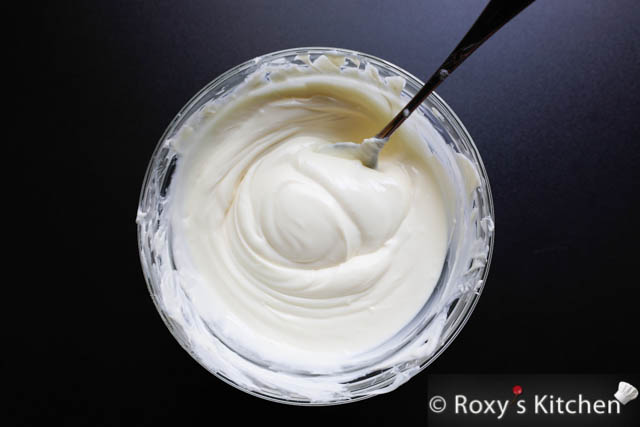
Allow the chocolate to cool, at room temperature, to 32-33°C (89-91°F) before you start working with it. 

Painting White Chocolate into the Popsicle Molds

Spoon two teaspoons of melted chocolate into each cavity. Use the flat paint brush to brush the chocolate on the bottom and sides of the mold cavity.  

Tap the mold a few times on your counter / work surface to smooth out the chocolate an release any air bubbles.

While the chocolate is still wet, insert a popsicle stick 2-3 times, then remove it. This will ensure the chocolate doesn’t cover the hole. 

Place the mold into the freezer for 1-2 minutes or in the fridge for 5 minutes, just until hardened. 

Remove the mold from the freezer/fridge and allow it to come to room temperature. 

Repeat the steps to paint another layer of white chocolate especially on the sides of each cavity. This time, spoon the melted chocolate into the cavity and paint one cavity at the time as the chocolate will harden much faster. Note that if your chocolate / candy melts started to harden, you need to pop them in the microwave for 10 more seconds until the temperature reaches 32-33°C (89-91°F) again. 

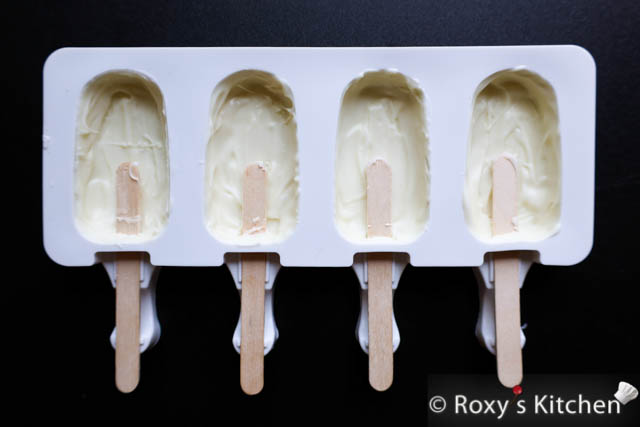
Insert the popsicle stick so it is a little more than halfway in. You can remove it before letting the chocolate harden again. However, I found it easier to insert it and leave it in (after the second coat, or even after the first coat); that way there is no risk of the bottom part of the cakesicle breaking once you push the popsicle stick in. 

Chill for a few more minutes until the chocolate hardens. 

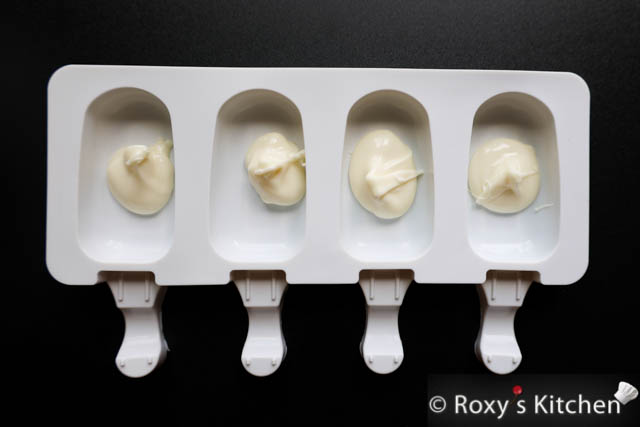
Filling the Popsicle Molds

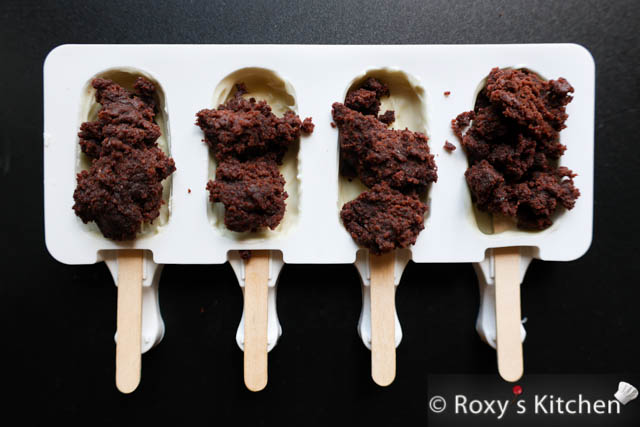
Add a tablespoon of the cake & frosting mixture into the candy shell. Press it slowly and ensure you leave a bit of space on top to add more melted chocolate. 

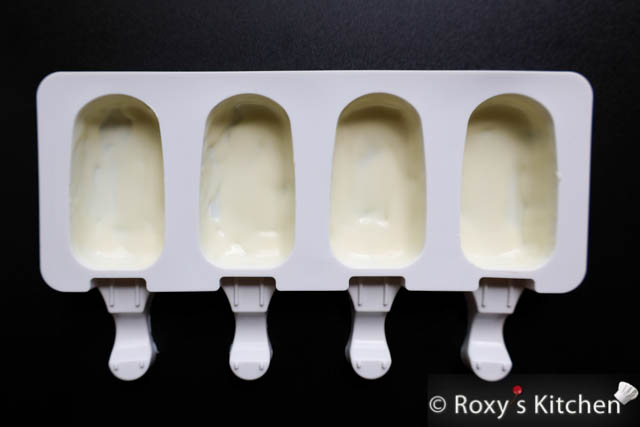
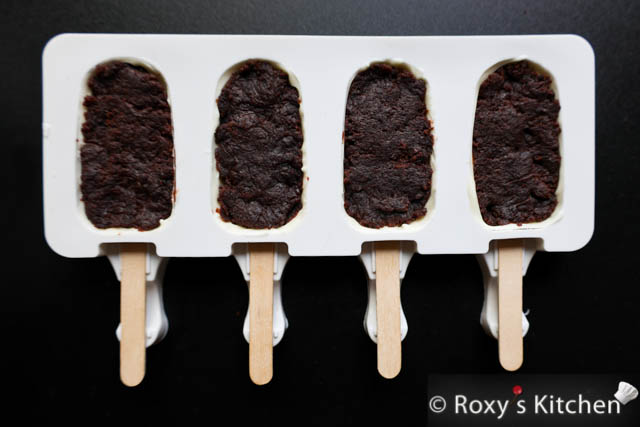
Add 1-2 more teaspoons of melted chocolate on top and spread it into a thin layer.  Gently tap the mold on your counter/work surface so that you have a nice flat surface. 

Place the cakesicles into the refrigerator or freezer again, until the chocolate hardens. 

Place the cakesicles into the refrigerator or freezer again until the chocolate hardens. 

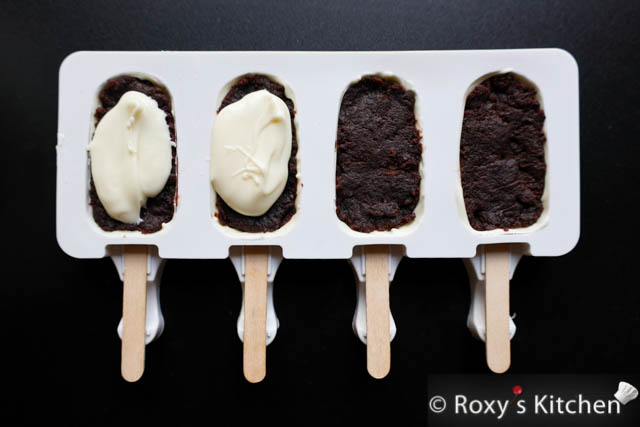
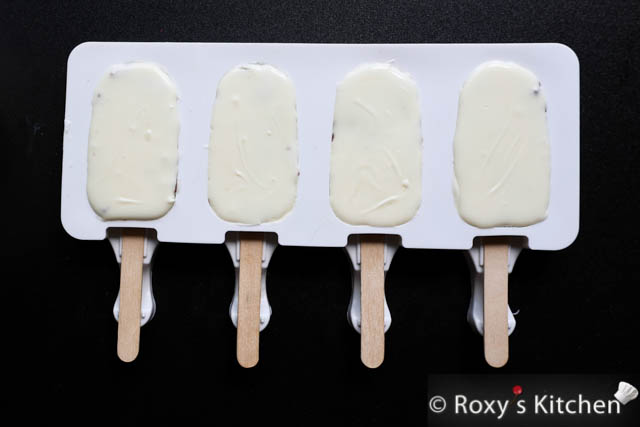
Remove them from the fridge/freezer, let them come to room temperature and remove them from the silicone mold. 

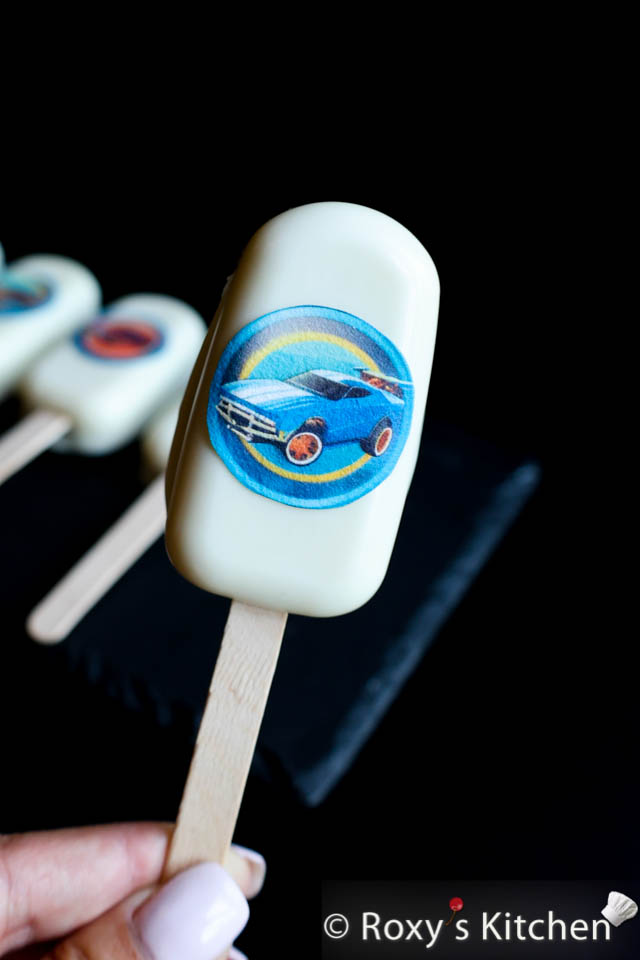
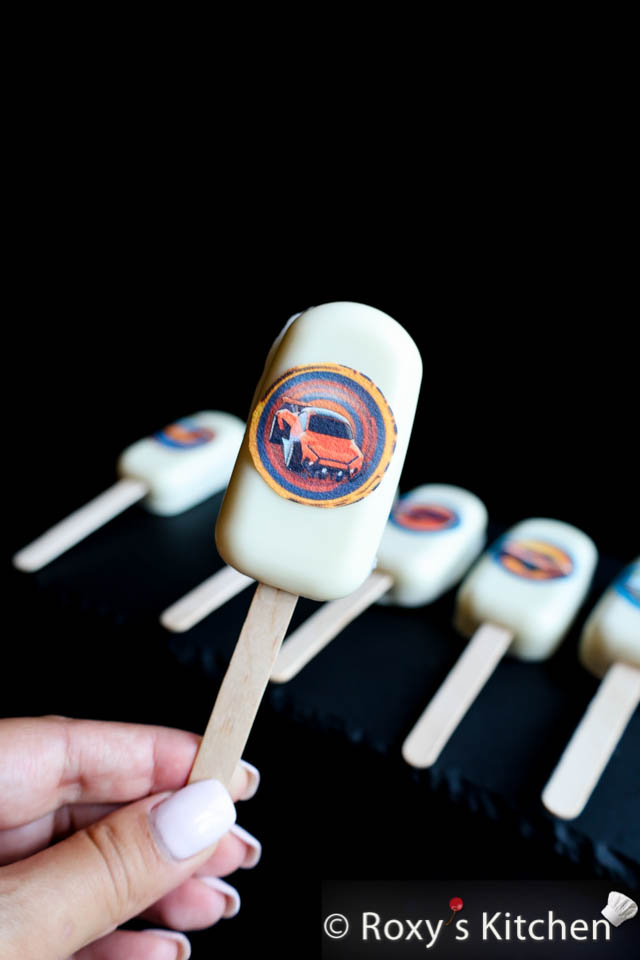
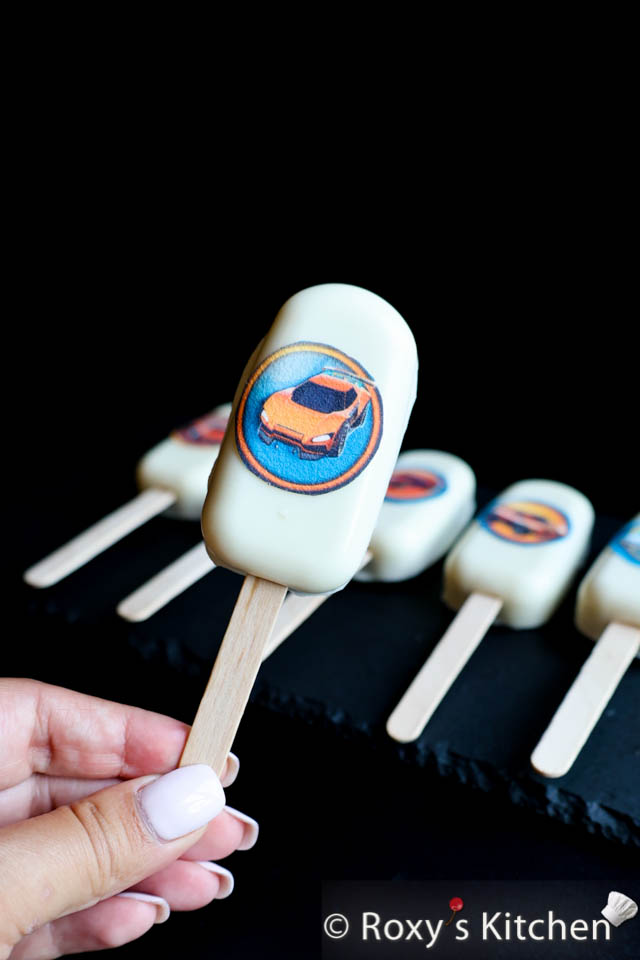
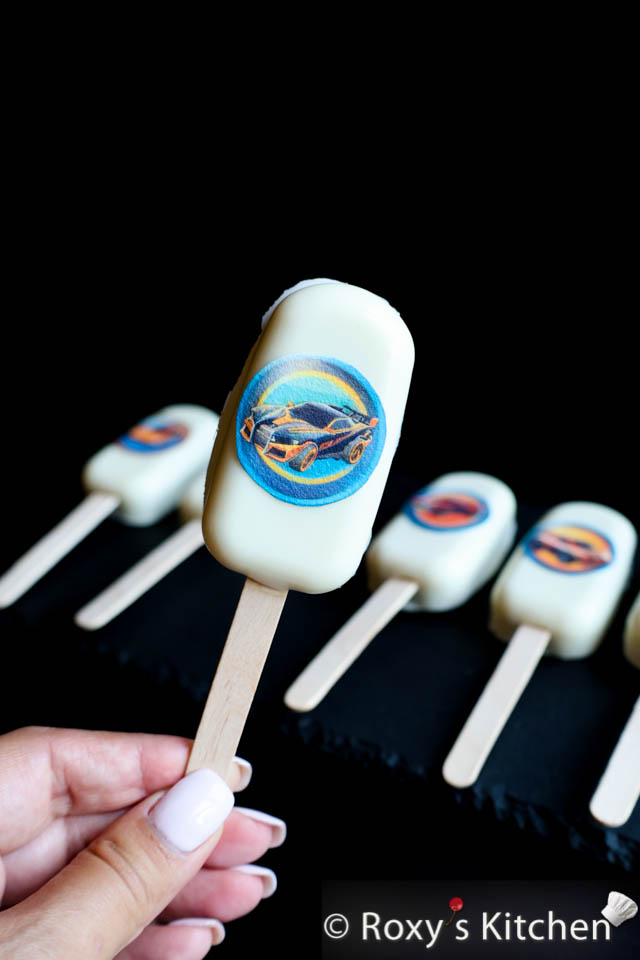
Decorating the Cakesicles with the Racing Cars

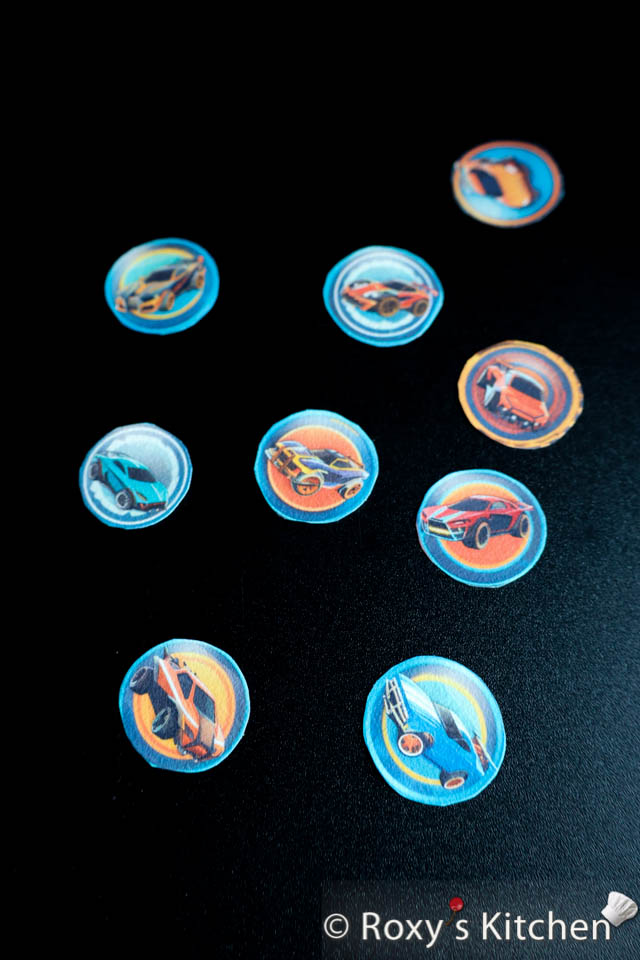
Print the race car designs onto edible paper using a printer with edible ink. Once printed, carefully cut out the circles from the edible paper using scissors. Aim for uniform sizes to maintain a neat appearance on each cakesicle.

Using edible glue, apply a small amount to the back of each sticker.

Gently press the sticker onto the front of each cakesicle, ensuring it adheres well.

Racing Car Cakesicles for Rocket League Fans - Free printable design included!

Tips:

  • Don’t melt too much chocolate at once as you will likely have to re-heat it in the microwave. This means that you’ll also have to mix it and you’ll lose the marbled effect. 
  • If you need to refrigerate the cakesicles, place them in a cardboard box to limit the amount of moisture that the cakesicles might attract from the refrigerator. Then, let them come to room temperature before serving them. 
Racing Car Cakesicles for Rocket League Fans - Free printable design included!

This post contains Amazon.com affiliate links. If you purchase a product through an affiliate link, your costs will be the same but I will receive a small commission which is used for hosting and running this site. I appreciate your support! 

Print Friendly, PDF & Email

YOU MAY ALSO LIKE:

Decorated Pumpkin Cheesecake

Wafer Sheets Filled with Caramelized Sugar and Walnut Cream

4-Ingredient Strawberry Dessert Cups

How to Easily Make Ferrero Rocher Chocolate Flowers Using a Silicone Mold

Share this:

  • Click to print (Opens in new window) Print
  • Click to email a link to a friend (Opens in new window) Email
  • Tweet
  • Click to share on Reddit (Opens in new window) Reddit
  • Pocket
  • Share on Tumblr

Filed Under: Cars, Desserts, Themed Parties Tagged With: cakesicles, how to make cakesicles, race car-themed desserts, racing cars birthday party, rocket league, Rocket league birthday party, rocket league desserts


Subscribe to Email Updates

loader

Email Address*

Name

FREE & Cheap Printables

  • Sale Product on sale
    Easter Cupcake Toppers (2'') - 12 Designs
    Easter Cupcake Toppers (2”) – 12 Designs
    $1.49 Original price was: $1.49.$1.19Current price is: $1.19.
    Add to cart
  • Sale Product on sale
    Ballerina Cake & Cupcake Toppers
    Ballerina Cake & Cupcake Toppers
    $2.99 Original price was: $2.99.$2.39Current price is: $2.39.
    Add to cart
  • Dancing Ballerina Coffee Mug
    Dancing Ballerina Coffee Mug
    $19.99
    Buy product
  • Sale Product on sale
    Soccer Party Package Printables
    Soccer Party Package Printables Watercolour Collection
    $4.99 Original price was: $4.99.$3.99Current price is: $3.99.
    Add to cart
  • Sale Product on sale
    Soccer Cake Toppers Watercolour Collection
    Soccer Cake Toppers Watercolour Collection
    $2.99 Original price was: $2.99.$2.39Current price is: $2.39.
    Add to cart
  • Soccer Cupcake Toppers (2'') Watercolour Collection - 12 Designs
    Soccer Cupcake Toppers (2”) Watercolour Collection – 12 Designs
    $1.49
    Add to cart
  • Sale Product on sale
    Ballerina Cake & Cupcake Toppers - Baby / Baby Shower Package
    Ballerina Cake & Cupcake Toppers – Baby Girl / Baby Shower Package
    $2.99 Original price was: $2.99.$2.39Current price is: $2.39.
    Add to cart
  • Sale Product on sale
    Puppy Cake Toppers – 3rd Birthday Package
    Puppy Cake Toppers – 3rd Birthday Package
    $2.99 Original price was: $2.99.$2.39Current price is: $2.39.
    Add to cart

Themed Birthday Parties

How to Make a Ballerina-Themed Cake

How to Make a Ballerina-Themed Cake

Minion Cake Tutorial

Minion Cake

15 Elegant Cakes with Peonies

15 Elegant Cakes with Peonies

Baby Crib Cake Tutorial

Baby Crib Cake Tutorial

More Posts from this Category


Recent Posts

How to Naturally Dye Easter Eggs Blue

How to Naturally Dye Easter Eggs Blue

Soccer Ball Cookies

Soccer Ball Cookies

How to Make a Car Cake with Remote-Controlled Headlights

How to Make a Car Cake with Remote-Controlled Headlights

How to Use a Cake Comb on Cake Covered in Chocolate Ganache

How to Use a Cake Comb on Cake Covered in Chocolate Ganache


Popular Posts


  • Egg Snowman
    Egg Snowman

  • 4-Ingredient Creamy Pineapple Berry Smoothie | Roxy's Kitchen
    Creamy Pineapple Berry Smoothie

  • Homemade Sour Cherry Liqueur
    Homemade Sour Cherry Liqueur – Easy Old Family Recipe Reveal...

  • Mini Cheese Balls | Roxy's Kitchen #appetizer #cheese #mozarella #parmesan #fingerfood
    Mini Cheese Balls

  • Rose Cupcake Bouquet in a Pot
    Easy Rose Cupcake Bouquet in a Pot

  • Grape and Banana Dolphin Parfait | Roxy's Kitchen
    Grape and Banana Dolphin Parfait

  • Quick & Easy Nutella Peanut Butter Monkey Cupcakes | Roxy’s Kitchen – 3-ingredient cupcakes, easiest frosting ever and so easy to decorate with your kids!
    Quick and Easy Nutella Peanut Butter Monkey Cupcakes

  • Safari Jungle Themed First Birthday Party Part III – DIY Decoration Ideas + Free Printables Included! | Roxy's Kitchen
    Safari / Jungle Themed First Birthday Party Part III – DIY D...

  • Easy 3-Ingredient Blueberry Jam | Roxy's Kitchen
    Easy Blueberry Jam

  • Breakfast Egg Stuffed Sweet Potatoes | Roxy's Kitchen A super filling five-ingredient breakfast loaded with vitamins & nutrients.
    Breakfast Egg Stuffed Sweet Potatoes

Recent Pins

  • Pink Letter T / Floral Monogram for Girls  Mug

Pink Letter T / Floral Monogram for Girls features a vibrant and delicate letter 'T' beautifully formed with soft pink cherry blossoms. This design combines nature's elegance with artistic flair, making it a perfect personalized gift for girls or stylish home decor. Ideal for spring-themed merchandise or to add a touch of floral charm to any collection. Available on a range of products, including t-shirts, mugs, and home accessories.
  • Chocolate Sponge Cake (Amandine)
Follow Me on Pinterest

Popular Posts


  • Mini Cheese Balls | Roxy's Kitchen #appetizer #cheese #mozarella #parmesan #fingerfood
    Mini Cheese Balls

  • 4-Ingredient Creamy Pineapple Berry Smoothie | Roxy's Kitchen
    Creamy Pineapple Berry Smoothie

  • Egg Snowman
    Egg Snowman

  • Oven Baked Pork Sirloin Chops
    Oven-Baked Pork Sirloin Chops

  • How to Make Modeling Chocolate for decorating cakes, cupcakes and cookies
    How to Make Modeling Chocolate for Decorating Cakes, Cupcake...

  • Homemade Sour Cherry Liqueur
    Homemade Sour Cherry Liqueur – Easy Old Family Recipe Reveal...

  • 50 Great Ideas for Your Winter Holidays Menu
    50 Great Ideas for Your Winter Holiday Menu

  • Tutorial with Step by Step Photos - How To Make Safari / Jungle Animals Cupcake Toppers – Tiger, Zebra, Giraffe, Elephant, Monkey, Hippo, Bear, Lion
    How To Make Safari / Jungle Animals Fondant Cupcake Toppers...

  • Safari Jungle Themed First Birthday Party Part III – DIY Decoration Ideas + Free Printables Included! | Roxy's Kitchen
    Safari / Jungle Themed First Birthday Party Part III – DIY D...

  • Safari / Jungle Themed First Birthday Party Part II – Appetizers, Finger Foods & Snack Ideas
    Safari / Jungle Themed First Birthday Party Part II – Appeti...

Copyright © 2025 · Lifestyle Pro Theme on Genesis Framework · WordPress · Log in