• Home
  • About
    • Contact
    • Terms & Conditions
  • Shop
  • Go to Cart

Roxy's Kitchen

Follow Roxy on: FacebookFollow Roxy on: PinterestFollow Roxy on: E-mailFollow Roxy on: YouTubeFollow Roxy on: Instagram
  • Holidays & Events
    • Themed Parties
      • Beach / Nautical
      • Cars
      • Characters
      • For Her
      • For Him
      • Love, Marriage & Family
      • Puppy / Dog
      • Robots
      • Soccer
      • Safari / Jungle
      • Superheros
      • Trains
    • Christmas
    • Easter
    • Halloween
    • Thanksgiving
    • Valentine’s Day
  • How To’s
    • Fondant, Chocolate & Icing Decorations
    • Cake Flavours
    • Cake Frosting & Fillings
    • Breads
    • Pie & Pasta Dough
    • Canning & Preserving
    • AI-Powered Apps & Virtual Assistants
    • Others / Tips & Tricks
  • Recipes by Category
    • 5licious
    • Appetizers & Snacks
    • Breakfast
    • Bites on Boards
    • Cakes
    • Desserts
    • Drinks
    • Kid Friendly & Funny
    • Main Course
    • Salads
    • Side Dishes
    • Soups & Stews
  • Roxy’s Cakes
  • FREE & Cheap Printables

Beach/Nautical Cake Tutorial – Part I: Filling, Covering & Stacking the Cake

June 8, 2023 by Roxy

Beach/Nautical Cake Tutorial - Part I: Filling, Covering & Stacking the Cake

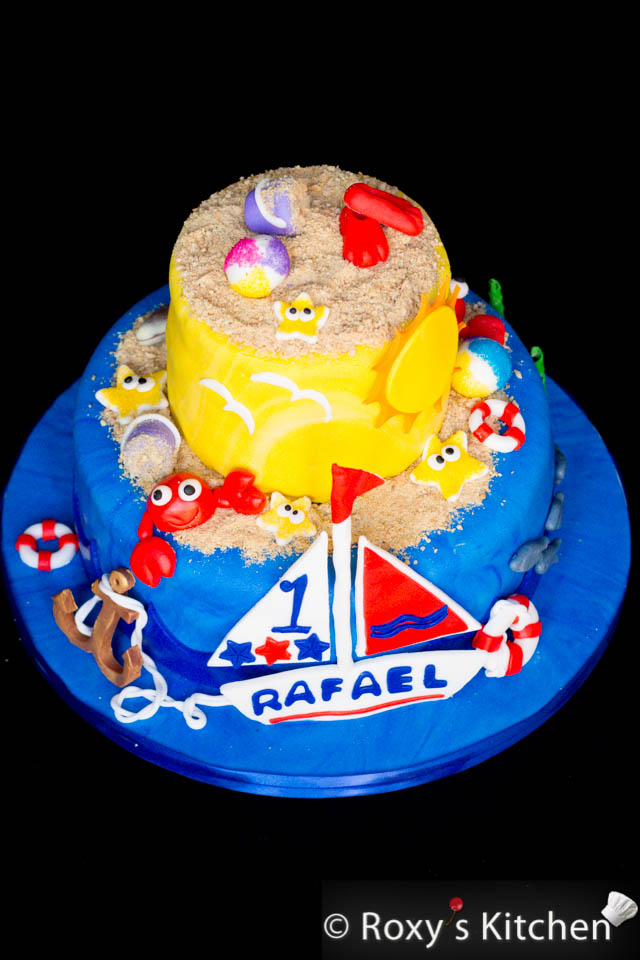
In this step-by-step tutorial, we will embark on a delightful journey to create a two-tier beach/nautical cake that will undoubtedly make waves of joy for a little boy or girl.

Whether you’re a seasoned baking aficionado or a beginner eager to dive into the world of cake decoration, this tutorial will provide you with all the necessary instructions and tips to craft a masterpiece that captures the essence of a beachside adventure. The full tutorial has detailed step-by-step instructions as well as 130 pictures. The tutorial is split into two parts: 

  1. Part I: Filling, Covering & Stacking the Cake
  2. Part II: Making the Fondant Decorations 

Through this tutorial, we will delve into the art of cake design, exploring the techniques and tricks required to bring this beach-inspired creation to life. From sculpting edible crabs and crafting gentle waves to adorning the cake with sailor-themed decorations, every step will be carefully outlined, ensuring a smooth sailing experience throughout the process.

Ingredients/Tools

Vanilla Cake

  • Two cakes – 25 cm (10’’) and 13 cm (5’’) round cakes. This 2-tier cake is enough for 30-35 servings. I used this Basic Vanilla Cake recipe so follow the instructions listed there to bake the cakes and make the cake batter out of 15 eggs altogether for the two cakes. Please adjust the other ingredient quantities accordingly as well. If you need help with this leave a comment below.
  • Syrup to moisten the cake. You can moist the cake with sugar syrup and any type of flavour you like – vanilla, rum, lemon etc. You can make the syrup using:
    • 300 ml (10 oz) water
    • 100 g (1 cup) sugar
    • 2.5 tablespoons vanilla extract (or rum, lemon etc.)

Raspberry Cream Cheese Buttercream Filling

  • Use this recipe for Raspberry Cream Cheese Buttercream to make the filling. Multiply the ingredients by 1.5 to get enough buttercream to fill a 25 cm (10’’) and a 13 cm (5’’) cake and crumb coat both cakes.  
  • 600 g (4.8 cups or 21 oz) of fresh raspberries

Covering the Cake

  • Powdered sugar or cornstarch for dusting your work surface
  • 900 g (2 lbs) blue fondant in a lighter shade (sky blue)
  • 115 g (1/4 lb) dark blue fondant (royal blue)
  • 450 g (1 lb) yellow fondant in a lighter shade (lemon yellow)
  • 60 g (1/8 lb) dark blue fondant (golden yellow)
  • Measuring tape or a piece of string
  • Fondant rolling pin
  • Fondant smoother
  • X-Acto knife or any other sharp knife with a thin blade

Other Tools/Items

  • 30 cm (12’’) foam cake board or cake platter
  • 25 cm (10’’)  cardboard cake board
  • 13 cm (5’’) cardboard cake board
  • Straight icing spatula or an offset one (whichever feels more comfortable to you)
  • Serrated knife
  • Pastry brush
  • 5 plastic dowel rods or bubble tea straws 
  • Measuring tape or ruller

Directions

Filling and Crumb Coating the Cake 

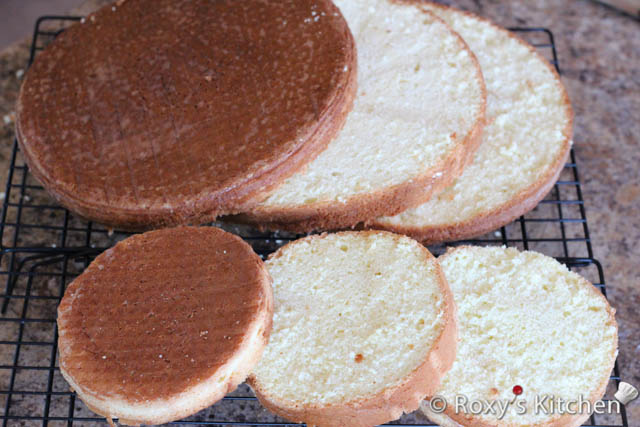
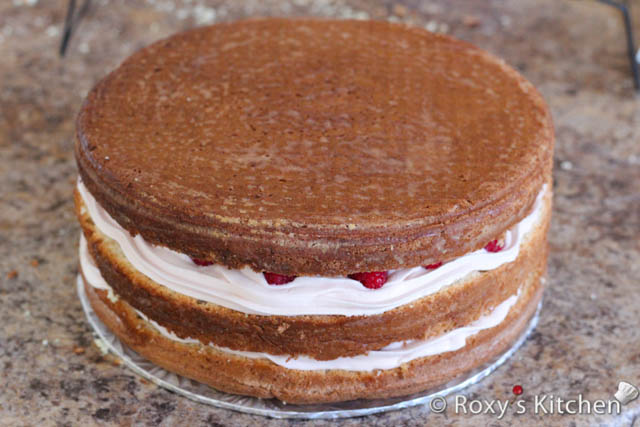
Step 1: Cut each cake horizontally in three using a serrated knife. Turn the cakes upside down before assembling them since the bottom of the cake always has a nice and flat surface.

Cut each cake horizontally in three using a serrated knife.

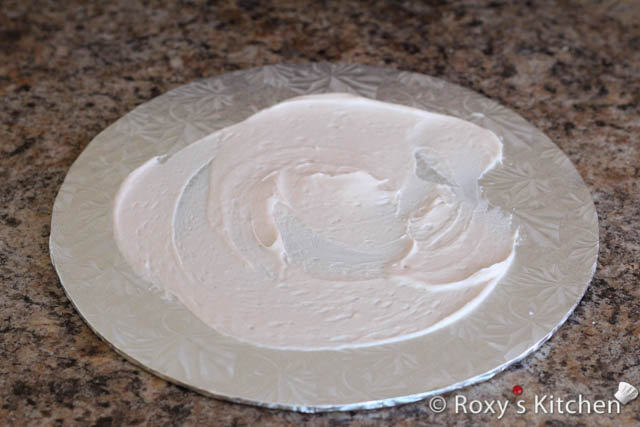
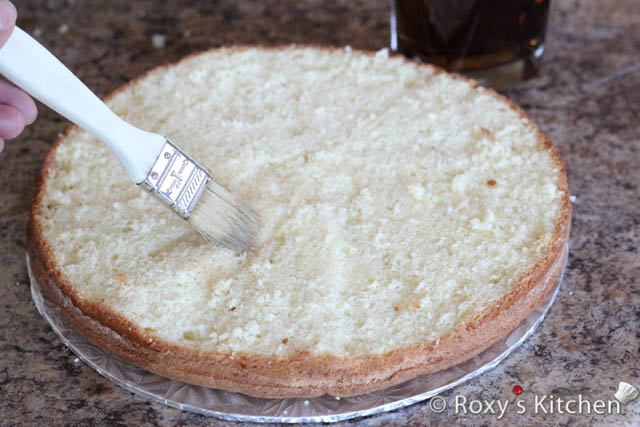
Step 2: Secure the bottom layer of the cake on a 25 cm (10’’) cardboard cake board with a little buttercream.  Moisten the cake with sugar syrup using a brush.

Secure the bottom layer of the cake on a 25 cm (10’’) cardboard cake board with a little buttercream. 
Moisten the cake with sugar syrup using a brush.

Step 3: Evenly cover the layer with ¼ of the raspberry filling and add a layer of fresh raspberries on top.

Evenly cover the layer with ¼ of the raspberry filling .
Add a layer of fresh raspberries on top.

Step 4: Repeat the steps indicated above for the second layer.

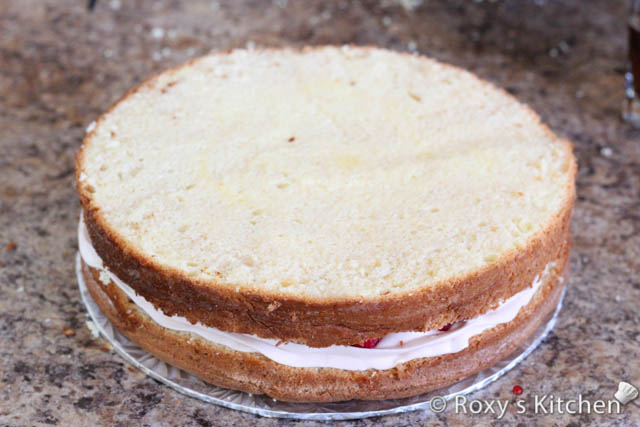
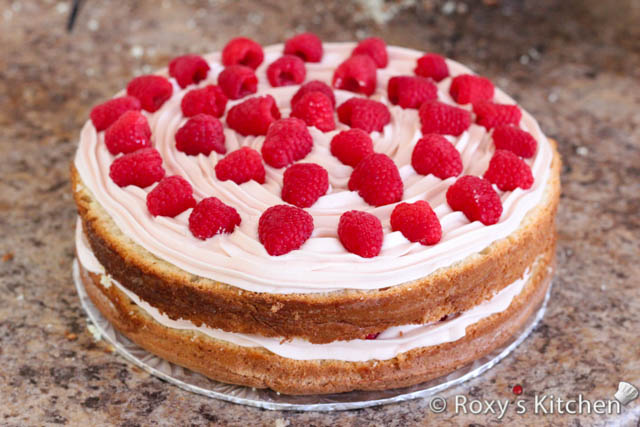
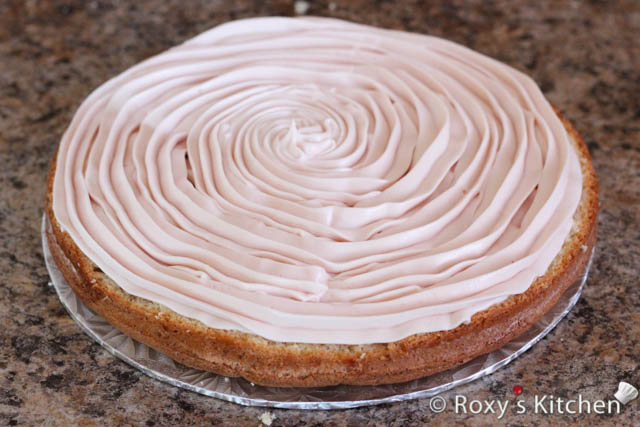
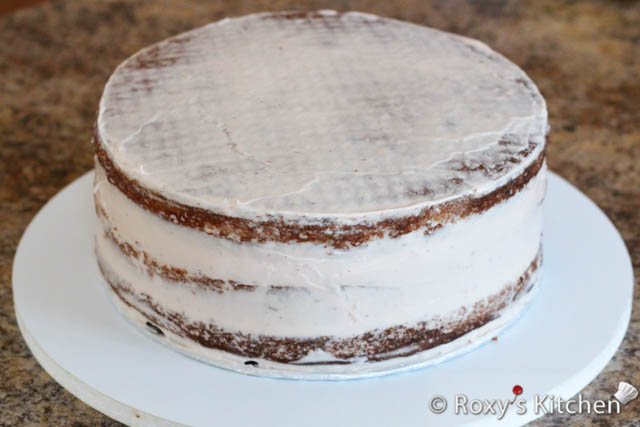
Step 5: Add the third layer on top and moist it with sugar syrup. Apply a thin layer of cream cheese buttercream using a straight or offset icing spatula (whichever feels more comfortable to you) to cover all holes and imperfections. In the cake decorating world this is called crumb coating a cake. 

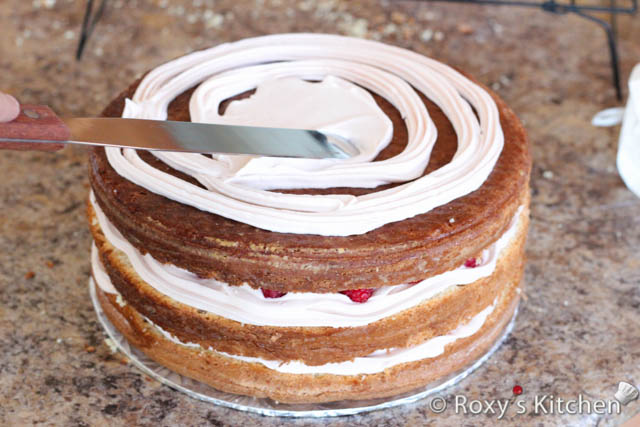
When working on the sides of the cake, hold your spatula straight up and down without tilting it or you will end up with sloped sides. Also, make sure to fill in any gaps between the layers to make an even surface. 

If you are decorating cakes regularly and you want to make your job easier then you should consider investing in a turntable. 

Refrigerate the cake for at least 30 minutes to allow the filling and coating to harden so that the cake layers will not slide out of alignment.

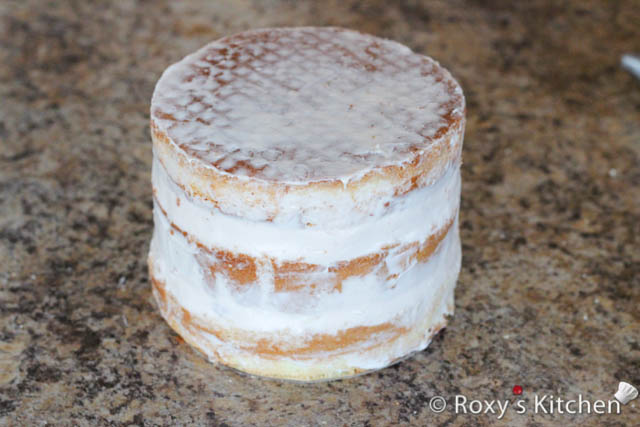
Step 6: Repeat the steps above to fill your 13 cm (5”) cake. Don’t forget to place this cake on a 13 cm (5”) cardboard cake board, this will be crucial when we’ll be stacking the cake tiers using dowel rods. Crumb coat the cake and again refrigerate it for at least 30 minutes.

Covering the Cake Tiers with Marbled Fondant 

Step 1: Before rolling out your fondant, sprinkle some powdered sugar or cornstarch on your work surface and knead it until it has a workable consistency and it doesn’t feel and look dry.

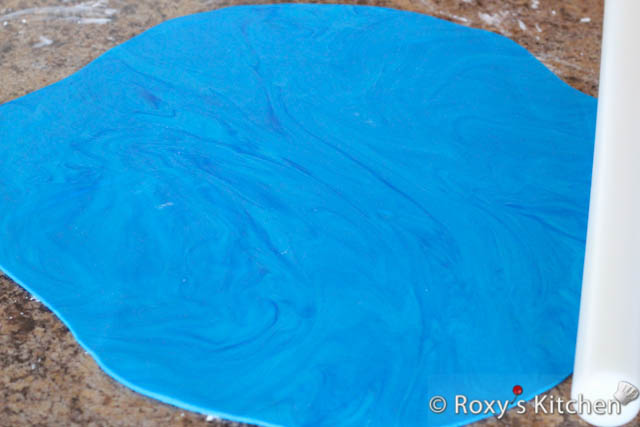
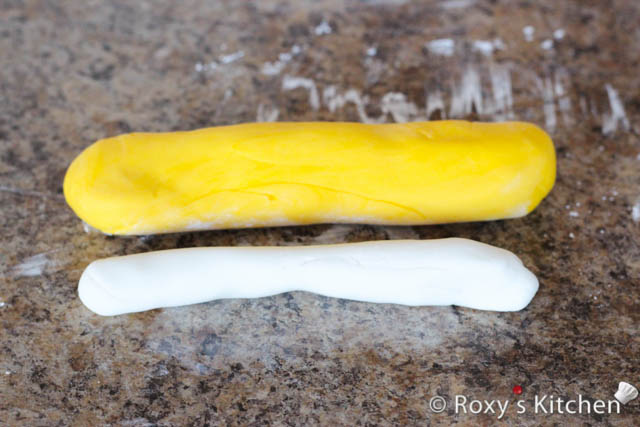
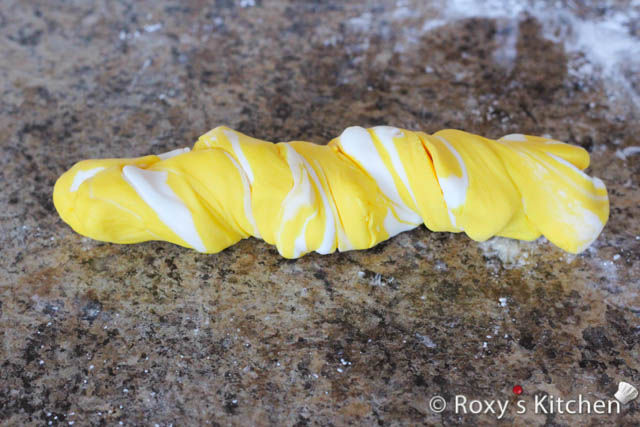
Step 2: To make the marbled fondant, roll out each colour into a log. I used 900 g (2 lbs) of blue fondant in a lighter shade and 115 g (¼ lb) in a darker shade. Place the two logs side by side and twist the colours together like a breadstick.

To make the marbled fondant, roll out each colour into a log.
Place the two logs side by side and twist the colours together like a breadstick.

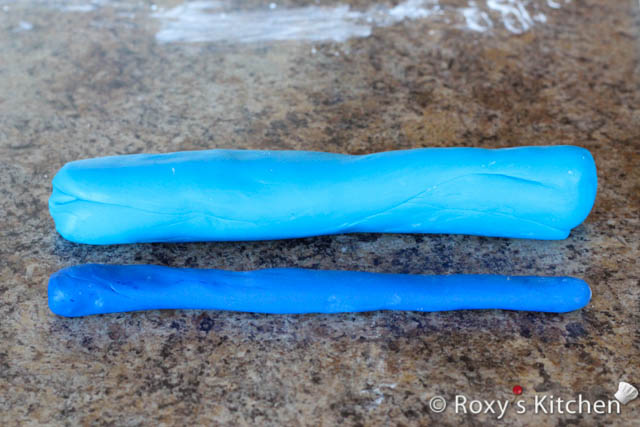
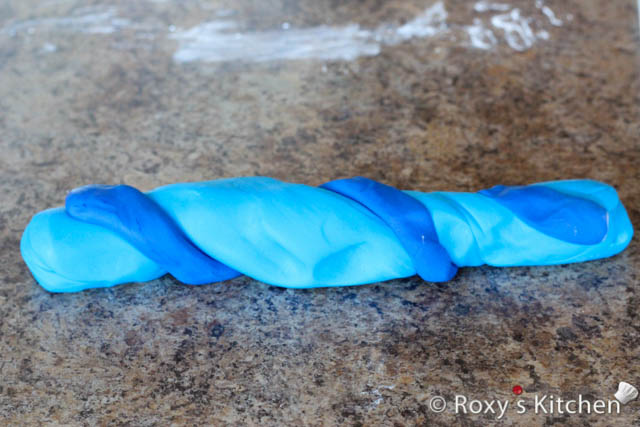
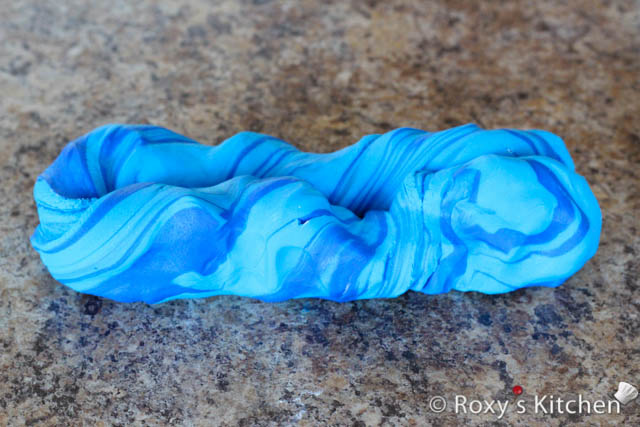
Step 3: Twist and fold it a few times and until you have the marbling effect desired.

Twist and fold it a few times and until you have the marbling effect desired.

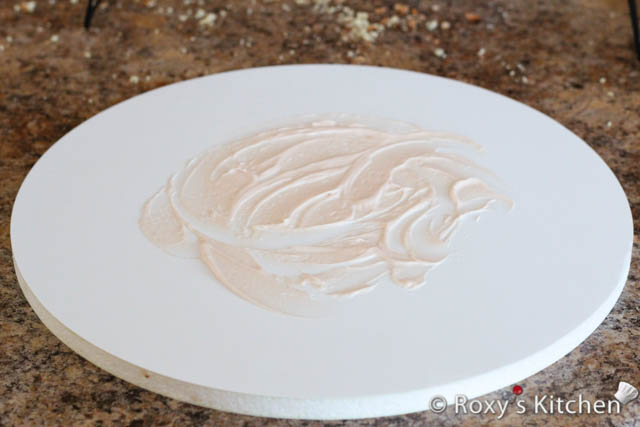
Step 4: Spread some buttercream on your foam cake board (or cake platter) and place your first 25 cm (10”) cake tier on it.

Step 5: Use a measuring tape or a piece of string to measure the top and sides of the cake. So if you measured 10 inches across the top and your cake is 4 inches tall that is 18 inches of cake in total so you need to roll out the fondant at least 18 inches in diameter but you should leave an inch or two extra. 

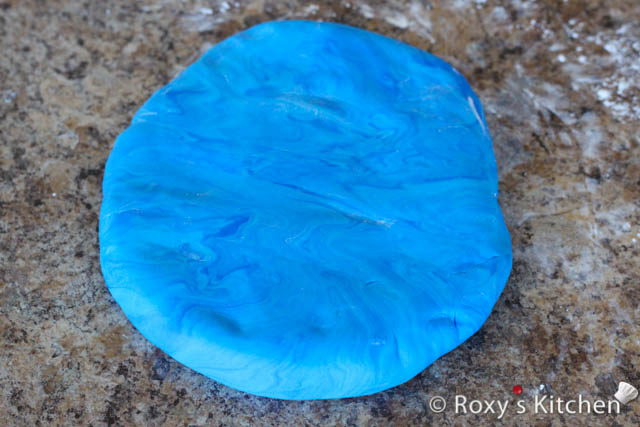
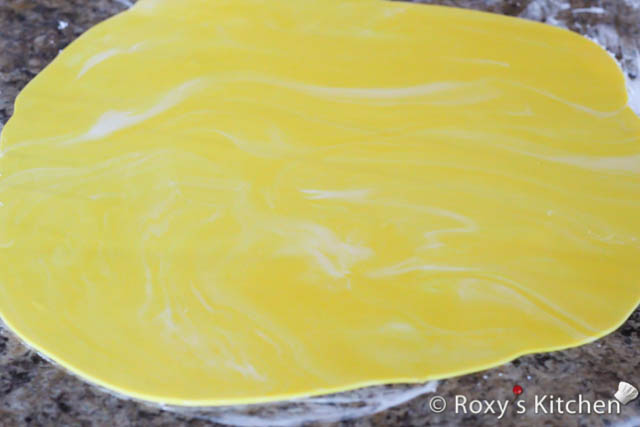
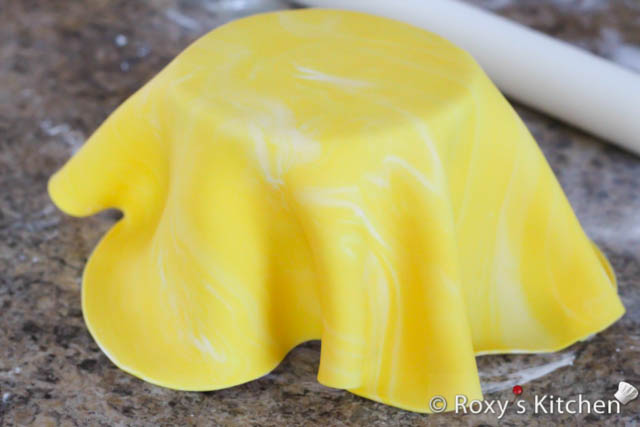
Step 6: Sprinkle some powdered sugar onto your work surface and roll out the marbled fondant using a fondant rolling pin in the approximate shape of your cake (i.e. circle for a round cake). As you are rolling it make sure you lift the fondant occasionally and rotate it 45 degrees to make sure it doesn’t stick to your work surface. If it sticks lift the fondant and sprinkle more powdered sugar or cornstarch.

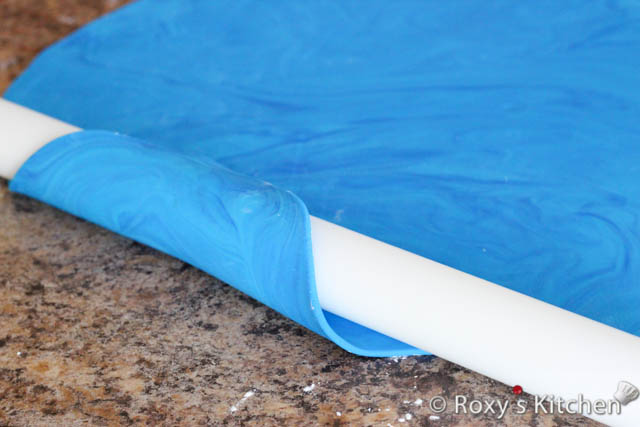
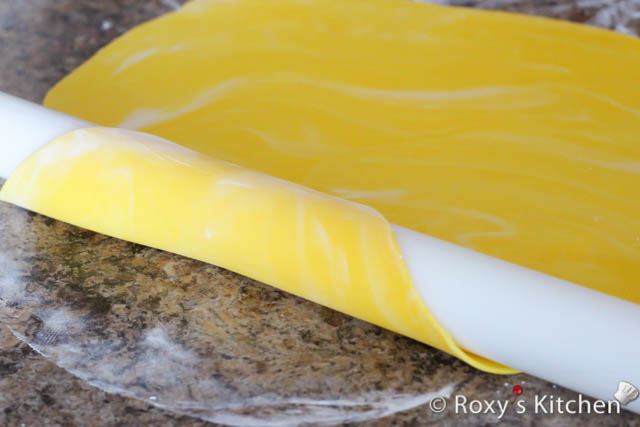
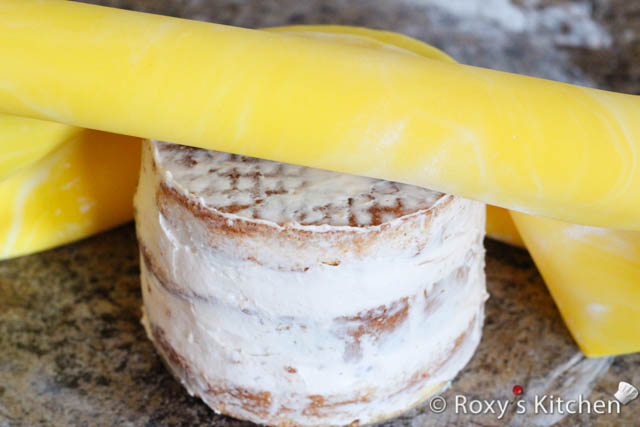
Step 7: Gently lift fondant over rolling pin and place it on the side of the cake. Start unrolling the fondant from the side of the cake and across the top to the other side.

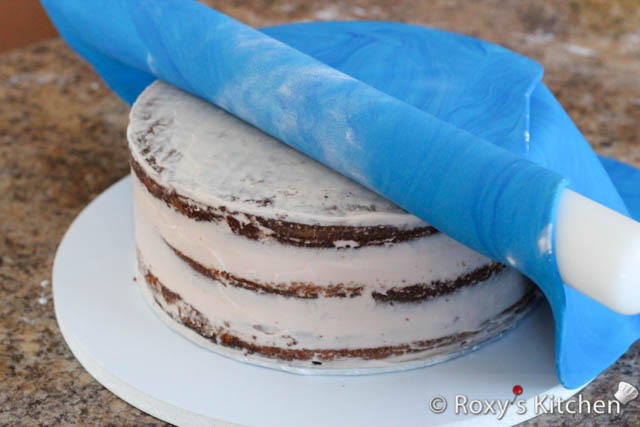
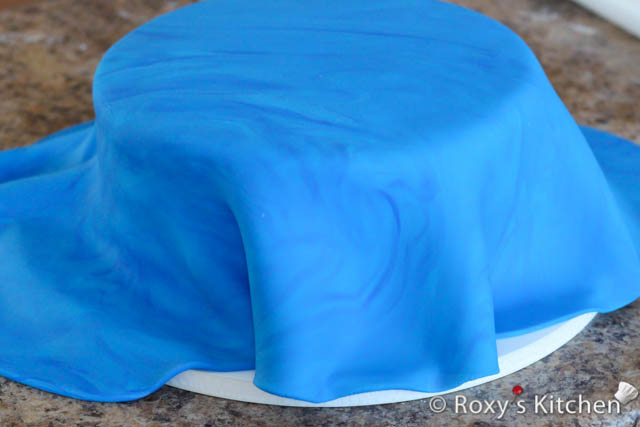
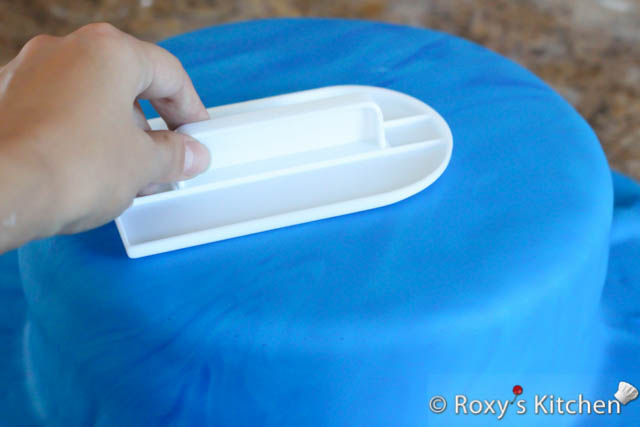
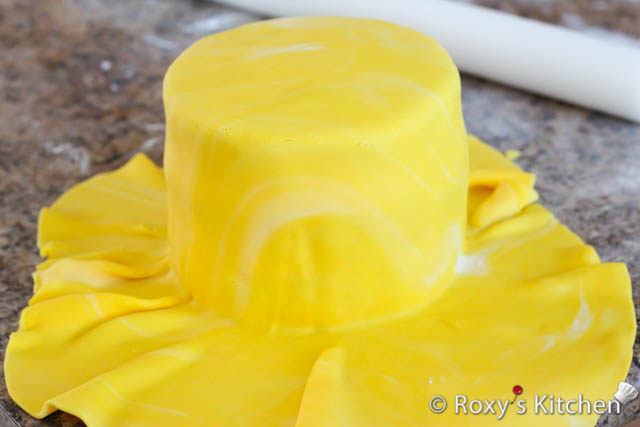
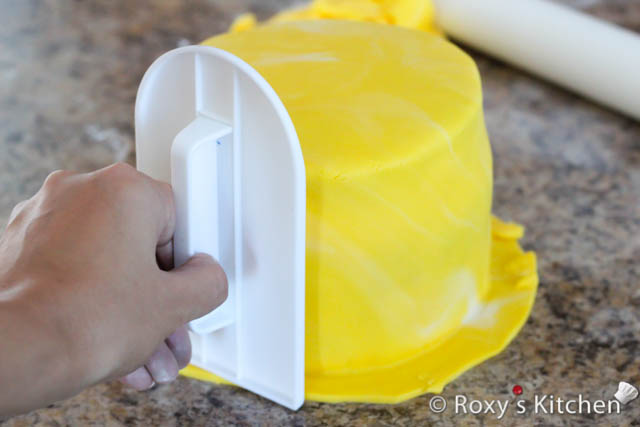
Step 8: Smooth the fondant with a fondant smoother (or the palm of your hand) starting from the top.  Start to gently pull the fondant out and down around the sides of the cake using one hand and spread the excess fondant and smooth it out using a fondant smoother (or your other hand). 

Keep turning the cake and repeating these steps until the sides are smooth and without any ruffles formed towards the bottom. It’s better if you use a fondant smoother since the pressure of your hands could leave marks and the warmth from your hands might make the fondant sticky. 

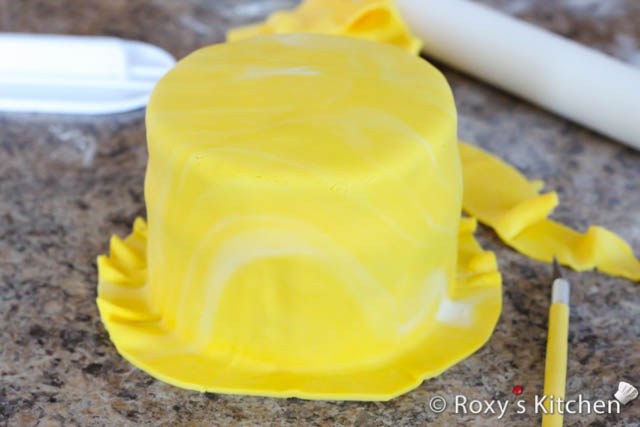
Use your fondant smoother to get rid of any wrinkles and air bubbles as well.  If you see any air bubbles, insert a pin on an angle, release the air and smooth the area again.

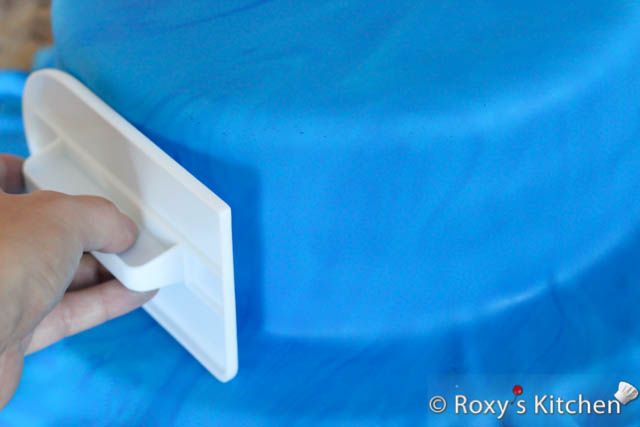
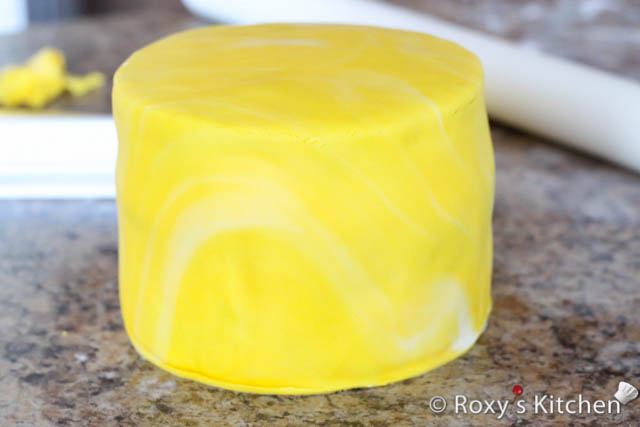
Step 9: Trim the edges at the bottom using an Exacto knife, a pizza cutter or any other sharp knife you have.

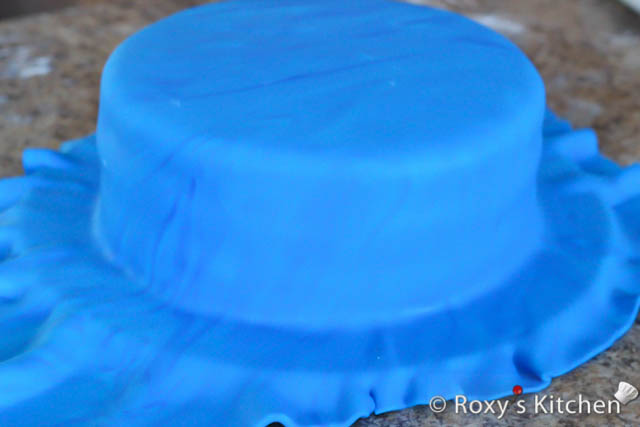
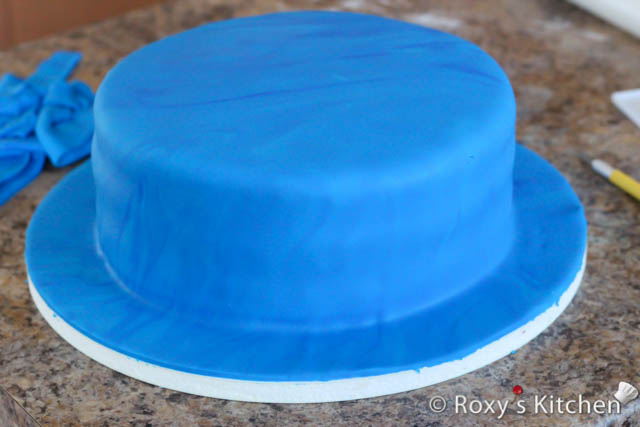
Step 10: Repeat the steps above to cover your 13 cm (5’’) cake as well.
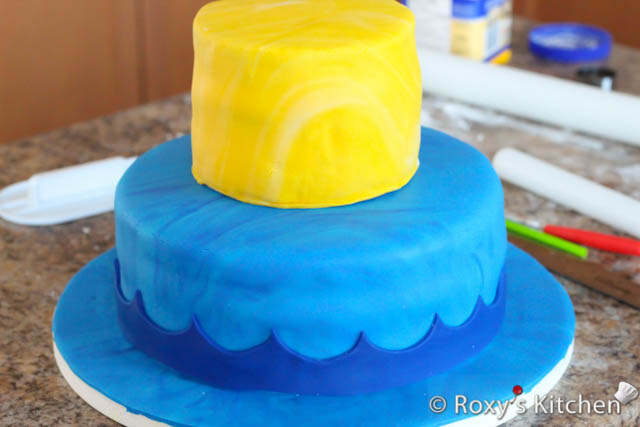
Stacking the Cake

By now you should have your two cake tiers covered in fondant so let’s stack them! Note that I made the fondant waves and attached them to the bottom tier before but you can stack the cakes and then make your waves, the order doesn’t really matter here.

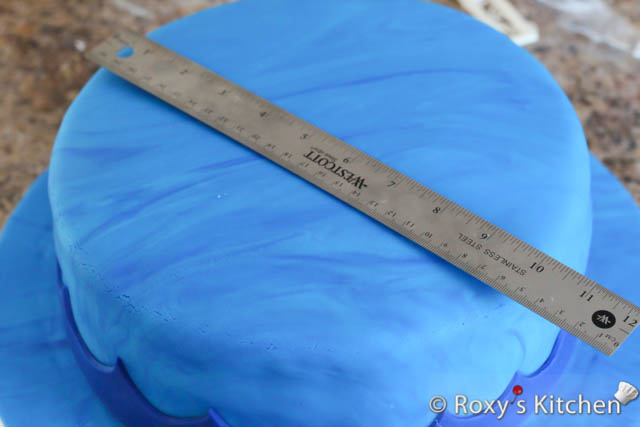
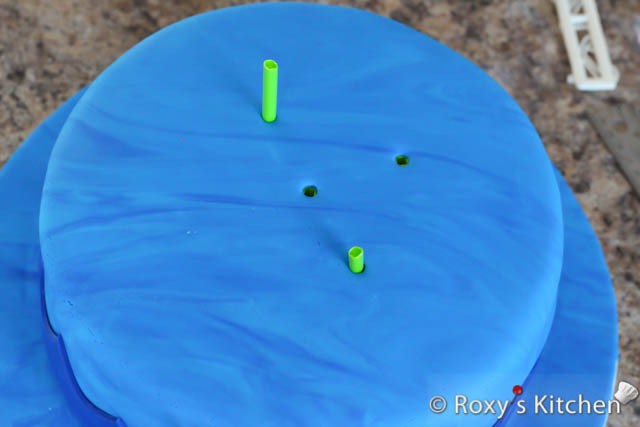
Step 1: Use a measuring tape or ruler to measure the bottom tier and mark its center. To make sure your cake does not collapse and the top tier does not smash the bottom tier you need to use five plastic dowel rods (or wood dowels but you have to use more to ensure your cake is sturdy enough).

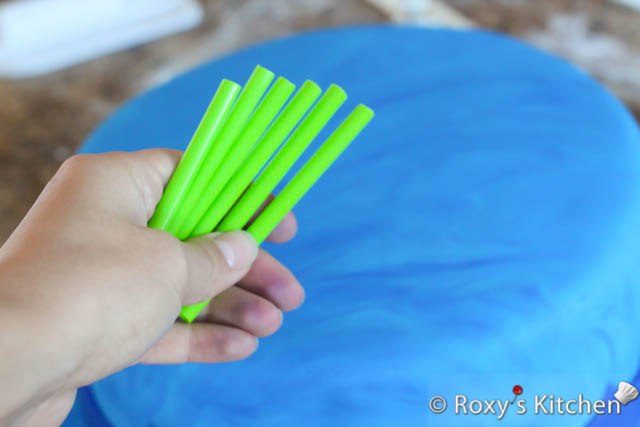
Step 2: Insert one dowel rod into the middle of the bottom tier and make a knife scratch on the rod to mark the exact height. Remove the dowel rod and cut where the line is with a serrated knife. 

Use your first rod as your reference and cut the remaining four dowel rods. Just as a final check your can line up all the dowels to make sure they are the same size.

Step 3: Insert dowels into the bottom tier, spacing evenly 5 cm (2’’) out from the marked centre. Push them down until they touch the cake board. Spread a little icing in the middle of the cake and on top of the dowels.

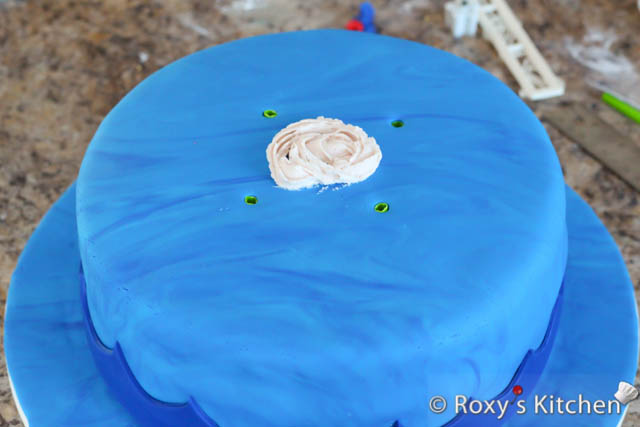
Step 4: Carefully pick up the 13 cm (5’’) tier. It might be easier to use a spatula to lift the tier until you can get your hands under it.  Stack the second tier onto the first making sure it’s centered.

Tips: 

  • Another way to make a guideline for inserting your dowels is to place a 13 cm (5’’) cake board (the same size as the top tier) on the base tier and slightly press it down to make an outline. Your dowels will be inserted about 2.5 cm (1”) in from the cake board outline. 
  • If you’ve accidentally made a dent in your fondant while lifting the top tier you can use the fondant smoother to fix that after stacking is complete.

This post contains Amazon.com affiliate links. If you purchase a product through an affiliate link, your costs will be the same but I will receive a small commission which is used for hosting and running this site. I appreciate your support! 

Print Friendly, PDF & Email

YOU MAY ALSO LIKE:

Halloween Pumpkin Cake

Bachelorette Party Corset Cake

How to Make a Burn-Away Cake

Soccer-Themed Birthday Party Desserts II 

Share this:

  • Click to print (Opens in new window) Print
  • Click to email a link to a friend (Opens in new window) Email
  • Tweet
  • Click to share on Reddit (Opens in new window) Reddit
  • Pocket
  • Share on Tumblr

Filed Under: Beach / Nautical, Butter, Cream Cheese, Raspberry, Roxy's Cakes, Themed Parties Tagged With: 1st birthday party, beach cake, birthday cake for girls, blue and yellow cake, how to cover a cake with fondant, how to make a beach cake, how to make a nautical cake, how to stack a two-tier cake, raspberry cream cheese buttercream, tort cu tematica nautica, tort cu tematica plaja, tort pentru copii, vanilla cake

Trackbacks

  1. Beach/Nautical Cake Tutorial - Part II: Making the Fondant Decorations  - Roxy's Kitchen says:
    June 8, 2023 at 10:04 PM

    […] Part I: Filling, Covering & Stacking the Cake […]

Subscribe to Email Updates

loader

Email Address*

Name

FREE & Cheap Printables

  • Sale Product on sale
    Easter Cupcake Toppers (2'') - 12 Designs
    Easter Cupcake Toppers (2”) – 12 Designs
    $1.49 Original price was: $1.49.$1.19Current price is: $1.19.
    Add to cart
  • Sale Product on sale
    Ballerina Cake & Cupcake Toppers
    Ballerina Cake & Cupcake Toppers
    $2.99 Original price was: $2.99.$2.39Current price is: $2.39.
    Add to cart
  • Dancing Ballerina Coffee Mug
    Dancing Ballerina Coffee Mug
    $19.99
    Buy product
  • Sale Product on sale
    Soccer Party Package Printables
    Soccer Party Package Printables Watercolour Collection
    $4.99 Original price was: $4.99.$3.99Current price is: $3.99.
    Add to cart
  • Sale Product on sale
    Soccer Cake Toppers Watercolour Collection
    Soccer Cake Toppers Watercolour Collection
    $2.99 Original price was: $2.99.$2.39Current price is: $2.39.
    Add to cart
  • Soccer Cupcake Toppers (2'') Watercolour Collection - 12 Designs
    Soccer Cupcake Toppers (2”) Watercolour Collection – 12 Designs
    $1.49
    Add to cart
  • Sale Product on sale
    Ballerina Cake & Cupcake Toppers - Baby / Baby Shower Package
    Ballerina Cake & Cupcake Toppers – Baby Girl / Baby Shower Package
    $2.99 Original price was: $2.99.$2.39Current price is: $2.39.
    Add to cart
  • Sale Product on sale
    Puppy Cake Toppers – 3rd Birthday Package
    Puppy Cake Toppers – 3rd Birthday Package
    $2.99 Original price was: $2.99.$2.39Current price is: $2.39.
    Add to cart

Themed Birthday Parties

Train Themed Birthday Party – Finger Foods, Snacks & Drinks

Train Themed Birthday Party - Finger Foods, Snacks & Drinks

Pull-Apart Soccer Cupcake Cake

Pull-Apart Soccer Cupcake Cake

How to Make an Easy Snowman Cake

Easy Snowman Cake

Spiderman Cake & Party Ideas

Spiderman Cake & Party Ideas

More Posts from this Category

Recent Posts

How to Naturally Dye Easter Eggs Blue

How to Naturally Dye Easter Eggs Blue

Soccer Ball Cookies

Soccer Ball Cookies

How to Make a Car Cake with Remote-Controlled Headlights

How to Make a Car Cake with Remote-Controlled Headlights

How to Use a Cake Comb on Cake Covered in Chocolate Ganache

How to Use a Cake Comb on Cake Covered in Chocolate Ganache

Popular Posts


  • Egg Snowman
    Egg Snowman

  • 4-Ingredient Creamy Pineapple Berry Smoothie | Roxy's Kitchen
    Creamy Pineapple Berry Smoothie

  • Homemade Sour Cherry Liqueur
    Homemade Sour Cherry Liqueur – Easy Old Family Recipe Reveal...

  • Mini Cheese Balls | Roxy's Kitchen #appetizer #cheese #mozarella #parmesan #fingerfood
    Mini Cheese Balls

  • Rose Cupcake Bouquet in a Pot
    Easy Rose Cupcake Bouquet in a Pot

  • Grape and Banana Dolphin Parfait | Roxy's Kitchen
    Grape and Banana Dolphin Parfait

  • Quick & Easy Nutella Peanut Butter Monkey Cupcakes | Roxy’s Kitchen – 3-ingredient cupcakes, easiest frosting ever and so easy to decorate with your kids!
    Quick and Easy Nutella Peanut Butter Monkey Cupcakes

  • Safari Jungle Themed First Birthday Party Part III – DIY Decoration Ideas + Free Printables Included! | Roxy's Kitchen
    Safari / Jungle Themed First Birthday Party Part III – DIY D...

  • Easy 3-Ingredient Blueberry Jam | Roxy's Kitchen
    Easy Blueberry Jam

  • Breakfast Egg Stuffed Sweet Potatoes | Roxy's Kitchen A super filling five-ingredient breakfast loaded with vitamins & nutrients.
    Breakfast Egg Stuffed Sweet Potatoes

Recent Pins

  • Cute, Funny, Happy Strawberry Face Mouse Pad

Add a splash of joy to your day with this adorable "Happy Strawberry Face" design! Featuring a glossy, bright red strawberry with big sparkling eyes and a cheerful smile, this sweet character brings charm and cuteness to everything from mugs to t-shirts. Perfect for kids, fruit lovers, or anyone who needs a little extra happy in their life.
  • Cute, Funny, Happy Strawberry Face iPhone Case

Add a splash of joy to your day with this adorable "Happy Strawberry Face" design! Featuring a glossy, bright red strawberry with big sparkling eyes and a cheerful smile, this sweet character brings charm and cuteness to everything from mugs to t-shirts. Perfect for kids, fruit lovers, or anyone who needs a little extra happy in their life.
  • Cute & Happy Strawberry Face Samsung Galaxy Phone Case

Add a splash of joy to your day with this adorable "Happy Strawberry Face" design! Featuring a glossy, bright red strawberry with big sparkling eyes and a cheerful smile, this sweet character brings charm and cuteness to everything from mugs to t-shirts. Perfect for kids, fruit lovers, or anyone who needs a little extra happy in their life.
  • Cute & Happy Strawberry Face Coasters (Set of 4)

Add a splash of joy to your day with this adorable "Happy Strawberry Face" design! Featuring a glossy, bright red strawberry with big sparkling eyes and a cheerful smile, this sweet character brings charm and cuteness to everything from mugs to t-shirts. Perfect for kids, fruit lovers, or anyone who needs a little extra happy in their life.
  • Cute & Happy Strawberry Face Pillow

Add a splash of joy to your day with this adorable "Happy Strawberry Face" design! Featuring a glossy, bright red strawberry with big sparkling eyes and a cheerful smile, this sweet character brings charm and cuteness to everything from mugs to t-shirts to home decor. Perfect for kids, fruit lovers, or anyone who needs a little extra happy in their life.
  • Cute Happy Strawberry Face Baby T-Shirt

Add a splash of joy to your day with this adorable "Happy Strawberry Face" design! Featuring a glossy, bright red strawberry with big sparkling eyes and a cheerful smile, this sweet character brings charm and cuteness to everything from mugs to t-shirts. Perfect for kids, fruit lovers, or anyone who needs a little extra happy in their life.
Follow Me on Pinterest

Popular Posts


  • Mini Cheese Balls | Roxy's Kitchen #appetizer #cheese #mozarella #parmesan #fingerfood
    Mini Cheese Balls

  • 4-Ingredient Creamy Pineapple Berry Smoothie | Roxy's Kitchen
    Creamy Pineapple Berry Smoothie

  • Egg Snowman
    Egg Snowman

  • Oven Baked Pork Sirloin Chops
    Oven-Baked Pork Sirloin Chops

  • How to Make Modeling Chocolate for decorating cakes, cupcakes and cookies
    How to Make Modeling Chocolate for Decorating Cakes, Cupcake...

  • Homemade Sour Cherry Liqueur
    Homemade Sour Cherry Liqueur – Easy Old Family Recipe Reveal...

  • 50 Great Ideas for Your Winter Holidays Menu
    50 Great Ideas for Your Winter Holiday Menu

  • Tutorial with Step by Step Photos - How To Make Safari / Jungle Animals Cupcake Toppers – Tiger, Zebra, Giraffe, Elephant, Monkey, Hippo, Bear, Lion
    How To Make Safari / Jungle Animals Fondant Cupcake Toppers...

  • Safari Jungle Themed First Birthday Party Part III – DIY Decoration Ideas + Free Printables Included! | Roxy's Kitchen
    Safari / Jungle Themed First Birthday Party Part III – DIY D...

  • Safari / Jungle Themed First Birthday Party Part II – Appetizers, Finger Foods & Snack Ideas
    Safari / Jungle Themed First Birthday Party Part II – Appeti...

Copyright © 2025 · Lifestyle Pro Theme on Genesis Framework · WordPress · Log in