


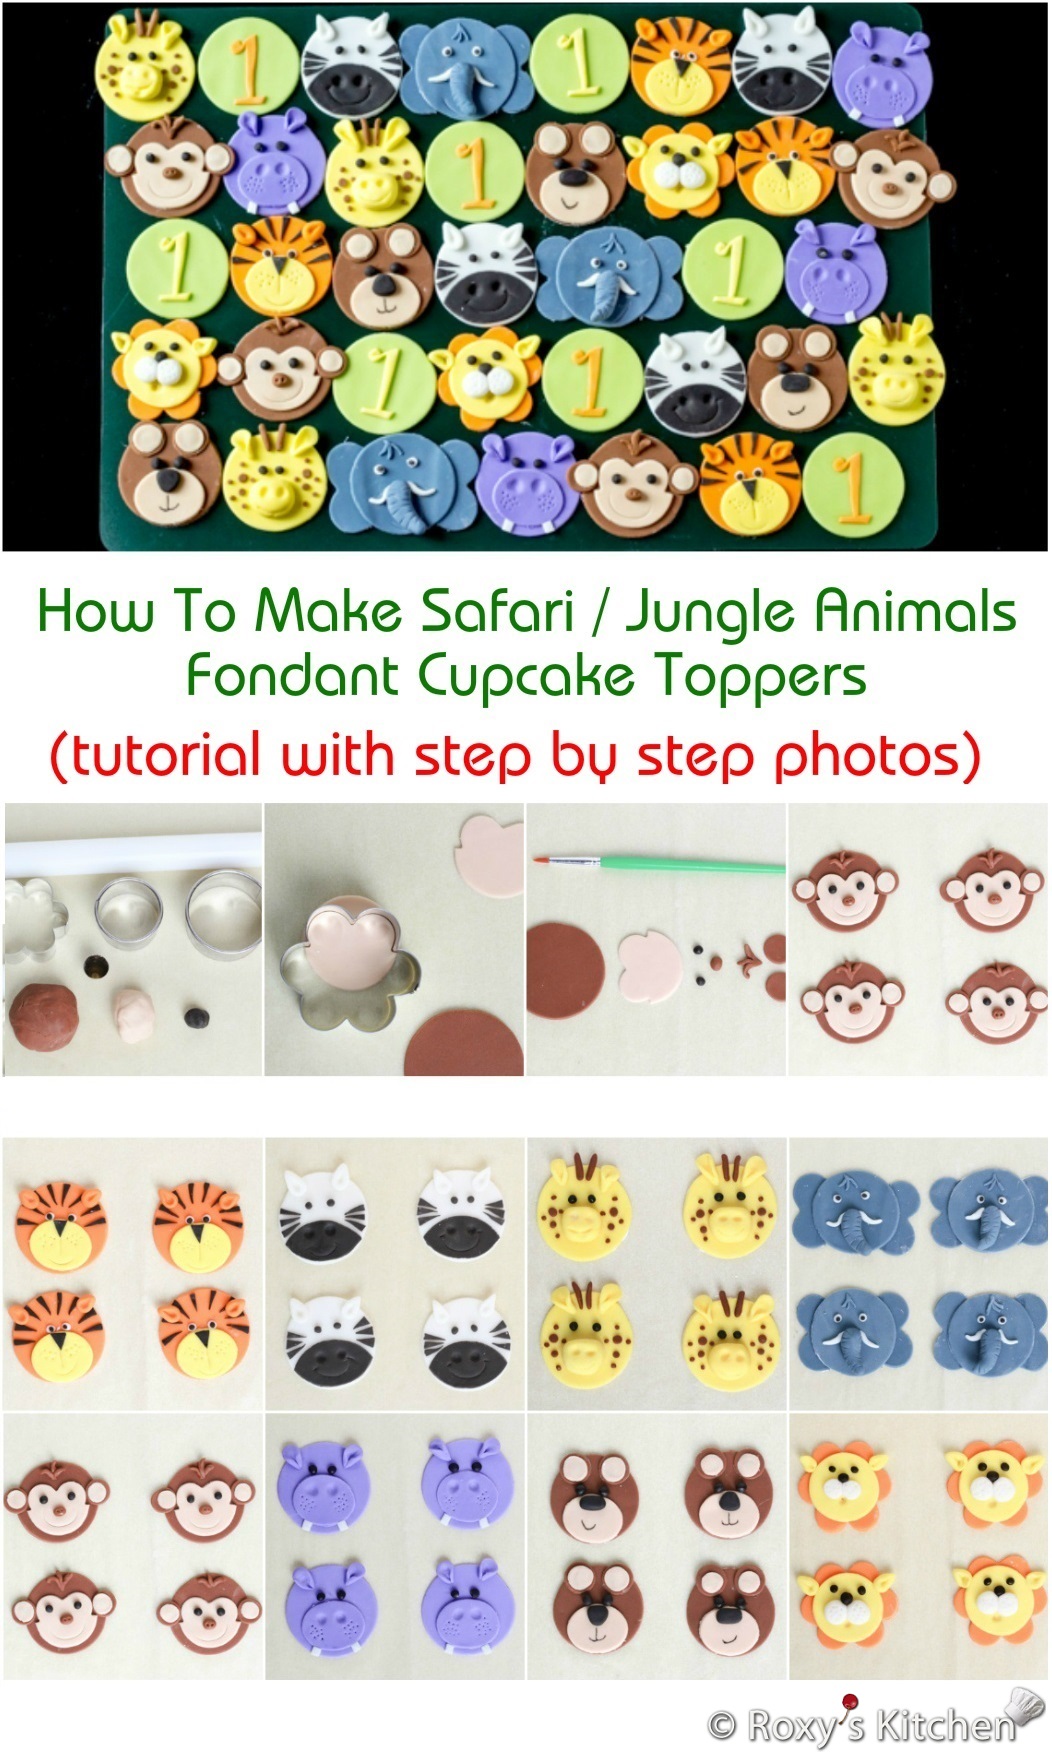
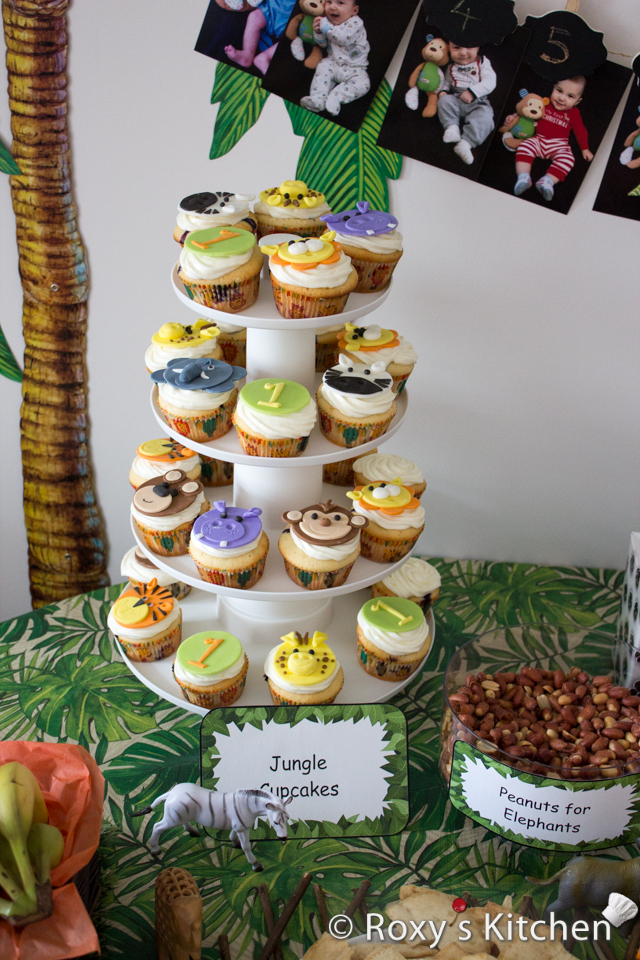
As promised, here is the full tutorial on how to make Safari / Jungle Animals Fondant Cupcake Toppers, the ones I showed you in Part I of my Safari / Jungle Themed First Birthday Party post. Here are all the posts in case you missed them:
Part I – Dessert Ideas
Part II – Appetizers, Finger Foods & Snack Ideas
Part III – DIY Decoration Ideas + FREE Printables
Part IV – Cheap Party Supplies & Decorations
In this post you will find step by step instructions and photos on how to make all the toppers as well as details on all the tools I used. I made four of each animal face cupcake topper, from tigers, zebras, giraffes, elephants to monkeys, hippos, bears and lions. I think they turned out pretty adorable, right? Which one is your favourite?
I also made a few ones with the number 1 but you can personalize these ones based on your little one’s age. I used the FMM Funky Number Tappit Cutters to make the number 1.
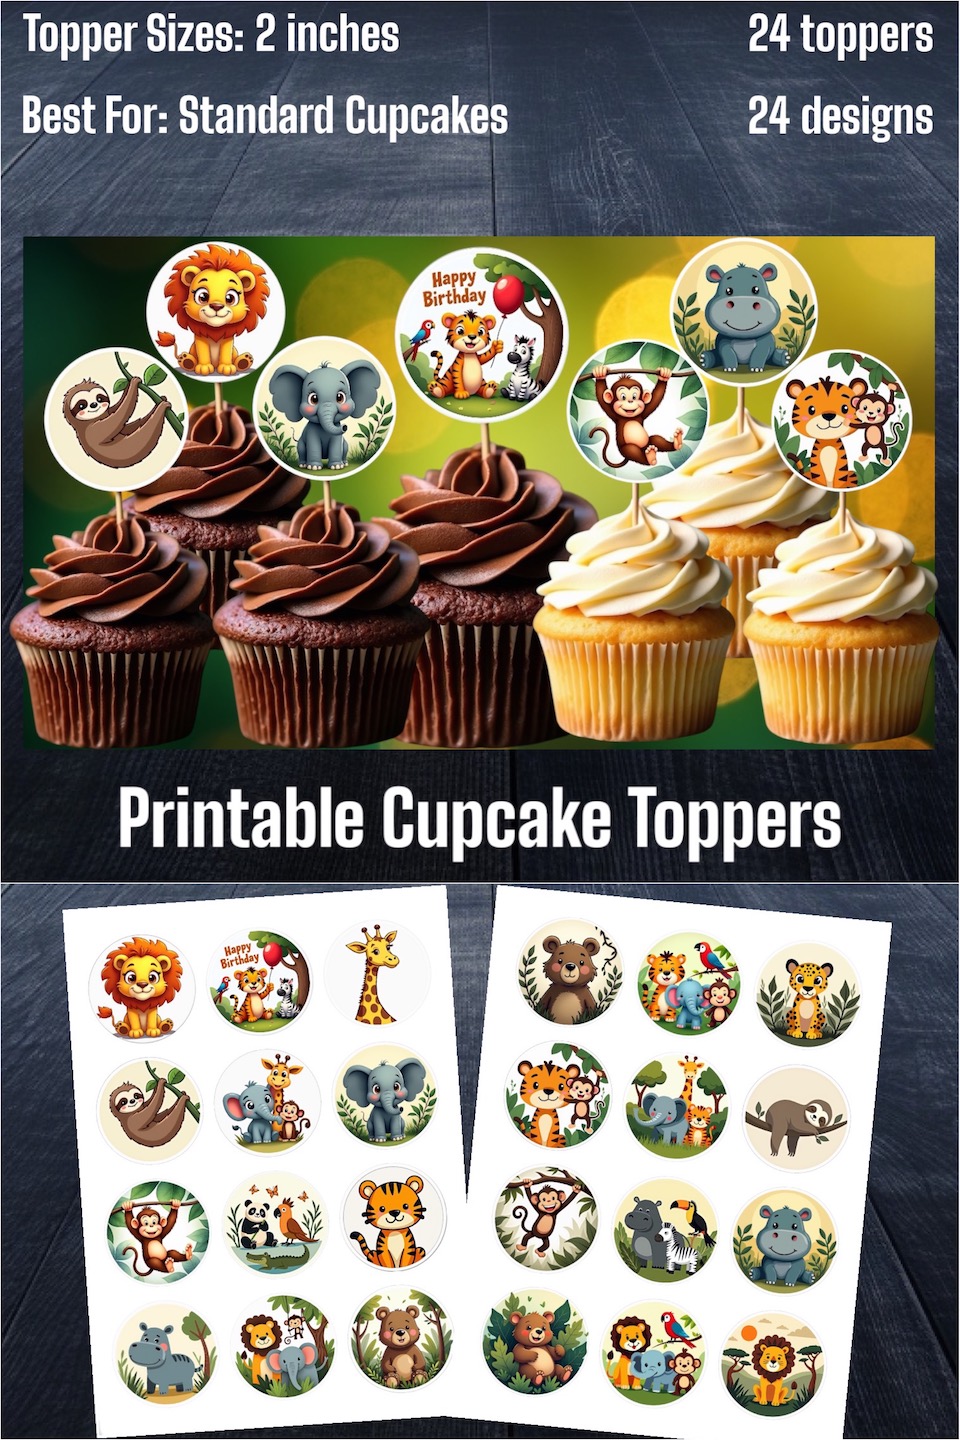
If you’re looking for an easier option, you can get these adorable and printable Jungle / Safari Cupcake Toppers from my website and customize your cupcakes:
And now let’s get started since it’s a pretty long tutorial. If you’ve found this useful I’d love to hear your thoughts in the comments!
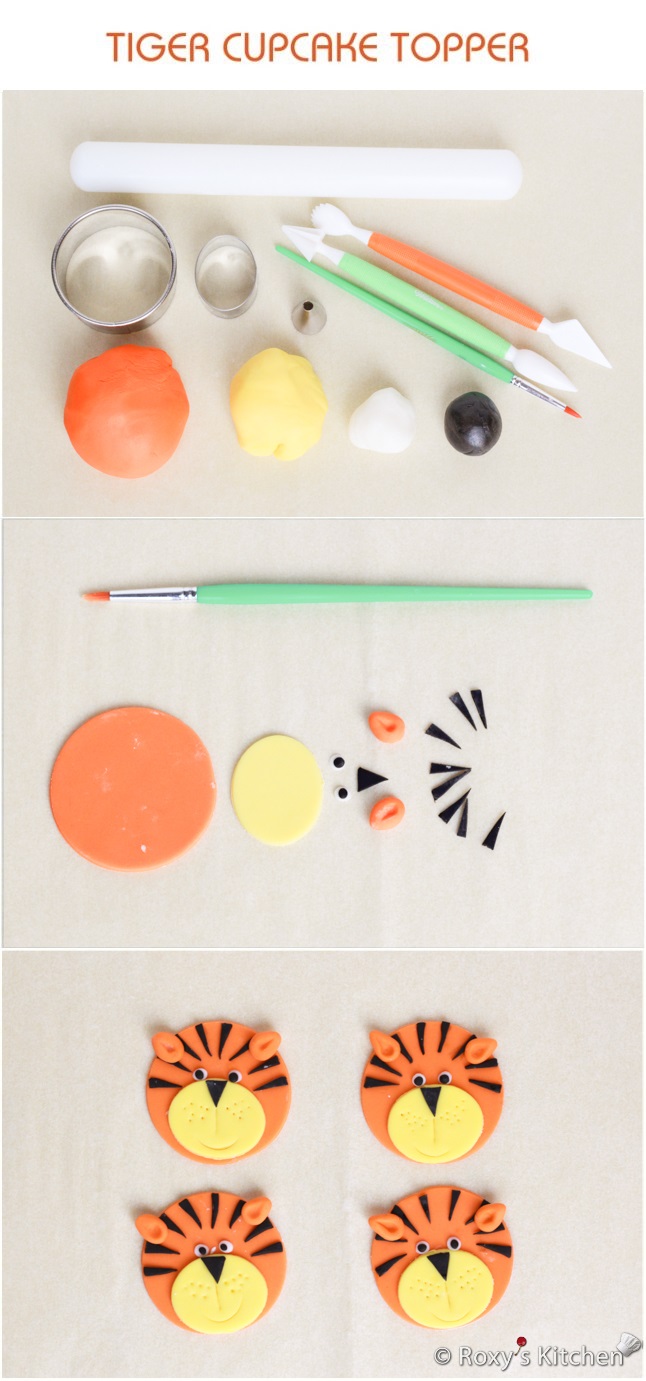
Tiger
Materials & Tools:
- Orange, yellow, white & black fondant
- 2.5 “(6.5 cm) round cutter (about the size of your cupcake’s circumference)– I used the 7th cutter of Ateco Plain Round Cutter Set of 11

- Oval cutter – I used the largest oval cutter of the Ateco Geometric Shape Cutter Set of 24
- Small fondant ball tool
- A toothpick or the cone fondant tool which has a pointy end
- Blunt knife fondant tool
- #8 round piping tip
- Small paint brush
- Small rolling pin – I use the Wilton 9″ fondant rolling pin
- X-Acto knife or any other sharp knife with a thin blade
Directions:
Knead and roll out the orange fondant to a 1/8 “(1/3 cm) thickness. Cut out round shapes using the 2.5 ” (6.5 cm) round cutter.
Knead and roll out the yellow fondant to the same thickness. Cut out oval shapes for the mouth.
Roll two small balls of orange fondant into a teardrop shape. Use the small ball tool to make an indentation, a bit more at the base of the ear and less towards the tip.
Cut the black stripes using the X-Acto knife and the nose shape.
For the eyes, roll out a bit of white fondant and make tiny circles using the small end of the #8 piping tip. You can shape these with your fingers as well but I find it harder to make them exactly the same in size. Attach two dots of black fondant for the pupils using a bit of water. If you want to save yourself some time you can buy the pre-made Candy Eyeballs.
Use a small brush and some water to attach all the pieces together as seen below.
Use the bigger end of a piping tip to mark the mouth and the blunt knife to mark line just below the nose. Use the pointy end of the cone fondant tool or a toothpick to mark in the cheeks.
Let the tiger face cupcake toppers dry on a flat surface.
Zebra
Materials & Tools:
- White & black fondant
- 2.5 “( 6.5 cm) round cutter (about the size of your cupcake’s circumference) – I used the 7th cutter of the Ateco Plain Round Cutter Set of 11
- #8 round piping tip
- Small paint brush
- Small rolling pin – I use the Wilton 9″ fondant rolling pin
- X-Acto knife or any other sharp knife with a thin blade
Directions:
Knead and roll out the white fondant to a 1/8 “(1/3 cm) thickness. Cut out round shapes using the 2.5 ” (6.5 cm) round cutter.
Knead and roll out the black fondant to the same thickness. Cut out round shapes and then using the same cutter cut off a bit of each end to make the mouth as seen in the image below.
Roll two small balls of white fondant into a teardrop shape. Use the end of the paint brush to make an indentation, a bit more at the base of the ear and less towards the tip.
Cut the black stripes using the X-Acto knife. For the eyes, roll out a bit of black fondant and make tiny circles using the small end of the #8 piping tip.
Use a small brush and some water to attach all the pieces together as seen below.
Use the bigger end of a piping tip to mark the mouth and the end of the paint brush to mark the nostrils.
Let the zebra face cupcake toppers dry on a flat surface.

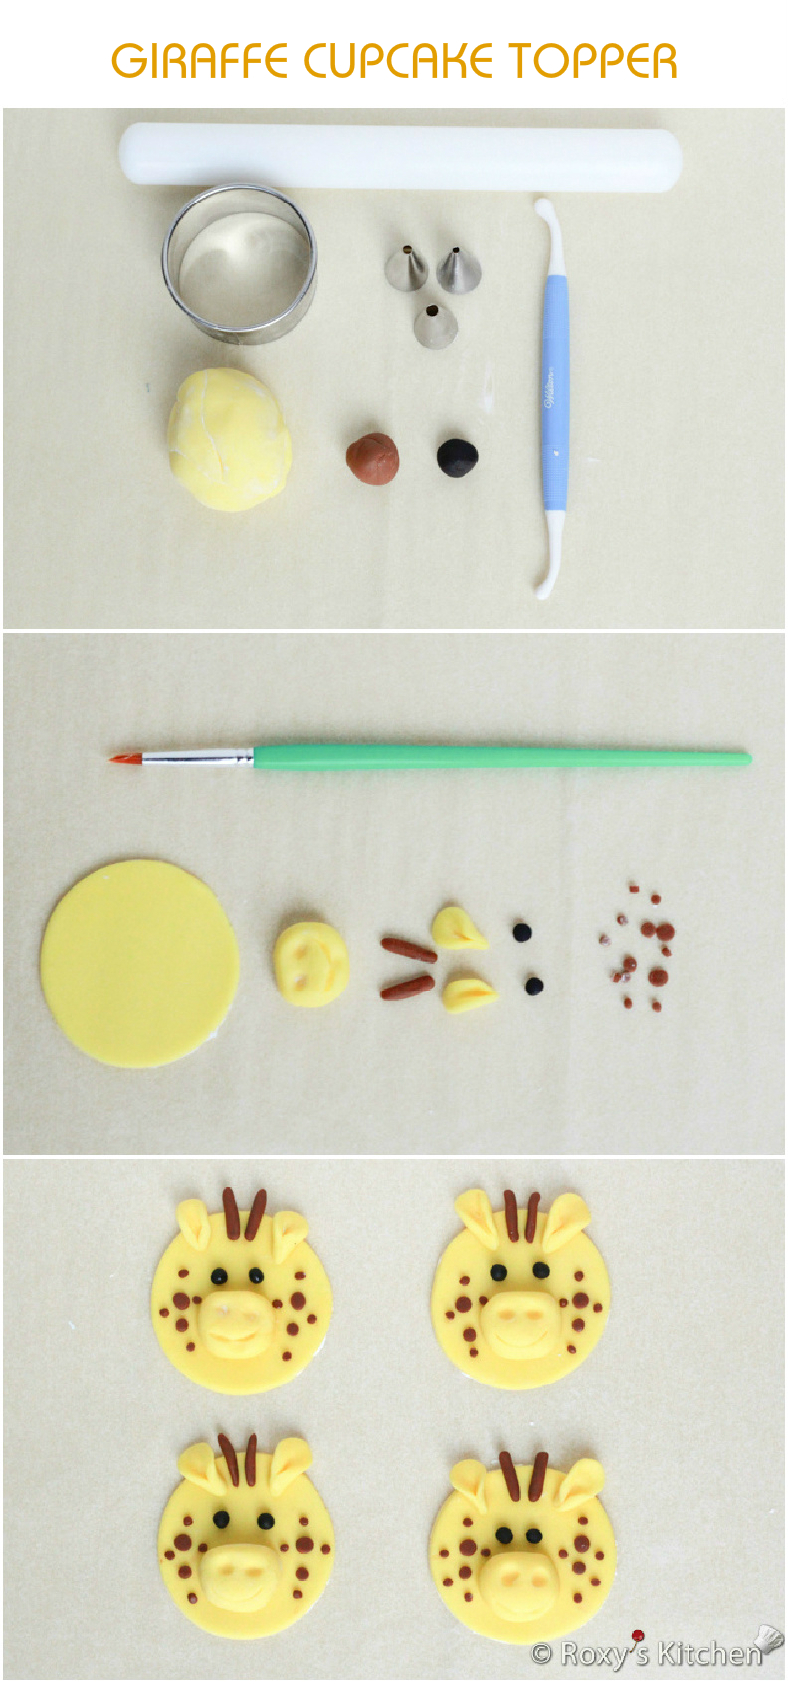
Giraffe
Materials & Tools:
- Yellow, brown & black fondant
- 2.5 “(6.5 cm) round cutter (about the size of your cupcake’s circumference) – I used the 7th cutter of the Ateco Plain Round Cutter Set of 11
- Small fondant ball tool
- A toothpick or the cone fondant tool which has a pointy end
- Three round piping tips in different sizes
- Small paint brush
- Small rolling pin – I use the Wilton 9″ fondant rolling pin
Directions:
Knead and roll out the yellow fondant to a 1/8 “(1/3 cm) thickness. Cut out round shapes using the 2.5 ” (6.5 cm) round cutter.
Roll a ball of fondant for the mouth/nose, shape it into an oval and flatten it with your fingers. Make the nostrils using the small fondant ball tool. Use the bigger end of one of the piping tips to mark the mouth.
Roll two small balls of yellow fondant, flatten them with your finger and pinch them at one end. Use the small fondant ball tool to create a small pocket in the ear.
Roll two tiny balls of brown fondant to make the two pieces between the giraffe’s ears.
Roll out some brown fondant and using the 3 round piping tips make tiny dots in different sizes. You could also make 10-12 tiny balls out of brown fondant and flatten them out with your finger instead of using the piping tips.
For the eyes, make two tiny balls out of black fondant. Or you can use an edible marker to draw them.
Use a small brush and some water to attach all the pieces together as seen below.
Let the giraffe face cupcake toppers dry on a flat surface.
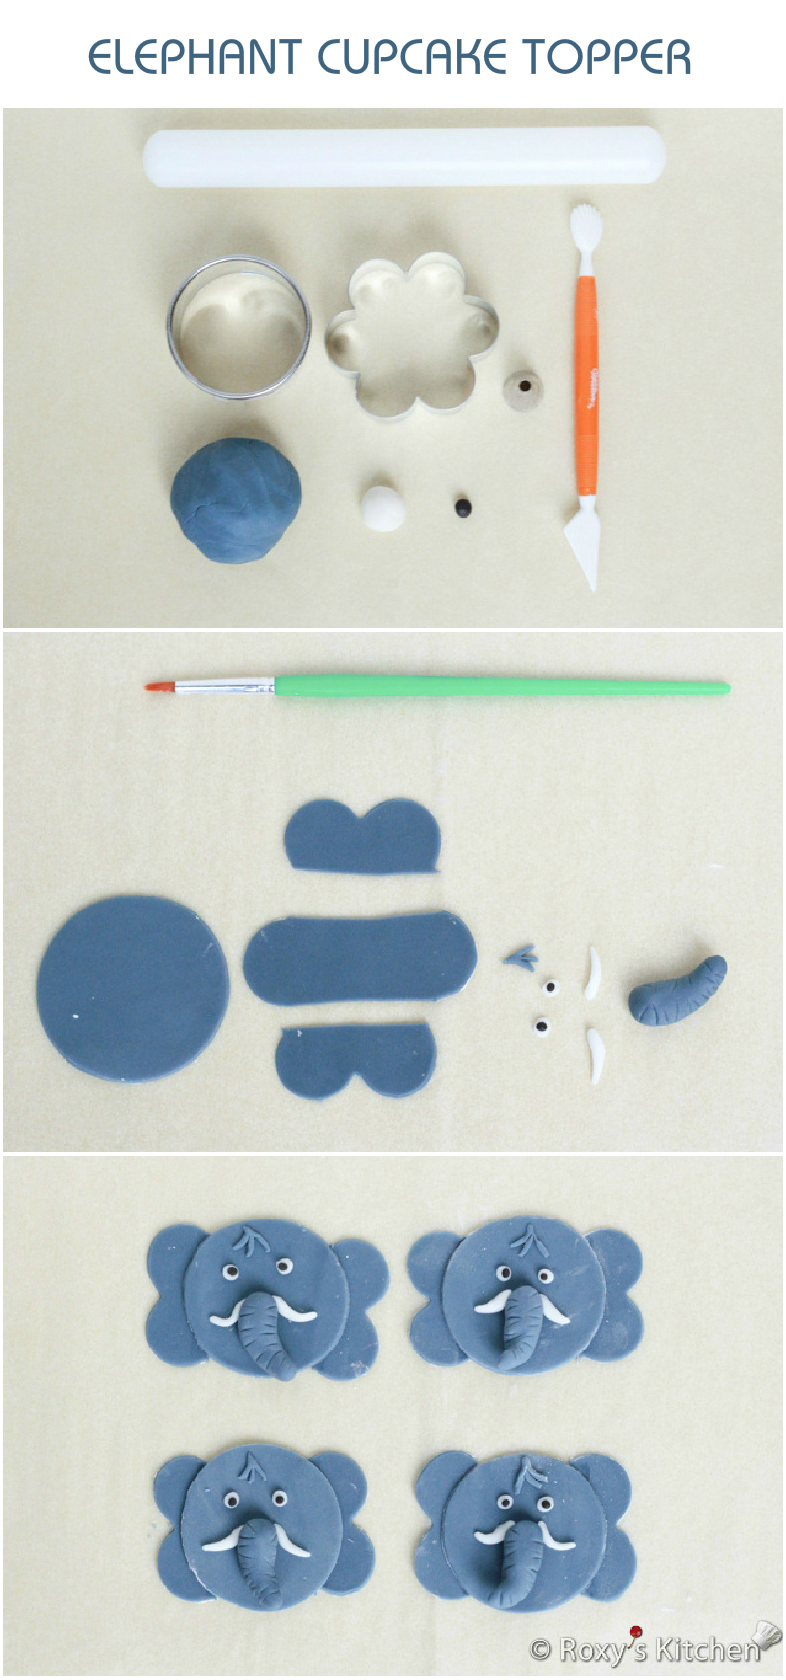
Elephant
Materials & Tools:
- Dark gray, black & white fondant
- 2.5 “(6.5 cm) round cutter (about the size of your cupcake’s circumference) – I used the 7th cutter of the Ateco Plain Round Cutter Set of 11
- 2.5 “(6.5 cm) flower cutter – I used the 4th cutter of the Fox Run Flower Cutter Set of 6
- Blunt knife fondant tool
- #8 round piping tip
- Small paint brush
- Small rolling pin – I use the Wilton 9″ fondant rolling pin
Directions:
Knead and roll out the gray fondant to a 1/8 “(1/3 cm) thickness. Cut out round shapes using the 2.5 ” (6.5 cm) round cutter.
Cut out a flower shape per elephant and make the ears as seen below.
Roll a ball of gray fondant and shape the trunk using your fingers. Make small indentations using the blunt knife fondant tool.
Make the two tusks using white fondant.
For the eyes, roll out a bit of white fondant and make tiny circles using the small end of the #8 piping tip. You can shape these with your fingers as well but I find it harder to make them exactly the same in size. Attach two dots of black fondant for the pupils using a bit of water.
Brush some water on the edge of the ears and stick them to the side of the head. Attach the trunk, eyes and tusks using some water as well.
Let the elephant face cupcake toppers dry on a flat surface.
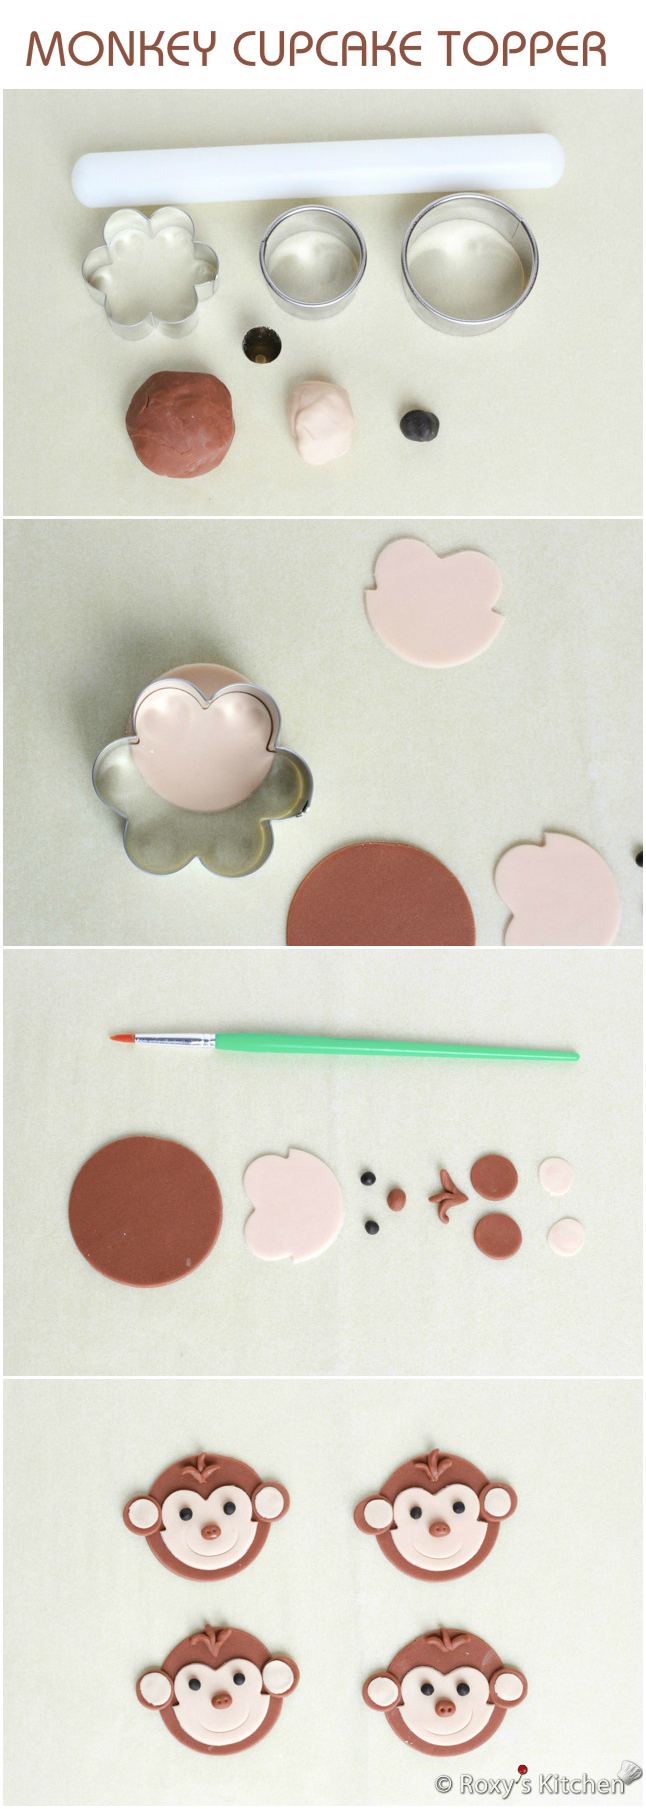
Monkey
Materials & Tools:
- Dark brown, light brown & black fondant
- 2.5 “(6.5 cm) round cutter (about the size of your cupcake’s circumference) + another round cutter slightly smaller – I used the 7th & 6th cutters of the Ateco Plain Round Cutter Set of 11
- 2.5 “(6.5 cm) flower cutter – I used the 3rd cutter of the Fox Run Flower Cutter Set of 6
- A piping tip
- Small paint brush
- Small rolling pin – I use the Wilton 9″ fondant rolling pin
Directions:
Knead and roll out the dark brown fondant to a 1/8 “(1/3 cm) thickness. Cut out round shapes using the 2.5 ” (6.5 cm) round cutter. Cut out two small round shapes using the large end of the piping tip for the ears.
Knead and roll out the light brown fondant to a 1/8 “(1/3 cm) thickness. Cut out round shapes using the smaller round cutter.
Roll out two small balls out of light brown fondant and flatten them with your fingers. Attach them to the two small circles using some water to form the ears.
Use the flower cutter to cut out the monkey face from the round shapes made out of light brown fondant as seen below.
Make two tiny balls out of black fondant for the eyes and a slightly bigger ball out of brown fondant for the nose. Make the hair out of dark brown fondant.
Use a small brush and some water to attach all the pieces together as seen below. Use the bigger end of the piping tip to mark the mouth.
Let the monkey face cupcake toppers dry on a flat surface.
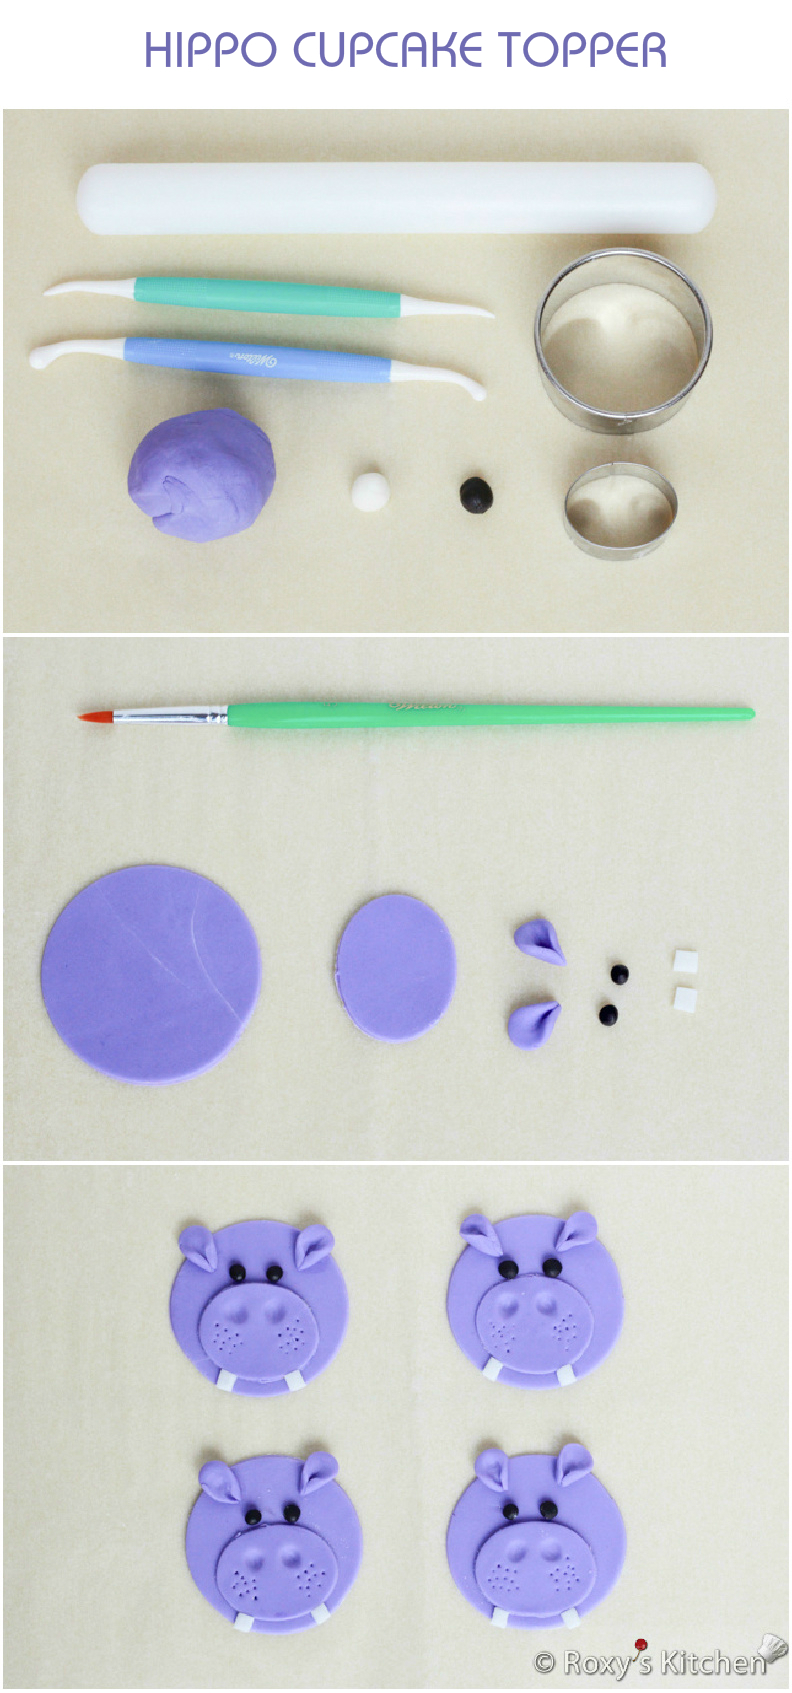
Hippo
Materials & Tools:
- Purple, white & black fondant
- 2.5 “(6.5 cm) round cutter (about the size of your cupcake’s circumference)– I used the 7th cutter of the Ateco Plain Round Cutter Set of 11
- Oval cutter – I used the largest oval cutter of the Ateco Geometric Shape Cutter Set of 24
- Small fondant ball tool
- Small fondant veining tool or any tool with a pointy end
- Small paint brush
- Small rolling pin – I use the Wilton 9″ fondant rolling pin
- X-Acto knife or any other sharp knife with a thin blade
Directions:
Knead and roll out the purple fondant to a 1/8 “(1/3 cm) thickness. Cut out round shapes using the 2.5 ” (6.5 cm) round cutter. Cut out oval shapes for the mouth.
Roll two small balls of purple fondant, flatten them with your finger and pinch them at one end. Use the small fondant ball tool to create a small pocket in the ear.
Cut the teeth out of rolled white fondant using the X-Acto knife. For the eyes, make two tiny balls out of black fondant.
Use the pointy end of the small fondant veining to mark in the cheeks and the small ball tool to make the nostrils.
Use a small brush and some water to attach all the pieces together as seen below.
Let the hippo face cupcake toppers dry on a flat surface.
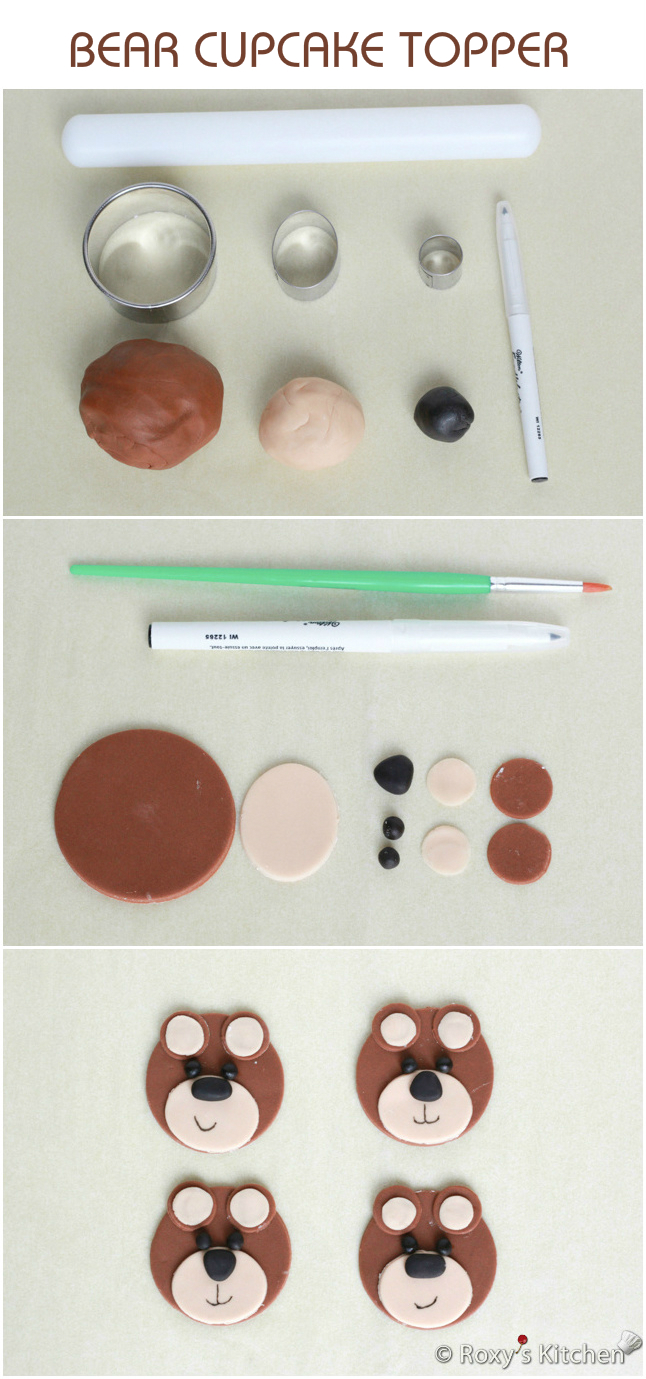
Bear
Materials & Tools:
- Dark brown, light brown & black fondant
- 2.5 “(6.5 cm) round cutter (about the size of your cupcake’s circumference) + the smallest round cutter – I used the 7th & 1st cutters of the Ateco Plain Round Cutter Set of 11
- Black edible marker
- Small paint brush
- Small rolling pin – I use the Wilton 9″ fondant rolling pin
Directions:
Knead and roll out the dark brown fondant to a 1/8 “(1/3 cm) thickness. Cut out round shapes using the 2.5 ” (6.5 cm) round cutter. Cut out two small round shapes using the smallest round cutter.
Knead and roll out the light brown fondant to a 1/8 “(1/3 cm) thickness. Cut out round shapes for the mouth using the oval cutter.
Roll out two small balls out of light brown fondant and flatten them with your fingers. Attach them to the two small circles using some water to form the ears.
Make two tiny balls out of black fondant for the eyes. Also, make a slightly bigger ball and shape it into a triangle or oval with your fingers to form the nose.
Use a small brush and some water to attach all the pieces together as seen below. Use the black marker to draw the mouth.
Let the bear face cupcake toppers dry on a flat surface.
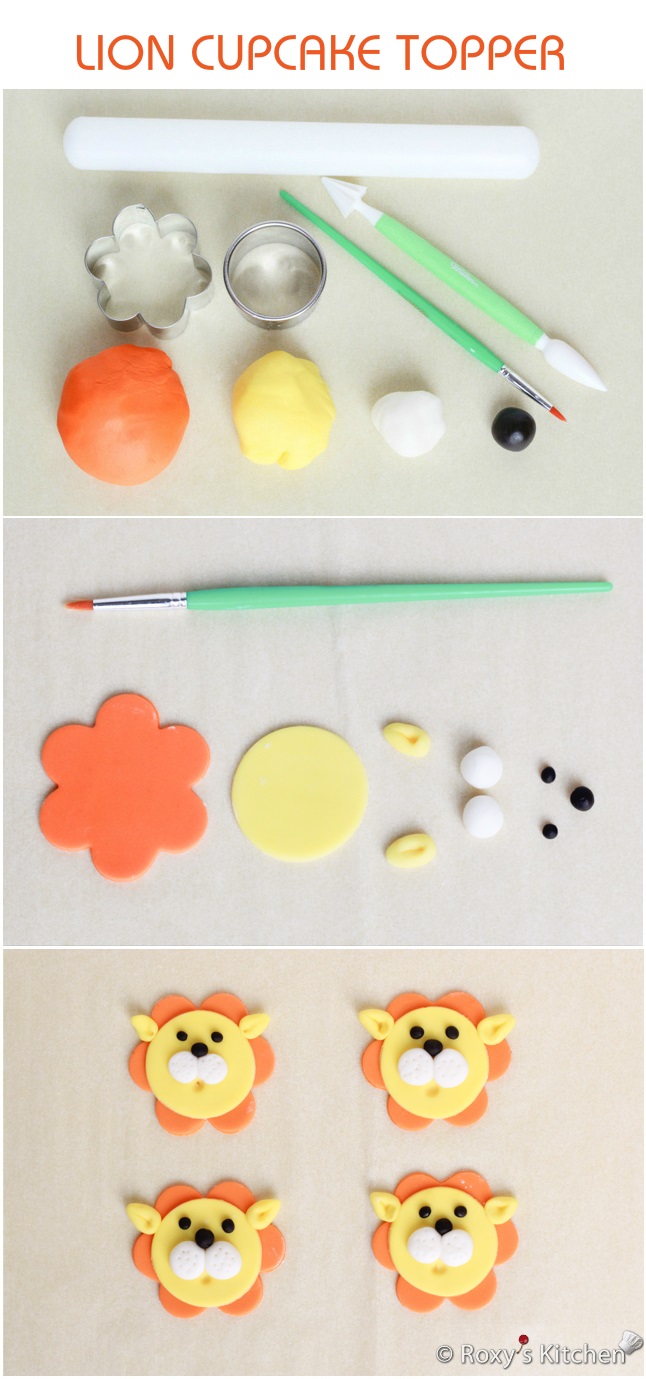
Lion
Materials & Tools:
- Orange, yellow, white & black fondant
- 2.5 “(6.5 cm) flower cutter (about the size of your cupcake’s circumference) – I used the 3rd cutter of the Fox Run Flower Cutter Set of 6
- Round cutter slightly smaller than the flower cutter above – I used the 6th cutter of the Ateco Plain Round Cutter Set of 11
- The cone fondant tool which has a pointy end or the small fondant veining tool
- Small paint brush
- Small rolling pin – I use the Wilton 9″ fondant rolling pin
Directions:
Knead and roll out the orange fondant to a 1/8 “(1/3 cm) thickness. Cut out flower shapes using the 2.5 ” (6.5 cm) cutter.
Knead and roll out the yellow fondant to the same thickness. Cut out round shapes.
Roll two small balls of yellow fondant into a teardrop shape. Use the end of the paint brush (or a small ball tool) to make an indentation, a bit more at the base of the ear and less towards the tip.
Make two small balls out of white fondant for the moustache. Make two tiny balls out of black fondant for the eyes and a slightly bigger one for the nose.
Use a small brush and some water to attach all the pieces together as seen below.
Use the pointy end of the cone tool to mark the moustache and the end of the paint brush (or a small ball tool) to mark the mouth.
Let the lion face cupcake toppers dry on a flat surface.

You might also like…
This post contains Amazon.com affiliate links for products I personally use and love. If you purchase a product through an affiliate link, your costs will be the same but I will receive a small commission which is used for hosting and running this site. I appreciate your support!


These are all adorable! Question: If I frost my cupcakes, can I just set these fondant animals on top? Or do I need to do something else to make sure they adhere properly? I’m new to fondant, so I wasn’t sure. Thank you!
They should stick to the frosting.
Sooo cute…. question when you add it to the cupcake does it necessarily have to have buttercream or can it be the elite whipped icing?
hi! I want to try making these for a friend’s baby’s 1 year old zoo party.
I’m a total newbie with fondant cupcakes. Are people supposed to eat the cake toppers? Or is it meant to harden completely and just plucked off?
Thanks!!
Hi Jamie,
You can definitely eat the fondant toppers. They shouldn’t harden as much so that you can’t eat them… actually, if you live in a hot and humid climate the fondant will be softer and not harden as easily. Also, it depends how many days ahead you’re making the toppers. The longer they sit the dryer they get but it takes a good amount of time for them to harden out completely. Personally, I don’t like eating the fondant… it’s mostly made of sugar. But I love decorating with it :). I have friends who really like the fondant though :).
I hope this helps!
Roxy
Thank you so much for this tutorial! I have a baby shower I am doing cupcakes for in 2 days and I was a little overwhelmed and considering cheating and just printing toppers for the cupcakes. Your tutorial is so simple, yet they look amazing and give me the hope that maybe I can pull this off! Thanks for sharing your talents!!
I hope you gave these cupcake toppers a try for the baby shower 🙂 . They take some time to make but the final result is worth the effort 🙂
Hi Roxy,
How much in advance can these cake toppers be prepared and how to store them? Do you also have tutorials on making the actual cake with the fondant and all the details you added to it including the name, number 1 etc.?
Thanks,
DK
Hi DK,
You can make the cupcake toppers 1 month ahead, let them dry completely and store them in a cardboard box in a dark place. The colors might fade if you leave them in sunlight. Don’t store them in airtight plastic containers or in the fridge as the fondant will become sticky. I’ve stored fondant decorations for several months (even 1 year) and they still looked good so if you need to make them more than 1 month in advance you’re safe to do so :).
I’m planning to write the posts for the cake as well but I haven’t had a chance to do so yet.
Hope this helps!
Thank you very much Roxy! I would really appreciate if you can post your tutorial on how to make the fondant animals & details for the main cake or direct me to the resources you used to make them. I’m planning on making it for my son’s first birthday on April 2nd. Most of the tutorial I found on youtube don’t look half as cute as yours. Thank you once again!
So sorry DK but I’ll most likely not be able to post the tutorial in time for your son’s birthday. Dealing with a sick toddler these days.
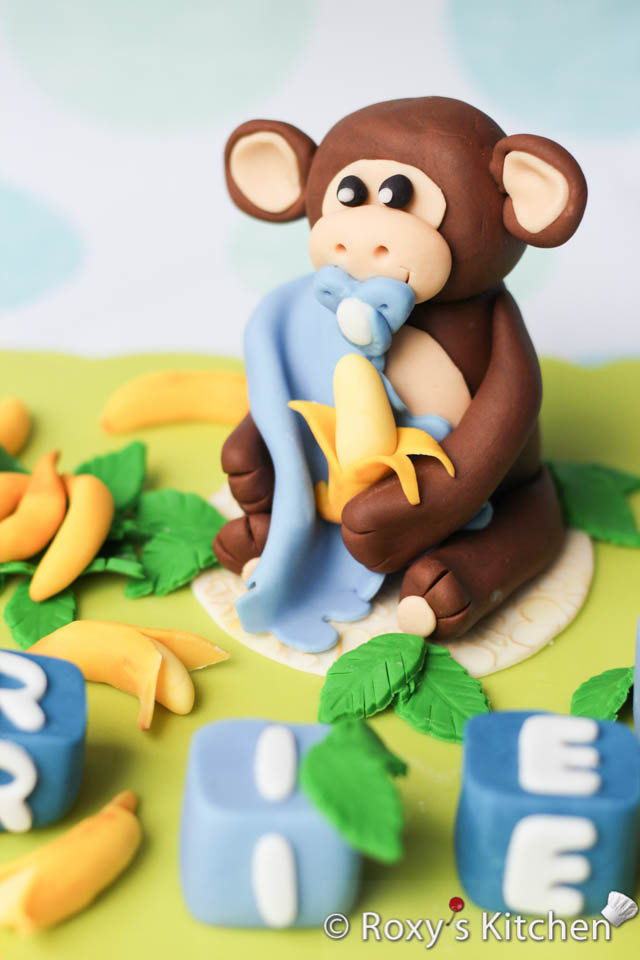
If it’s helpful at all, the tutorial for the teddy bear cake topper is already posted here – https://roxyskitchen.com/teddy-bear-fondant-cake-topper-tutorial.html
I used a simple leaf cutter to make the leaves for the palm trees. For the name I used these funky cutters – http://www.amazon.com/gp/product/B002INR2OE/ref=as_li_tl?ie=UTF8&camp=1789&creative=9325&creativeASIN=B002INR2OE&linkCode=as2&tag=roxskit-20&linkId=HZUM6D6YOVOUWKGX
For the wood sign I used an impression mat – http://www.amazon.com/FMM-Tree-Bark-Brick-Impression/dp/B001SSJWG6/ref=sr_1_1?s=home-garden&ie=UTF8&qid=1427772006&sr=1-1&keywords=wood+impression+mat
For the flowers, you can use a small cutter or a plunger & cutter – http://www.amazon.com/Fox-Run-67003-4-Piece-Blossom/dp/B00AZMKCC4/ref=sr_1_sc_1?s=home-garden&ie=UTF8&qid=1427772208&sr=1-1-spell&keywords=flower+plunger+cuttoer
All other fondant figurines are shaped by hand.
How much fondant would you need to make 50 cupcakes?
Hi Daniell, You would need about 3. 5 – 4 pounds of fondant. I hope this helps and sorry for the late reply.
i had to make jungle cupcakes and your website with precise instructions came in very handy. Just wanted to thank you for all the insttuctions for newbies like me.. Best wishes Michelle
You’re very welcome, Michelle! I’m so glad you found the tutorial useful :).
These are so cute. I never thought I could do something like this on my own, but after reading this I just might be able to.