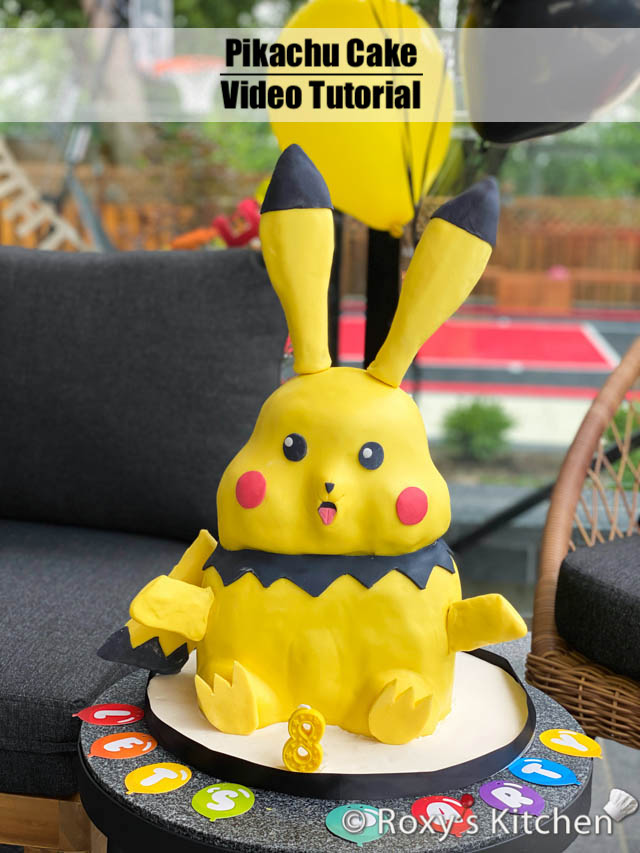
This Pikachu Cake is sure to shock and delight all of your friends and family, whether they’re Pikachu fans or just love a good slice of cake. I made this cake for Daniel’s 8th birthday party. It has layers of moist chocolate cake, walnut cake and a chocolate walnut filling. Check out the instructions or the video below to see how I made it.
Ingredients
Multiply the ingredients in this Moist Chocolate Cake recipe by 2.5 to make:
- Two 20 cm (8 inch) round cakes
- One 18 cm (7 inch) round cake
- One 13 cm x 6.4 cm (5 inch x 2.5 deep) hemisphere/dome cake
Multiply the ingredients in this Walnut Cake recipe by 1.5 to make:
- One 20 cm (8 inch) round cake
- One 18 cm (7 inch) round cake
Sugar Syrup to Moisten the Cake (optional):
- 400 ml water
- 10 Tbsp sugar
- 5-6 Tbsp rum extract
- Make the Chocolate Walnut Filling using this recipe but double the ingredients
Unwhipped Chocolate Ganache / Firm Frosting for Crumb Coating the Pikachu Cake:
- 600 g semi-sweet chocolate (baking or couverture chocolate)
- 300 ml whipping cream
Covering the Cake & Making the Pikachu Details:
- 2.75 kg (6 lbs) yellow fondant
- A bit of black fondant, red fondant and white fondant
- 700 g (1.5 lbs) white fondant for covering the cake drum (optional)
Other Tools/Items:
- 35-35 cm (14-16’’) cake drum
- two 20 cm (8’’) cake boards
- one 18 cm (7’’) cake board
- one 13 cm (5’’) cake board
- 10-12 Boba plastic straws or cake dowels
- 1 tall wooden dowel for the centre cake dowel, if needed for extra stability
- circle cutters for the eyes and red cheeks: 5 cm (2’’) and 7.5 cm (3’’) in diameter.
- an X-Acto knife or another sharp knife
- fondant modelling tools: the ball tool, the blade tool
- fondant smoother
- powdered sugar or cornstarch for dusting the surface when you work with fondant
- a small brush + edible glue or water to attach the fondant decorations
- a serrated knife for carving the cake
- Styrofoam for the ears; note: you can also make these out of Rice Krispies Treats mixed with melted marshmallows – for 300 g (6 cups) of mini marshmallows use 135 g (9 cups) of Rice Krispies cereals.
- some cardboard or extra cake boards for the arms and tail
- 6-8 bamboo skewers
Directions
Making the Cake
Multiply the ingredients in this Moist Chocolate Cake recipe by 2.5 and prepare the batter as per the instructions. Grease all your pans with butter/oil and then line them with parchment paper or coat them with flour. Split the batter amongst all the pans to make:
- Two 20 cm (8 inch) round cakes
- One 18 cm (7 inch) round cake
- One 13 cm x 6.4 cm (5 inch x 2.5 deep) hemisphere/dome cake
Bake the cakes, let them cool off. Cut each round cake horizontally in two.
Multiply the ingredients in this Walnut Cake recipe by 1.5 and prepare the batter as per the instructions. Grease all your pans with butter/oil and then line them with parchment paper or coat them with flour. Split the batter between two pans to make:
- One 20 cm (8 inch) round cake
- One 18 cm (7 inch) round cake
Bake the cakes, let them cool off. Cut each cake horizontally in two.
Prepare a simple sugar syrup by boiling 400 ml water with 10 tablespoons of sugar. Add 5-6 tablespoons of rum extract when it starts boiling and remove from heat. Let it cool off.
Making the Filling
Make the Chocolate Walnut Filling using this recipe but double the ingredients.
Making the Chocolate Ganache for Covering the Cake
Make Unwhipped Chocolate Ganache / Firm Frosting out of 600 g semi-sweet chocolate callets/chips and 300 ml whipping cream by following the instructions in this recipe.
Assembling and Decorating the Pikachu Cake
Watch this video tutorial or read the detailed instructions below to see how to stack and decorate this Pikachu Cake.
Making the Body
Cut a ~5 cm (2’’) piece out of your 20 cm (8’’) cake boards to make a flat side.
Using one of these cake boards as a template, cut the side of all your 20 cm (8’’) round cakes.
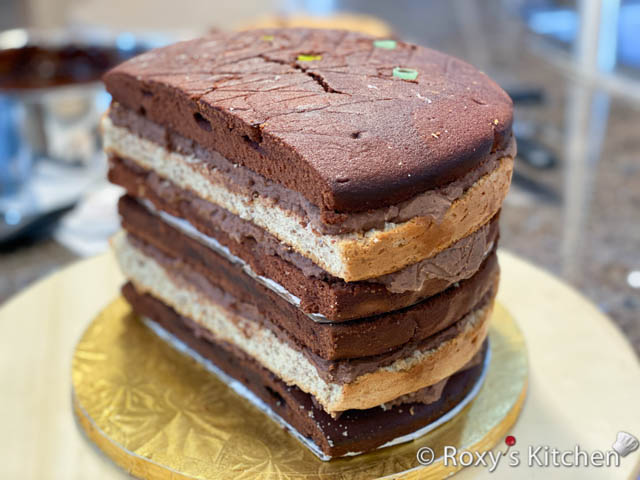
Spread some filling on one of the cake boards and place the first chocolate cake layer on top. Moisten it with sugar syrup and spread chocolate walnut filling on top (~250-300g of filling per layer). Place a walnut cake layer on top, moisten it with sugar syrup and spread more filling. Lastly, place the 3rd cake layer on top and moisten it with sugar syrup.
Cut 4 boba straws or cake dowels to the height of the first 20 cm (8’’) stacked cake and insert them into the cake in four corners, about 3.8 cm (1.5’’) away from the edge.
Spread a tablespoon of filling and place the second cake board on top. Then, repeat the same steps as above to stack and fill the second cake with the same layers … chocolate cake / filling / walnut cake / filling / chocolate cake.
Cut 4 more boba straws or cake dowels to the height of the second 20 cm (8’’) stacked cake and insert them into the cake in four corners, about 3.8 cm (1.5’’) away from the edge.
Cover the body with plastic wrap and freeze it for 1-2 hours. Freezing the cake for a few hours before carving will make it easier to carve without crumbling.
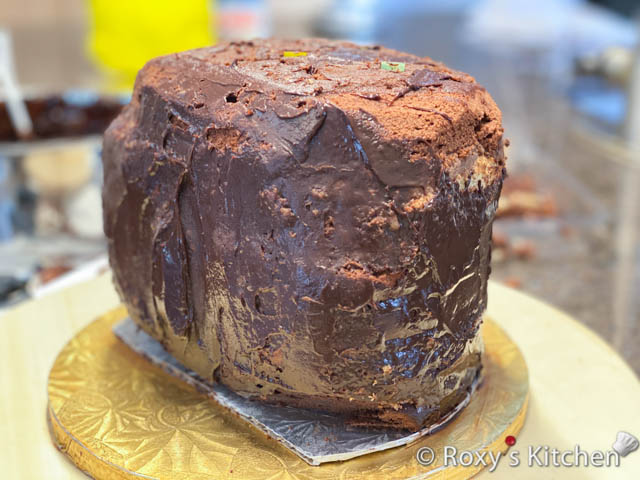
Carve the body using a serrated knife. It’s best to watch the video to see how I’ve done it. If you’re not confident in your freehand carving skills, consider using a template to guide your carving. I usually just print a picture of what I want to carve just for reference and proceed with the freehand carving, checking the image once in a while to make sure I end up with the right shapes.
Use cake scraps and chocolate ganache to build up Pikachu’s belly and legs. The ganache will act as glue.
Making the Head
Cut your 18 cm (7’’) cake board into an oval. This will be the base of Pikachu’s head.
Using this cake board as a template, cut the sides of your 18 cm (7’’) round cakes to make it oval too.
Spread some filling on the oval cake board and place the first chocolate cake layer on top. Moisten it with sugar syrup and spread chocolate walnut filling on top (~200-250g of filling per layer). Place a walnut cake layer on top, moisten it with sugar syrup and spread more filling. Lastly, place the 3rd cake layer on top and moisten it with sugar syrup.
Cut 4 boba straws or cake dowels to the height of the first 20 cm (8’’) stacked cake and insert them into the cake in four corners, about 3.8 cm (1.5’’) away from the edge.
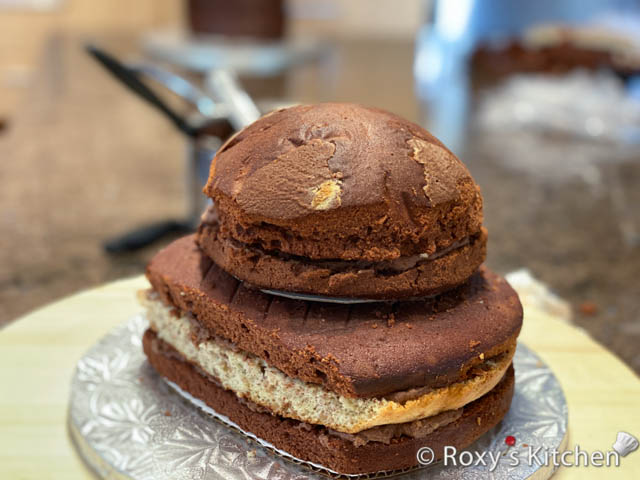
Spread a tablespoon of filling and place the 13 cm (5’’) round cake board. Then, place the base of the 13 cm (5’’) dome cake, moisten it with sugar syrup and spread chocolate walnut filling on top (~150 g). Place the second dome cake layer on top and moisten it with sugar syrup.
Cover Pikachu’s head with plastic wrap and freeze it for 1-2 hours. Again, freezing the cake for a few hours before carving will make it easier to carve without crumbling.
Carve the head using a serrated knife. It’s best to watch the video to see how I’ve done it.
Use cake scraps and chocolate ganache to build up the cheeks, nose, mouth. The ganache will act as glue.
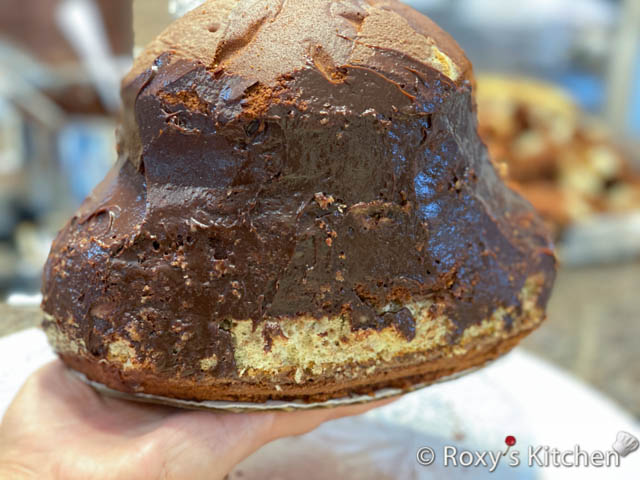
Stacking and Covering the Cake with Ganache
Stack the two cakes by spreading a bit of filling on top of the body and placing the head over it.
If you feel that your cake is not stable enough, you can use a centre dowel. Use a strong wooden dowel. If you don’t have pre-drilled holes in the centre of your cake boards (you can purchase cake boards that have pre-drilled holes), then sharpen one end of the dowel. That way it’s easier to pass it through the cake and cake boards.
Push your dowel through or hammer it down all the way through your cake. This works if you’re using regular/cardboard cake boards between your cakes. Laminated cake boards are not good for this as it will be difficult to push the dowel through even if it’s sharpened.
Crumb coat the stacked cake with a thin layer of the ganache. Your ganache needs to be cool to the touch and have a thick pouring consistency.
Refrigerate the cake for 1-2 hours. Then, apply the last layer of ganache and smooth it out using a straight or offset spatula. It doesn’t have to be perfect as the cake will be covered with fondant.
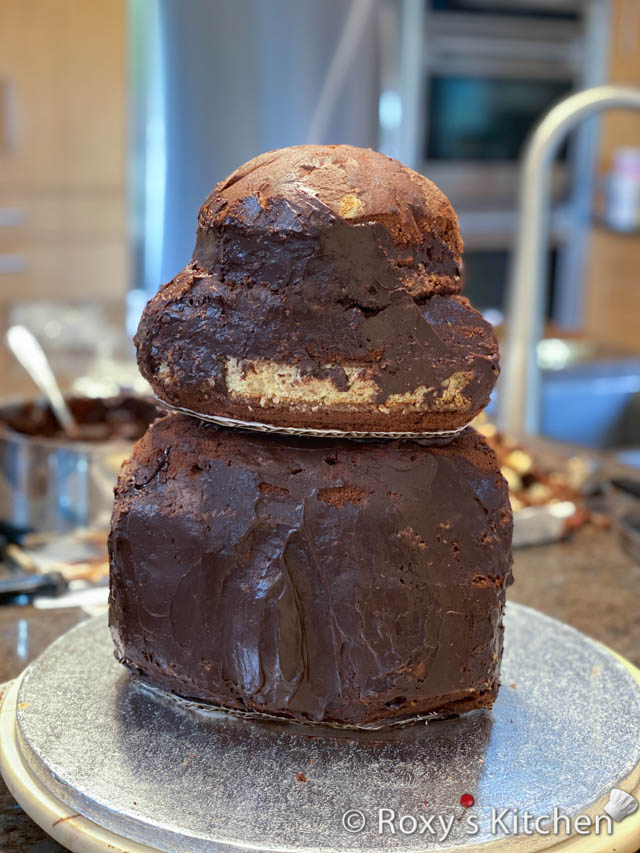
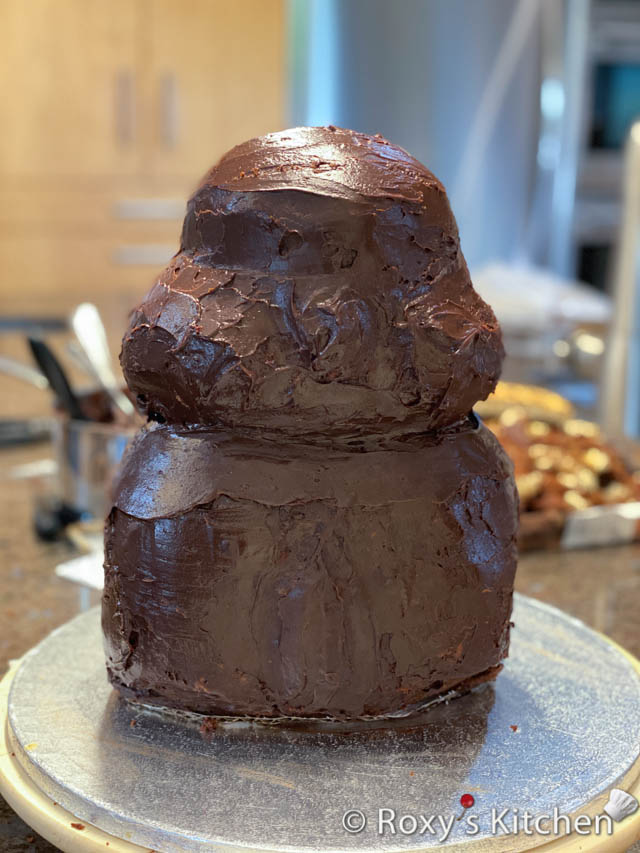
Covering the Cake with Fondant
Place Pikachu on the cake drum.
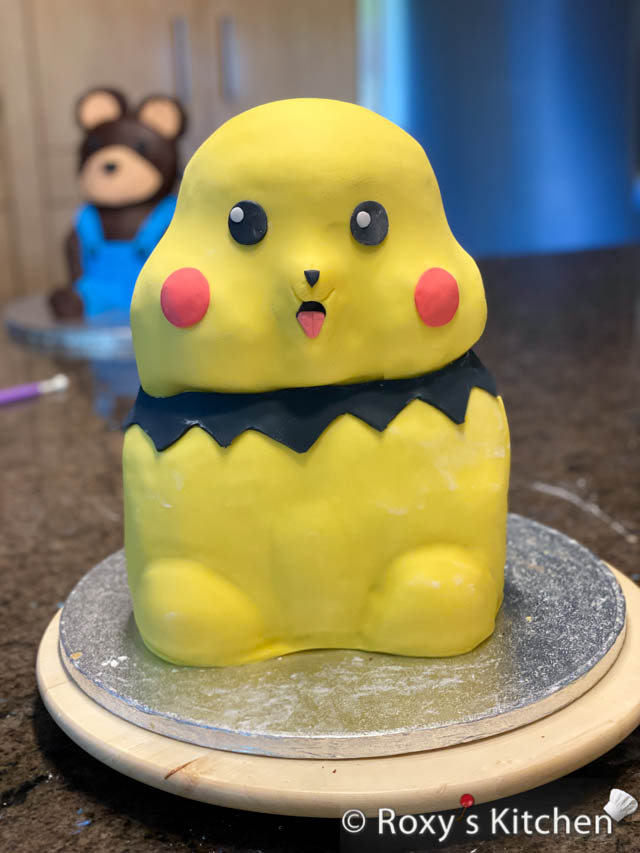
Knead and roll your yellow fondant to cover the cake.
Before rolling out your fondant, sprinkle some powdered sugar or cornstarch on your work surface and knead it until it has a workable consistency and it doesn’t feel and look dry.
Use a bit of fondant to build up Pikachu’s legs and the nose/mouth. That is only if it’s still needed and you didn’t build these using cake scraps and ganache.
Use a measuring tape or a piece of string to measure the top and sides of the cake. So if you measured 8’’ across the top and your cake is 14’’ tall that is 36’’ of cake in total so you need to roll out the fondant at least 36’’ in diameter but you should leave an inch or two extra.
Cover Pikachu’s body first and then the head separately, creating a seam right around the neck and at the back. It’s easier than trying to cover it all in one go.
Sprinkle some powdered sugar onto your work surface and roll out the fondant in the approximate shape of your cake. As you are rolling it make sure you lift the fondant occasionally and rotate it 45 degrees to make sure it doesn’t stick to your work surface. If it sticks lift the fondant and sprinkle more powdered sugar or cornstarch.
Gently lift the fondant place it on the side of the cake, starting in the middle of Pikachu’s back. Start unrolling the fondant from the side of the cake and across to the other side.
Smooth the fondant with a fondant smoother (or the palm of your hand) starting from the top. Start to gently pull the fondant out and down around the sides of the cake using one hand and spread the excess fondant and smooth it out using a fondant smoother (or your other hand).
Keep turning the cake and repeating these steps until the sides are smooth and without any ruffles formed towards the bottom. It’s better if you use a fondant smoother since the pressure of your hands could leave marks and the warmth from your hands might make the fondant sticky.
Use your fondant smoother to get rid of any wrinkles and air bubbles as well. If you see any air bubbles, insert a pin on an angle, release the air and smooth the area again.
Trim the edges at the bottom using an X-Acto knife, a pizza cutter or any other sharp knife you have.
Repeat the same process to cover Pikachu’s head with fondant except this time you will be unrolling the fondant from the side of the cake to the top and across to the other side.
While the fondant is still soft, use your fondant ball and blade tools to shape the mouth and nose.
If desired, cover the part of the cake drum that’s still visible with white fondant.
Making the Ears/Tail/Arms
Cut two ears out of styrofoam. The best way to cut styrofoam without making a mess is using a hot knife. Styrofoam will melt at around 300°C (600°F). A hot cutting tool will melt through the styrofoam instead of cutting it resulting in less of a mess.
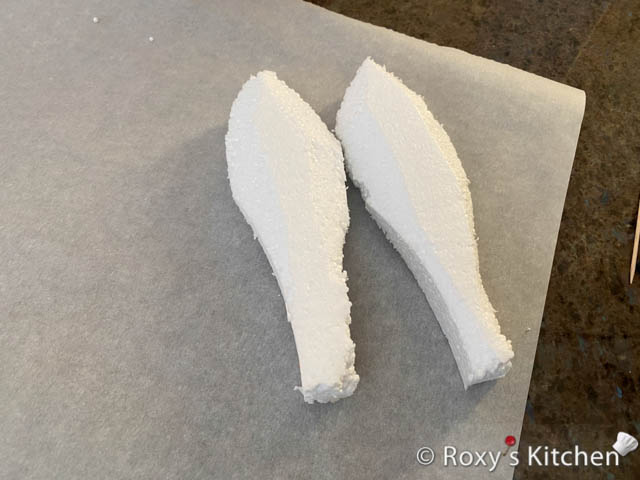
Stick two bamboo skewers in each ear, leaving at least 8 cm (3’’) out to insert them in the cake.
The ears are super tall but relatively thin. So they need to be lightweight to hold up nicely. That’s why I used styrofoam instead of regular cake.
As mentioned earlier in my post, you can also make these out of Rice Krispies Treats mixed with melted mini marshmallows – for 300 g (6 cups) of mini marshmallows use 135 g (9 cups) of Rice Krispies cereals.
Place the mini marshmallows in a bowl and heat them in the microwave for 30 seconds. Then stir and heat in 15 second intervals (stirring between) until the marshmallows are melted. Add the rice krispies and stir until the cereal is fully coated in melted marshmallows.
Grease your hands with cooking spray then shape the ears. Firmly press the rice krispies together to compact them into a firm shape. Stick two bamboo skewers in each ear, leaving at least 8 cm (3’’) out to insert them in the cake.
Cover the ears with a thin layer of ganache.
Then, roll some more yellow fondant and cover the ears. Brush a bit of water on the ganache so that the fondant sticks in place. Cover the tip of the ears with black fondant.
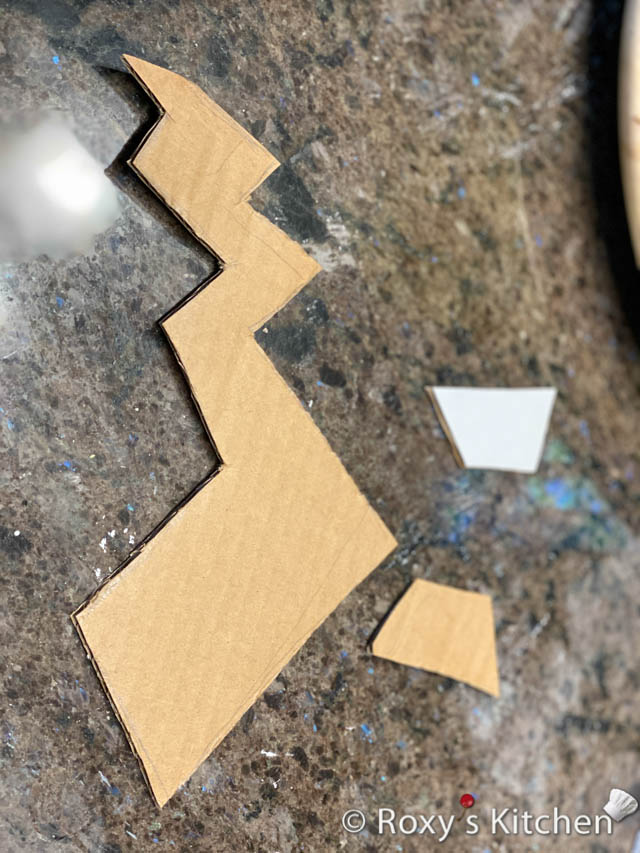
For the tail, I cut out the shape out of cardboard. Then, I brushed it with some water and covered it in yellow fondant. For the tip of the tail, roll some black fondant and cut a zig-zag pattern using a sharp knife. Then, brush some water on the tip of the tail and wrap the black fondant around.
For each arm, you can place 2 smaller skewers (leaving 1/3 out) in between 2 cardboard pieces that were cut into a trapezoid shape and glue them together. Then, cover them with yellow fondant just as you did with the tail.
Making the Other Fondant Details for the Pikachu Cake
Now on to the final details! For the collar, roll out a strip of black fondant that’s about 8 cm (3’’) wide. Cut a zig-zag pattern on one side using a sharp knife. I made two pieces, one for the front and one for the back but you can also make a long one, as long as the circumference of Pikachu’s neck. Attach these to the cake using a bit of water.
Use the circle cutters to make the eyes out of black fondant and red cheeks out of red fondant. Add two tiny white dots to the eyes, I usually cut these using the small part of a round piping tip but you can just shape them with your hands too.
Make the black triangle nose and red tongue.
Make Pikachu’s feet out of yellow fondant and attach them to the cake using a bit of water.
Insert the arms in the sides of the cake.
Place the tail at the back. It just leans on the cake, I didn’t attach it with anything special. But if you want it attached, you can secure it in place by brushing a bit of water where the tail meets the cake and passing 1-2 toothpicks through the cardboard tail and cake.
Insert the ears in the cake before serving, or earlier if you have a tall enough fridge. I couldn’t fit Pikachu in my fridge with the ears on :)!
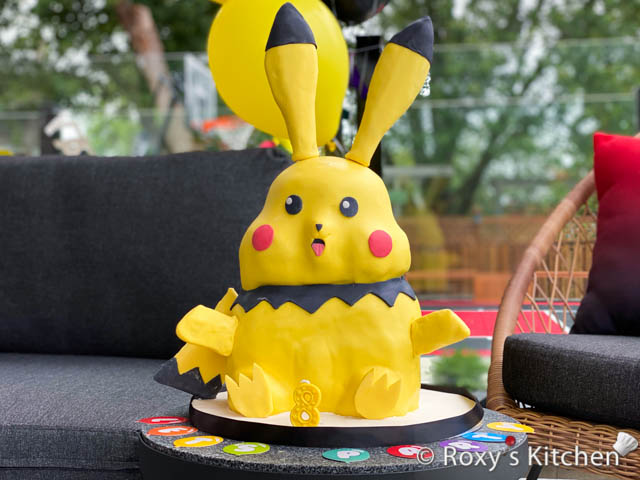
I hope you found this tutorial useful! If you give this a try, I’d love to see your cakes!


