• Home
  • About
    • Contact
    • Terms & Conditions
  • Shop
  • Go to Cart

Roxy's Kitchen

Follow Roxy on: FacebookFollow Roxy on: PinterestFollow Roxy on: E-mailFollow Roxy on: YouTubeFollow Roxy on: Instagram
  • Holidays & Events
    • Themed Parties
      • Beach / Nautical
      • Cars
      • Characters
      • For Her
      • For Him
      • Love, Marriage & Family
      • Puppy / Dog
      • Robots
      • Soccer
      • Safari / Jungle
      • Superheros
      • Trains
    • Christmas
    • Easter
    • Halloween
    • Thanksgiving
    • Valentine’s Day
  • How To’s
    • Fondant, Chocolate & Icing Decorations
    • Cake Flavours
    • Cake Frosting & Fillings
    • Breads
    • Pie & Pasta Dough
    • Canning & Preserving
    • AI-Powered Apps & Virtual Assistants
    • Others / Tips & Tricks
  • Recipes by Category
    • 5licious
    • Appetizers & Snacks
    • Breakfast
    • Bites on Boards
    • Cakes
    • Desserts
    • Drinks
    • Kid Friendly & Funny
    • Main Course
    • Salads
    • Side Dishes
    • Soups & Stews
  • Roxy’s Cakes
  • FREE & Cheap Printables

How to Transfer an Image to Fondant/Gum Paste without an Edible Printer

January 11, 2023 by Roxy

How to Transfer an Image to Fondant/Gum Paste without an Edible Printer

If you bake and decorate cakes for your family and friends most likely you don’t have an edible printer or an inkjet printer with edible ink and edible image transfer sheets / wafer paper. In this post I’ll teach you how to transfer an image to fondant/gum paste without an edible printer.

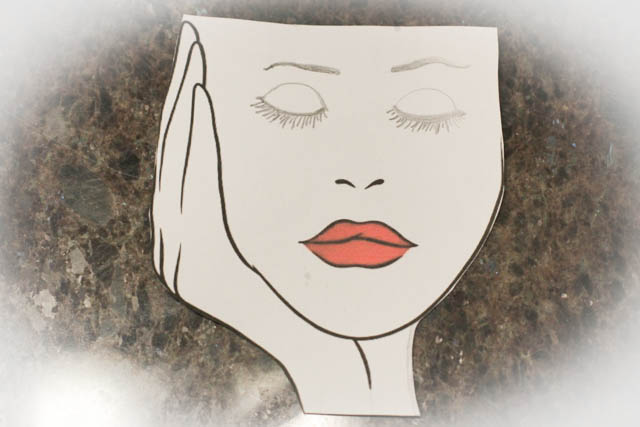
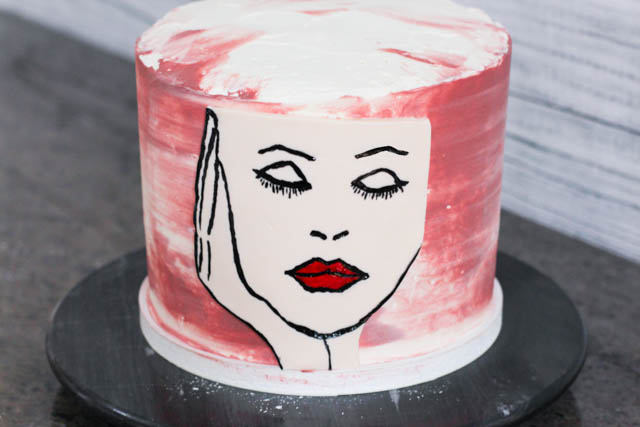
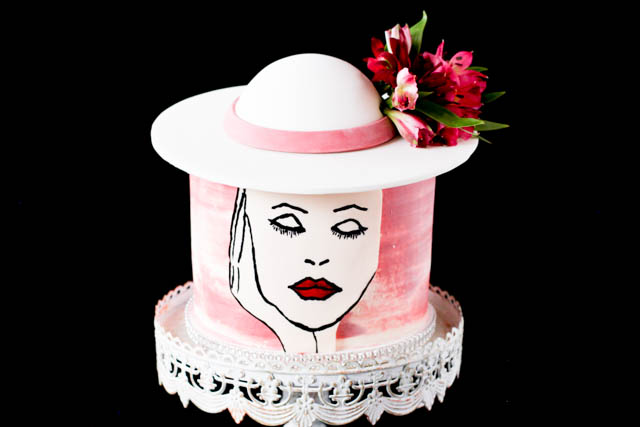
You will be hand painting (with some support) so the image you choose can be as detailed as you think your steady hands can handle. I chose a simple image of a lady’s face for my Lady with a Hat cake I made for my birthday. 

You can transfer the image to gum paste as it dries out faster. If you don’t have gum paste, you can also use regular fondant mixed with a bit of Tylose or CMC powder if you want your decorations to hold their shape and dry out faster. If not, regular fondant works too. 

Ingredients/Tools

  • drawing or image of choice
  • gum paste or fondant mixed with Tylose or CMC Powder (e.g. for 250g fondant mix in 1 teaspoon of tylose powder) 
  • rolling pin
  • corn starch or powdered sugar for dusting 
  • X-acto knife or a very sharp knife 
  • gel food colours + 1 drop of Vodka that needs to be mixed with each color you use – I used black and red colours 
  • thin brush for painting or food-safe markers 
  • A fondant/gum paste modelling tool that has a pointed end – e.g the dresden/veining tool, a small frilling tool that has a rounded end and a pointed end; if you don’t have any of these, use a skewer or the painting brush handle if it has a thin and round tip 

Directions

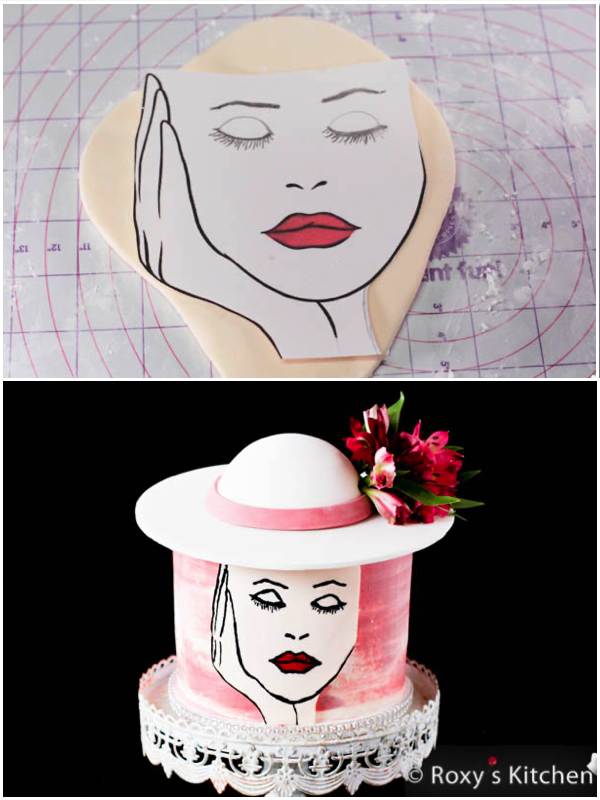
Firstly, draw or print out the image you chose to transfer to fondant. I used a lady face image I found online and enhanced it by drawing eyes and eyebrows to make the cake I envisioned.

Firstly, draw or print out the image you chose to transfer to fondant.

Cut out your image. 

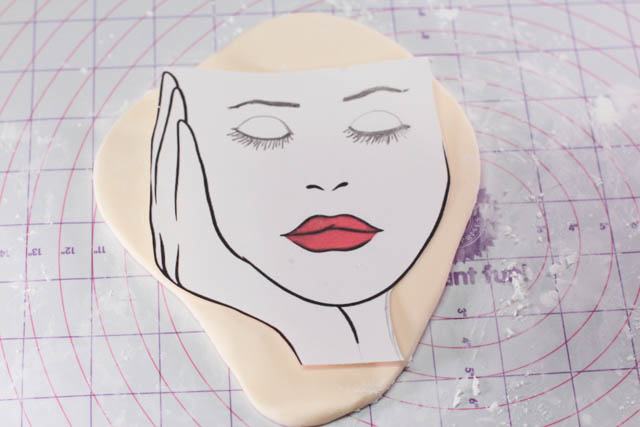
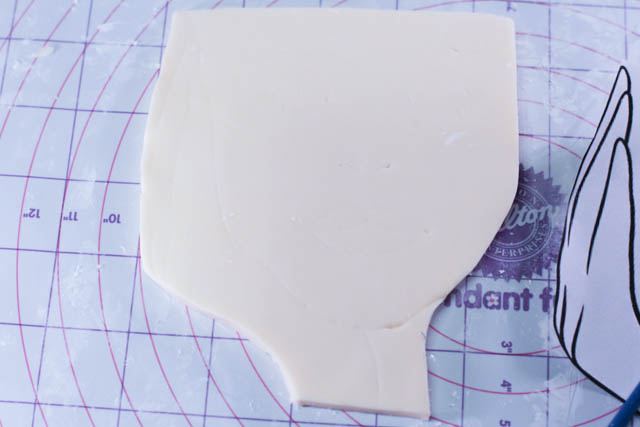
Knead your gum paste or fondant mixed with Tylose Powder until it has a workable consistency and it doesn’t feel and look dry.  I used white gum paste mixed with a drop of Ivory Wilton gel food colour. 

Dust your working surface with cornstarch and roll the gum paste around 3mm thick.

Place your cut-out image on the fondant. Cut out the outline with the X-acto knife. 

Place your cut-out image on the fondant. Cut out the outline with the X-acto knife. 

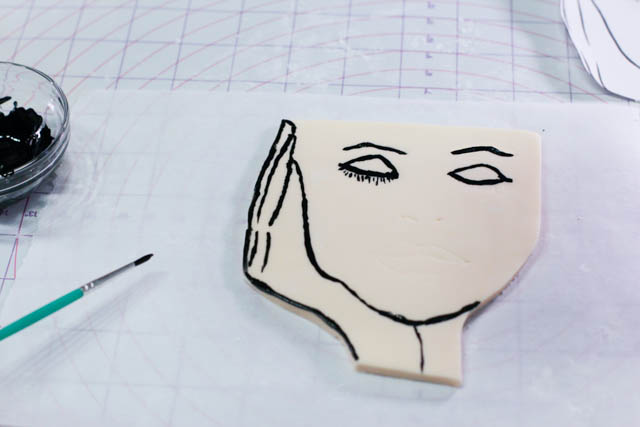
Then, use the pointed end of your fondant tool to trace over the outline of your drawing and every single detail. Press just enough so that it leaves a mark on the gum paste. 

Then, use the pointed end of your fondant tool to trace over every line of your drawing, pressing just enough so that it leaves a mark on the gum paste. 
Fondant with marked outline.

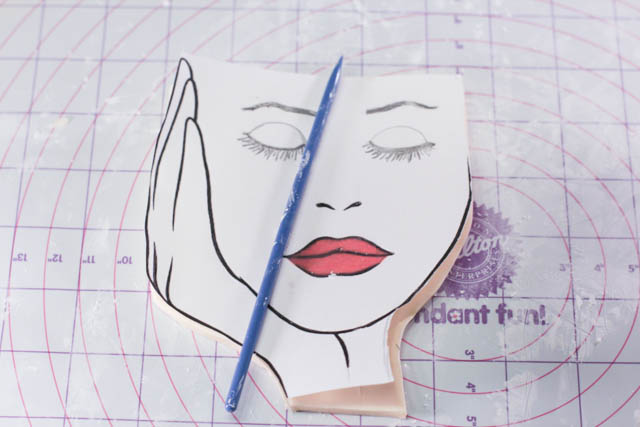
Another way to do this is to use a pin and prick through your drawing, spacing the pricks 2-4mm apart. Later on you will paint the outline by connecting the dots you made. 

Now the only thing you need is a steady hand to paint over the outline you created! 

Paint over the outline you traced using black gel food colouring mixed with 1 drop of Vodka. Or use a black food-safe marker to do this if you find it easier.

Paint over the outline you traced using black gel food colouring mixed with 1 drop of Vodka.

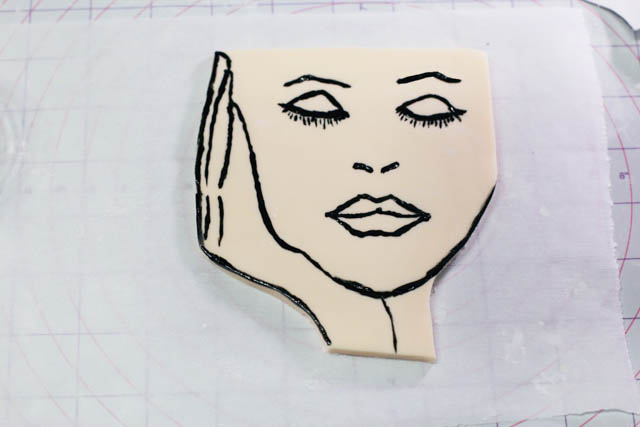
Paint all the details of your image. Let it dry for at least 12 hours if you want your decoration to hold its shape. 

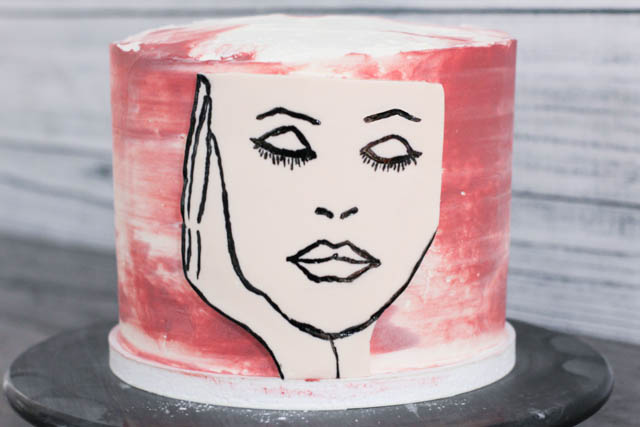
Because I wanted my gum paste image to be wrapped a bit around the cake, I placed it right away on the cold cake. My cake was covered with this ganache buttercream frosting but it can be covered with ganache only or buttercream only. 

Brush a bit of water on the back of the gum paste image so that it sticks to the cake safely. Place it carefully without touching the outline you just painted.  

I added the final touches, by painting the lips red, after I attached the image to the cake. 

Attach image decoration to the cake.
Paint the final touches by making the lips red.
Lady with a Hat Cake - How to Transfer an Image to Fondant/Gum Paste without an Edible Printer

Video – How to Transfer an Image to Fondant/Gum Paste without an Edible Printer

Print Friendly, PDF & Email

YOU MAY ALSO LIKE:

How to Make Fondant/Gum Paste Butterflies 

Monkey & Bananas Cake Topper

How to Make Honey Fondant for Covering and Decorating Cakes

Fondant Bow Topper

Share this:

  • Print (Opens in new window) Print
  • Email a link to a friend (Opens in new window) Email
  • Tweet
  • Share on Reddit (Opens in new window) Reddit
  • Share on Tumblr

Filed Under: Fondant, Chocolate & Icing Decorations, How To's Tagged With: cake decorations, edible image, edible picture, fondant decorations, how to transfer image to fondant, how to transfer image to gum paste

FREE & Cheap Printables

  • Sale Product on sale
    Black & Gold Happy Birthday Cake & Cupcake Toppers
    Black & Gold Happy Birthday Cake & Cupcake Toppers
    $5.00 Original price was: $5.00.$2.50Current price is: $2.50.
    Add to cart
  • Sale Product on sale
    Colorful Happy Birthday Cake & Cupcake Toppers
    Colorful Happy Birthday Cake & Cupcake Toppers
    $5.00 Original price was: $5.00.$2.50Current price is: $2.50.
    Add to cart
  • Sale Product on sale
    Printable Ice Hockey Cake & Cupcake Toppers
    Ice Hockey Cake & Cupcake Toppers
    $12.24 Original price was: $12.24.$9.52Current price is: $9.52.
    Buy product
  • Ice Hockey Coffee Mug
    Ice Hockey Coffee Mug
    $19.99
    Buy product
  • Sale Product on sale
    Ice Hockey Cupcake Toppers (2'') - 12 Designs
    Ice Hockey Cupcake Toppers (2”) – 12 Designs
    $10.20 Original price was: $10.20.$5.10Current price is: $5.10.
    Buy product
  • Sale Product on sale
    Ballerina Cake & Cupcake Toppers
    Ballerina Cake & Cupcake Toppers
    $8.16 Original price was: $8.16.$6.12Current price is: $6.12.
    Buy product
  • Dancing Ballerina Coffee Mug
    Dancing Ballerina Coffee Mug
    $19.99
    Buy product
  • Valentine's Day Cake & Cupcake Toppers
    Valentine’s Day Cake & Cupcake Toppers
    $6.00
    Add to cart

Themed Birthday Parties

Soccer-Themed Party Games

Soccer-Themed Party Games

Banana Minions

Banana Minions

Wedding Anniversary Cake – Chocolate Cake with Wild Berries Mousse & Chocolate Mousse

Thanksgiving Cake – Vanilla Cake with Chocolate & Mascarpone 

Thanksgiving Cake

More Posts from this Category

Recent Posts

Easiest Way to Make Number Cakes – No Special Pans & No Cake Waste

Easiest Way to Make Number Cakes - No Special Pans & No Cake Waste - Free 0 to 9 Number Templates Included

Quick & Easy Chocolate Mint Ice Cream

Quick & Easy Chocolate Mint Ice Cream

100+ Ballerina & Tutu-Themed Cake Designs

100+ Ballerina & Tutu-Themed Cake Designs

How to Naturally Dye Easter Eggs Blue

How to Naturally Dye Easter Eggs Blue

Copyright © 2026 · Lifestyle Pro Theme on Genesis Framework · WordPress · Log in