


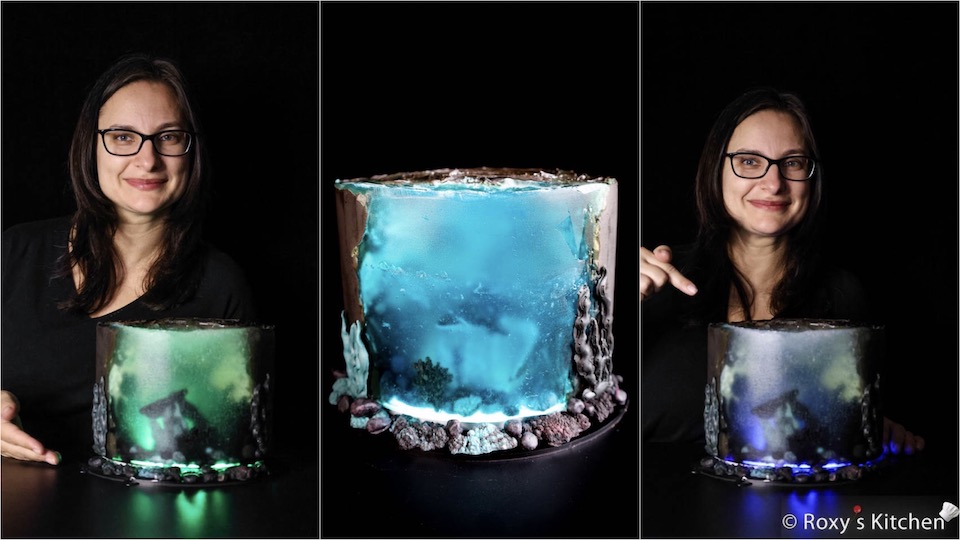
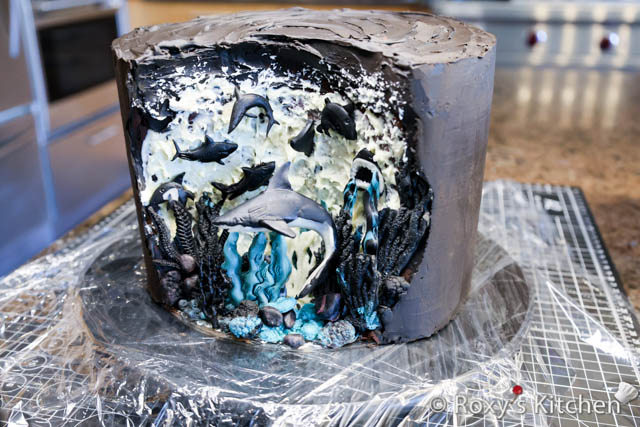
I finally got the chance to experiment making an Illuminated Underwater Cake with sharks, seaweed, corals and other underwater decorations. I’ve been generating underwater cake designs with luminescent effects using Artificial Intelligence (AI)-powered apps. You can read more about these AI-powered apps in my prior post. You’ve probably seen lots of these cakes on social media lately as well. So, I was truly inspired by all those amazing-looking underwater cakes that glow hence why, I started experimenting. I’m happy with my first attempt and how the cake turned out (1st and 2nd versions as you will see later); however, I look forward to using what I’ve learned so far to make them even better (i.e. more transparent to see all the underwater details).
The water-like look is made using a mixture of water, gelatine, lemon juice, sugar, Sprite and a touch of food colouring. I wanted to use Sprite to get some realistic-looking underwater bubbles. I created two versions of the cake and I’ll explain all the details below.
1st version:
2nd version:

The glowing or illuminated effect is made by placing the carved cake on a transparent acrylic cake board and adding a source of light underneath.
Ingredients/Tools
Moist Chocolate Cake
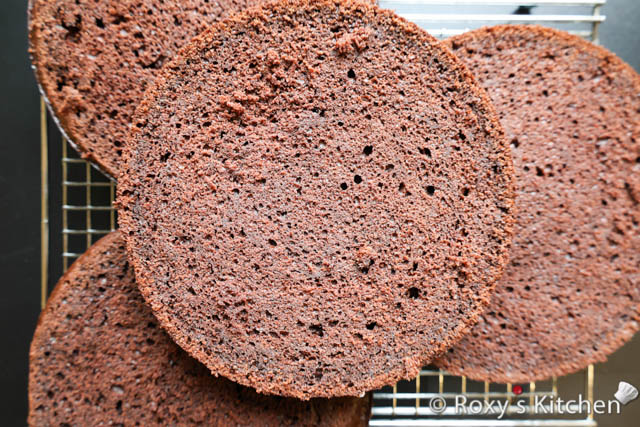
Follow the directions in this Moist Chocolate Cake recipe and the ingredients below to make 4 20 cm (8 inch) cake layers. You can divide the batter between two pans and then cut each cake horizontally in two. I baked 1 taller cake in a 7.6 cm (3’’) tall pan which I cut in two and 2 cake layers in 2 other 5 cm (2’’) tall pans.
- 8 eggs
- 550 g sugar
- 295 ml vegetable oil
- 295 ml brewed coffee, room temperature
- 500 g yogurt
- 600 g all purpose flour
- 100 g cocoa powder
- 1.3 Tbsp baking powder
- 3/4 Tbsp baking soda
- a pinch of salt
Sugar Syrup to Moisten the Cake
- 300 ml water
- 7 Tbsp sugar
- 3 Tbsp vanilla extract + a few drops of strawberry or raspberry-flavoured baking oils (I use Lorann Oils)
Prepare the simple sugar syrup by boiling the water with sugar. Then, add the flavours when it starts boiling and remove from the heat. Let it cool off.
Chocolate Walnut Filling
Make the Chocolate Walnut Filling using the directions in this recipe and these ingredients:
- 350 g semi-sweet chocolate (baking or couverture chocolate)
- 700 ml whipping cream
- 200 g walnuts
I also used 200 g of raspberry jam which I divided into three and spread on each cake layer before spreading the chocolate walnut filling.
Unwhipped Chocolate Ganache / Firm Frosting for Covering the Cake
Make Unwhipped Chocolate Ganache / Firm Frosting by following the instructions in this recipe and the ingredients below.
Dark chocolate ganache:
- 1 kg semi-sweet chocolate (baking or couverture chocolate)
- 500 ml whipping cream
- black oil-based food colouring to make a thin layer of black ganache; I use the ones from Colour Mill
White chocolate ganache:
- 88 g semi-sweet chocolate (baking or couverture chocolate)
- 25 ml whipping cream
Modeling Chocolate Underwater Decorations
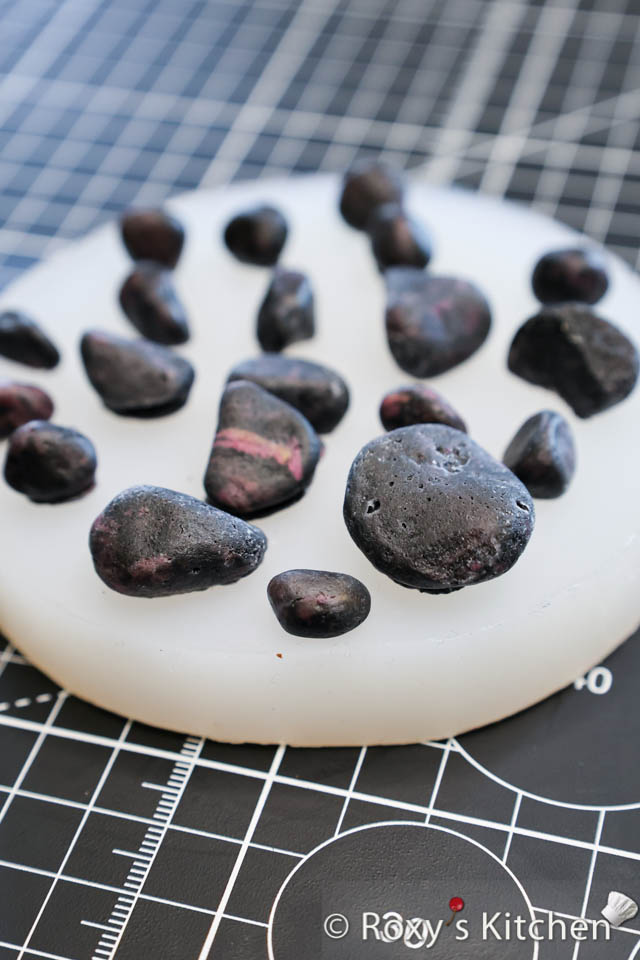
I made all the underwater decorations – sharks, seaweed, rocks, corals – using homemade modeling chocolate (mostly black and teal colours) and silicone molds. You can find the recipe for modeling chocolate here and a post on How to Make Realistic-Looking Rocks or Pebbles.
Here are some of the silicone molds used:
Note that for the second version of the cake, I made the decorations using fondant. I would not recommend using fondant as the decorations at the bottom might start melting away and dripping out of your cake.
To make the decorations, some fondant/chocolate modeling tools will be useful to have (e.g. the blade tool, the ball tool, leaf shaping pointy tool, small spatula).
Water
- 56 g unflavoured gelatine
- 500 ml water
- 500 ml Sprite
- 210 g sugar
- 55 ml lemon juice
- Wilton sky blue gel food colouring
Note that this quantity is enough to fill the carved part of the cake. Mine had a depth of ~ 4 cm (1.5’’) and was 15.5 cm (6’’) wide and 15.5 cm (6’’) tall and had a semicircle kind of shape plus all the decorations in. You might need to adjust the ingredients if the volume of the carved part is different.
Tools/Supplies to Make Your Cake Glow/Illuminated
- 21 cm (8’’) transparent acrylic board
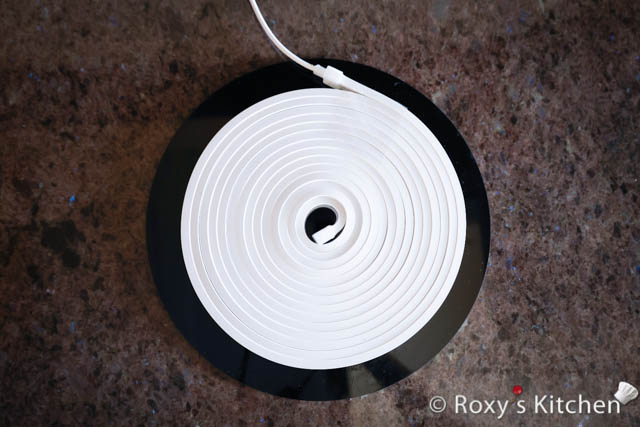
- colour changing silicone flexible neon strip – I have this one which is great as you can roll it easily and place it under the cake board
Other Tools/Items
- a serrated knife for carving the cake
- an adjustable tall ( 15 cm / 6’’) cake ring and a PTFE teflon sheet for lining the cake ring / wrapping around the cake before pouring the gelatine mixture; you can also use acetate sheets to line your cake ring instead of the PTFE teflon sheets but lightly grease them so that the gelatine doesn’t stick to them
- plastic wrap
- scotch tape
- 25 cm (10’’) cake board or flat cake platter; I used a black acrylic cake board but it doesn’t matter what you use
Directions
Make, Fill and Assemble Your Cake
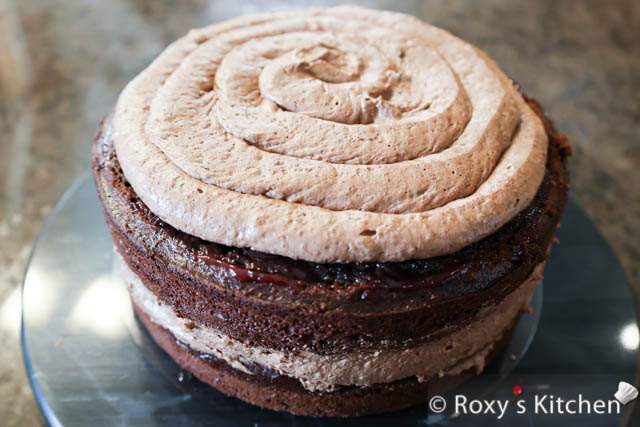
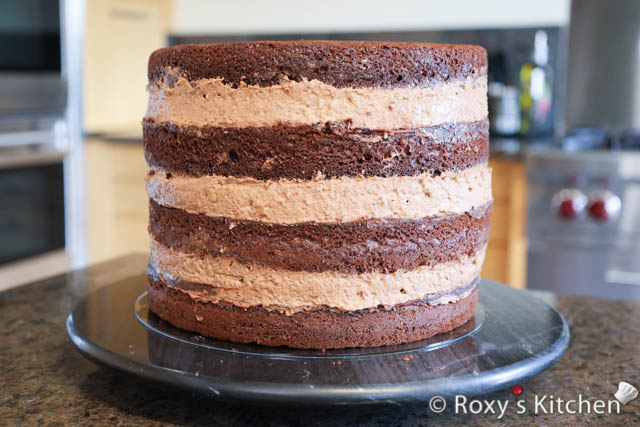
Make the cakes and the filling based on the recipes and instructions above. Cut the dome of the cakes using a serrated knife. Cut and level each cake layer.
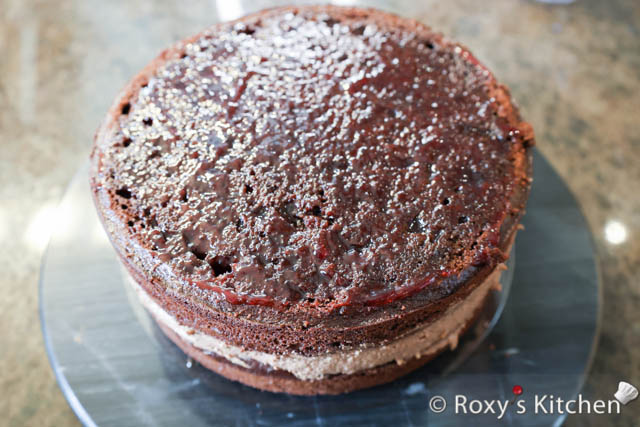
Then, spread a bit of frosting in the middle of the transparent acrylic cake board and place your first cake layer on top. Spread raspberry jam on top and pipe a layer of chocolate walnut filling. Then, place another cake layer on top. Fill and stack the rest of your cake – cake layer moistened with sugar syrup, raspberry jam, chocolate walnut filling etc..
Ensure the cake is levelled. You might need to press down on the side that is higher to help move the frosting around and level the cake.
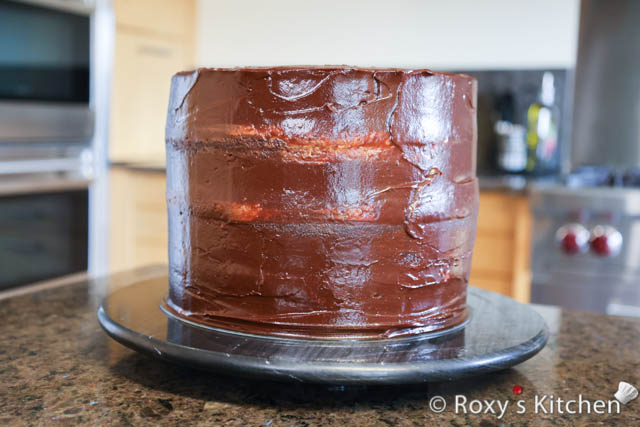
Cover Your Cake & Carve It
Make Unwhipped Chocolate Ganache / Firm Frosting out of semi-sweet chocolate by following the instructions in this recipe.
Crumb coat the stacked cake with a thin layer of the ganache. Your ganache needs to be cool to the touch and have a thick pouring consistency (like peanut butter or Nutella).
Refrigerate the cake for 1 hour.
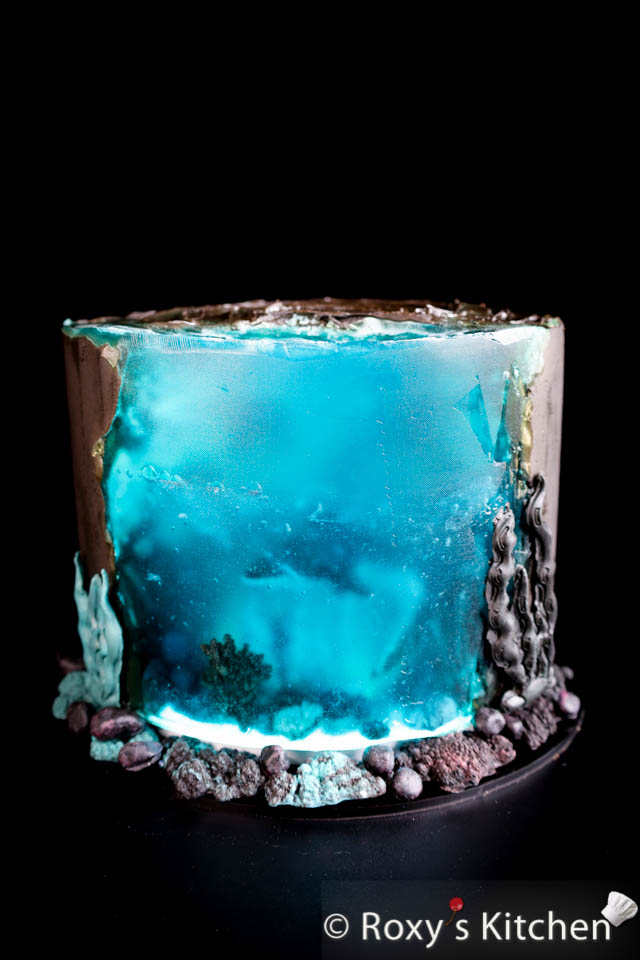
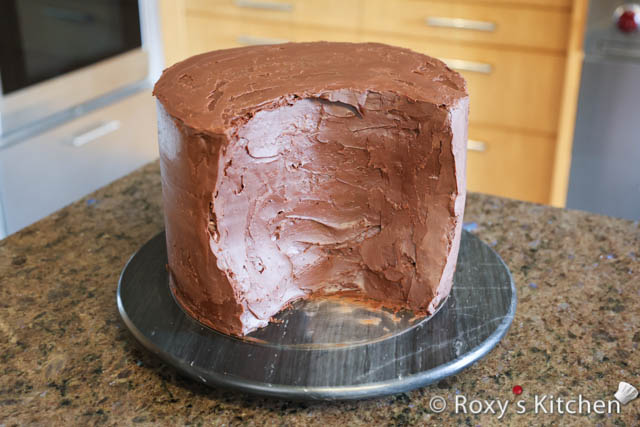
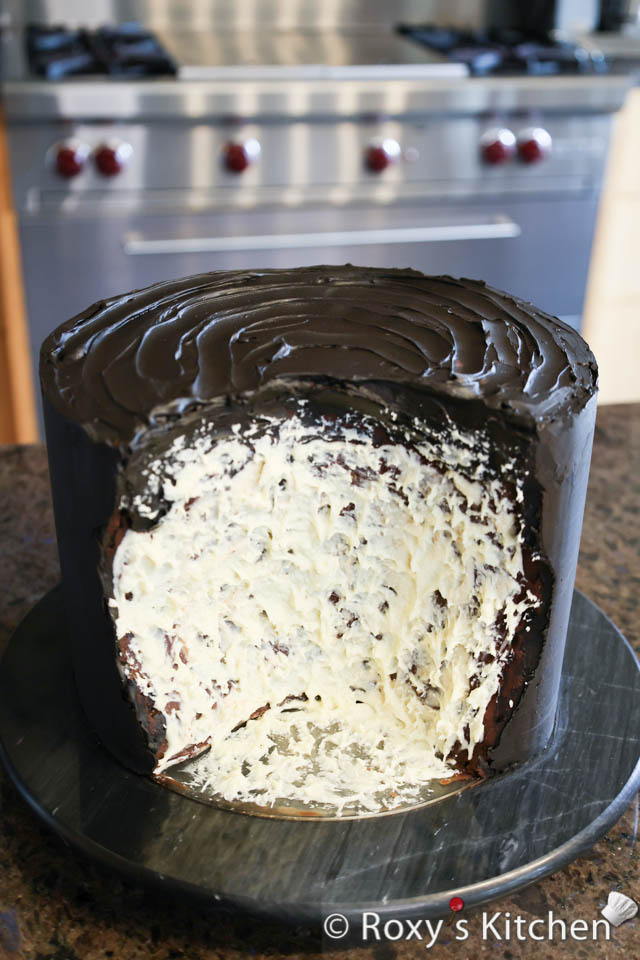
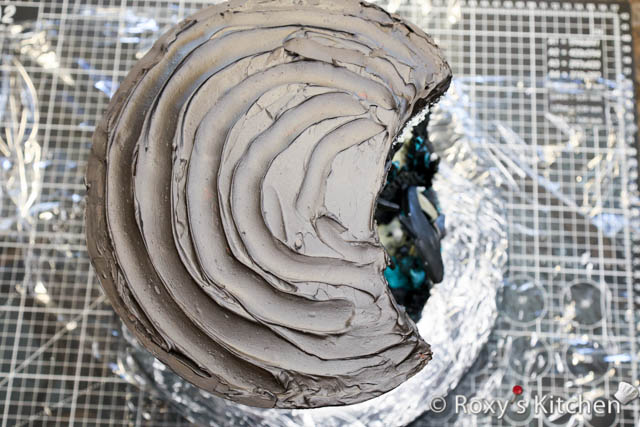
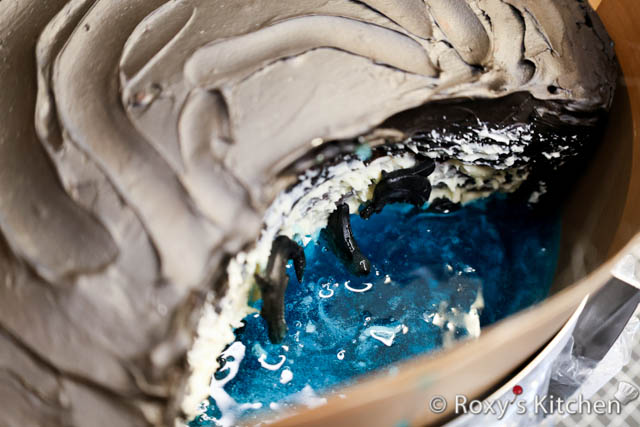
Use a serrated knife to carve out a semi circle like in the picture below. Mine had a depth of ~ 4 cm (1.5’’) and was 15.5 cm (6’’) wide and as tall as the cake, 15.5 cm (6’’).
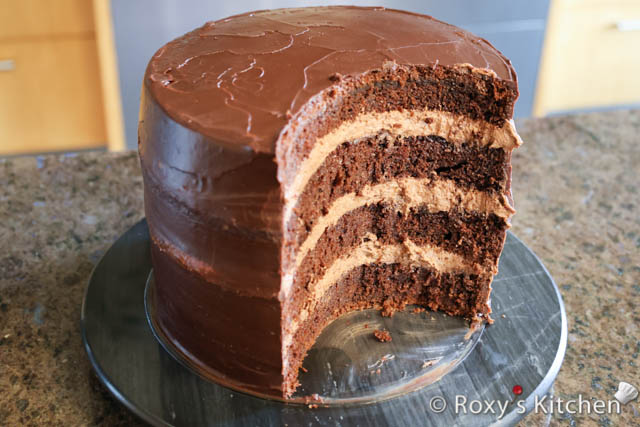
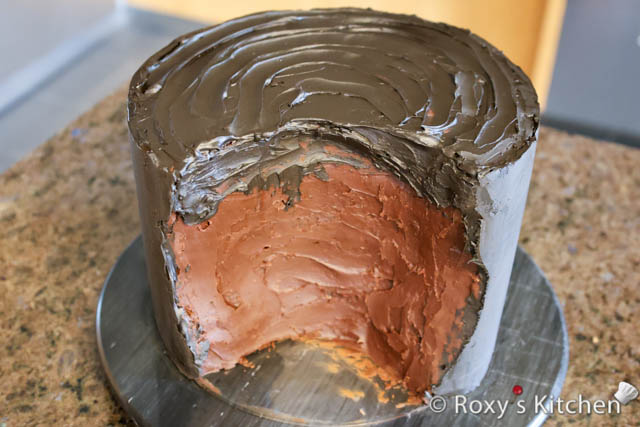
Apply a thicker layer of semi-sweet chocolate ganache and smooth it out using a spatula and a cake scraper / smoother. Use an offset spatula to smooth the top and use a cake scraper to smooth the sides. Don’t use all the ganache, save about 1/4 of the chocolate ganache in which you will add black oil-based food colouring to make the black ganache.
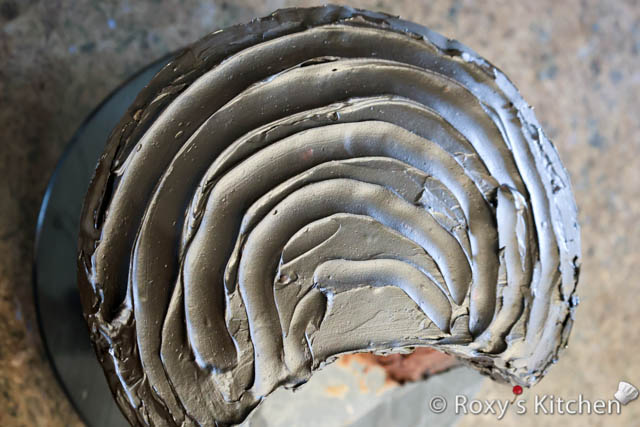
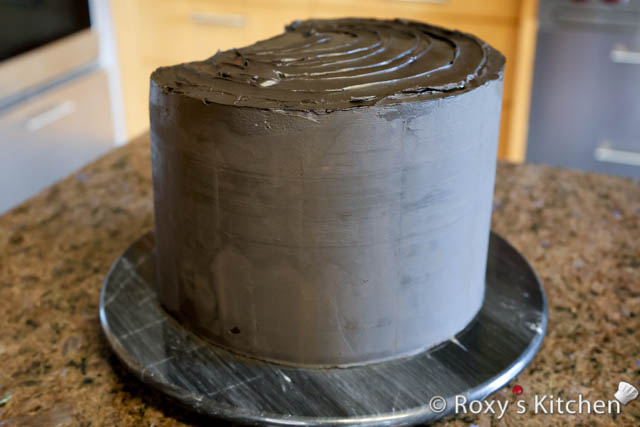
Refrigerate the cake for 30 minutes. Then, apply the last layer of black chocolate ganache and smooth it out very well using the offset spatula and cake scraper / smoother.
A few tips:
- once smooth, the little ganache that’s left over the edges can be taken off with a sharp knife
- if your ganache becomes too stiff, place the ganache in the microwave for 5-10 seconds and stir with a spatula
- if the ganache on your cake sides is not very smooth, you can dip the cake scraper in hot water to get smooth sides
Make the Underwater Decorations
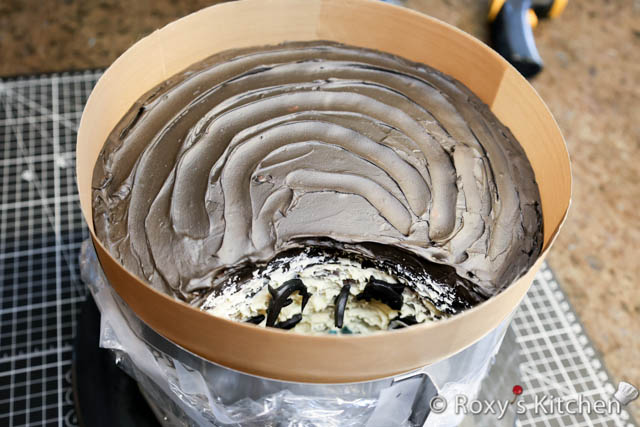
Make a bit of Unwhipped Chocolate Ganache / Firm Frosting out of white chocolate by following the instructions in this recipe. Once it has a thick pouring consistency, apply a thin layer of ganache in the cavity you carved and then gently dab a folded piece of paper towel on it to give it a rougher look. I applied very little white chocolate ganache on the acrylic board that’s visible too. Note that you should have clear parts on the acrylic board (not covered in chocolate nor decorations), otherwise the light you will place under the cake board will not pass through and will be useless.
As mentioned before, I made all the underwater decorations – sharks, seaweed, rocks, corals – using homemade modeling chocolate and silicone molds. You can find the recipe for modeling chocolate here.
The process to use the molds is pretty straight forward. You knead your modeling chocolate, press it into the mold using your hands and fondant/chocolate modeling tools. You then use a blunt blade to remove the excess; if you use a knife you might cut your silicone mold. Lastly, you let the chocolate harden and then carefully take it out of the mold.
Here are some of the silicone molds used:
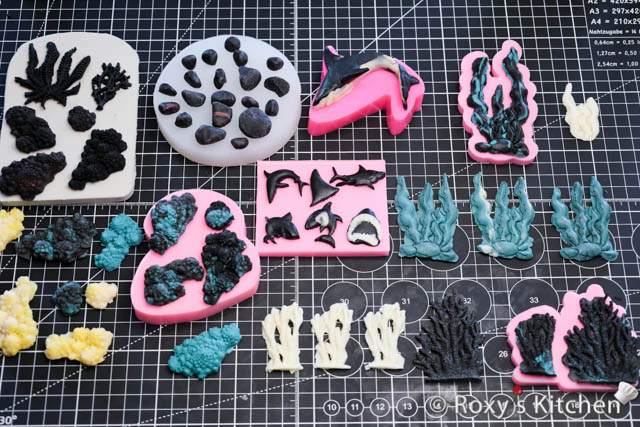
Here is a more detailed post on How to Make Realistic-Looking Rocks or Pebbles.
Note that for the second version of the cake, I made the decorations using fondant. I would not recommend using fondant as the decorations start melting away and dripping out of your cake.
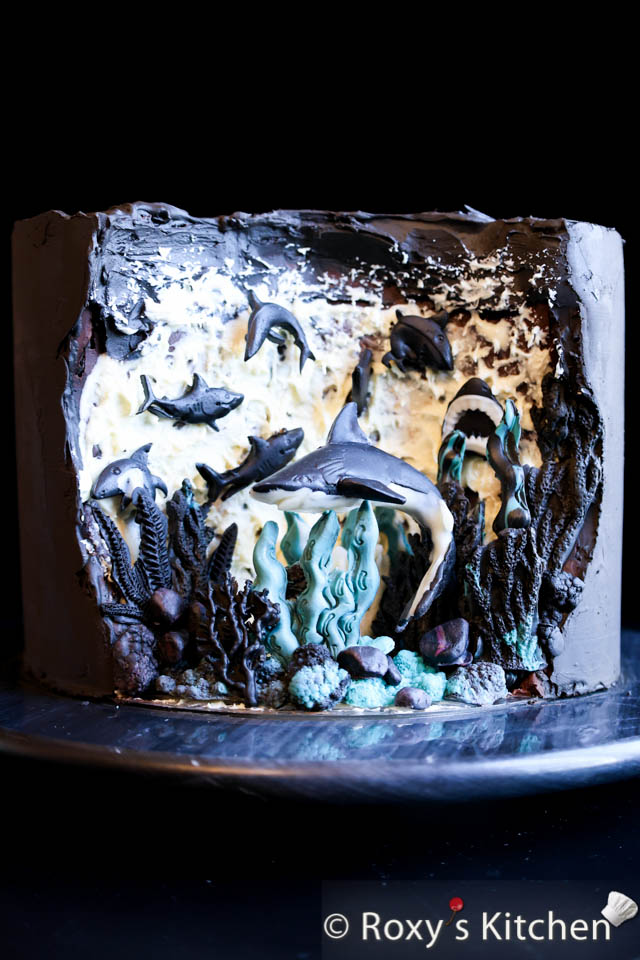
Place all the underwater sharks, seaweed, rocks, moss etc. on the cake. You can attach them with a bit of melted chocolate. For the big shark in the middle, I created a base out of modeling chocolate and then inserted he end of a toothpick in this and the other end in the shark. Ideally, you should cover the toothpick in a bit of melding chocolate so it’s not visible. You can also completely skip using the toothpick and just place the shark on the base. Then, add some seaweed in front to mask the base and make it look like the shark is floating / swimming.
Again, note that you should have enough clear parts on the acrylic board (not covered in decorations), otherwise the light from the neon strip you will place under the cake board will not pass through and will be useless.
Make the Water with Gelatine
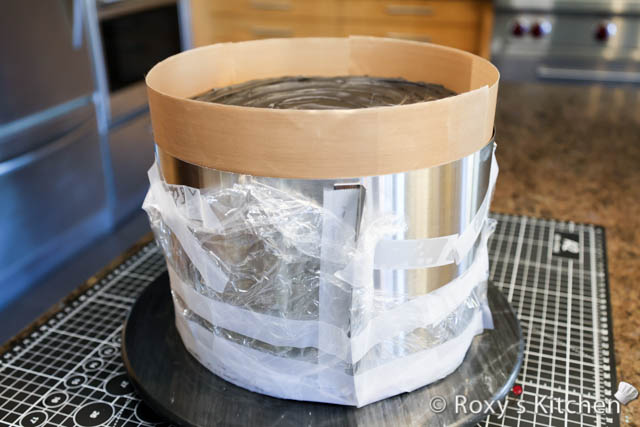
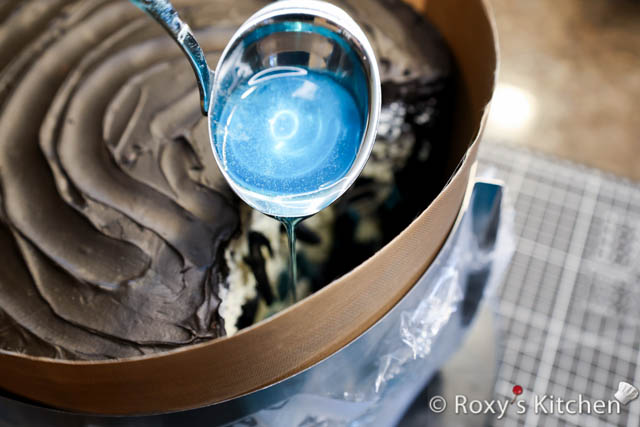
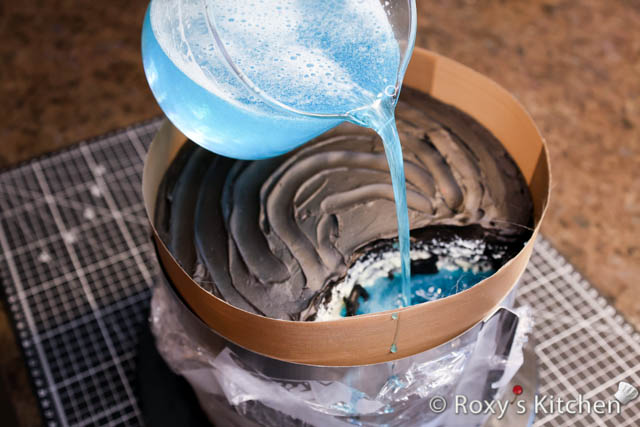
Firstly, get your cake ready. Place plastic wrap on a bigger and flat cake board or cake platter; make sure you leave the plastic wrap hanging around the sides. Place the cake on top. Then, wrap the PTFE teflon sheet around the cake and place the cake ring around. Tighten the cake ring around the cake.
Lift the plastic wrap that’s hanging around the cake and tightly press it against the cake ring. Wrap scotch tape around the base very tightly. You don’t want any gaps at the bottom (or holes in your plastic wrap) as the gelatine will come out around the edges and that’s not what we want.
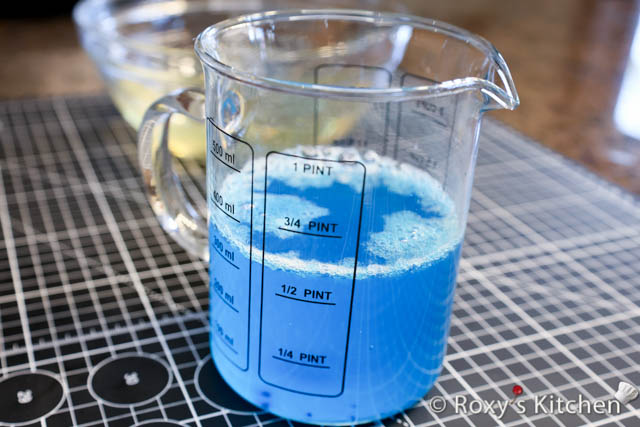
To make the water, soak the gelatine in the water for 15-20 minutes.
In the meantime, mix the Sprite with the lemon juice and the food colouring. Tips for how much food colouring to use:
- Dip 1/3 of a toothpick in blue gel food colouring to achieve this blue colour and look like in my first version of the cake; the more food colouring you add, the less transparent your water will be so your decorations won’t be visible so be careful how much you add
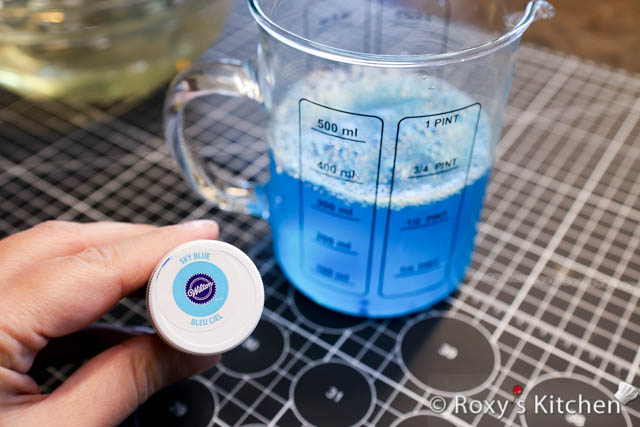
- Dip the tip of a toothpick very little (like half a pencil tip) in blue gel food colouring to achieve this greenish colour and look like in my second version of the cake
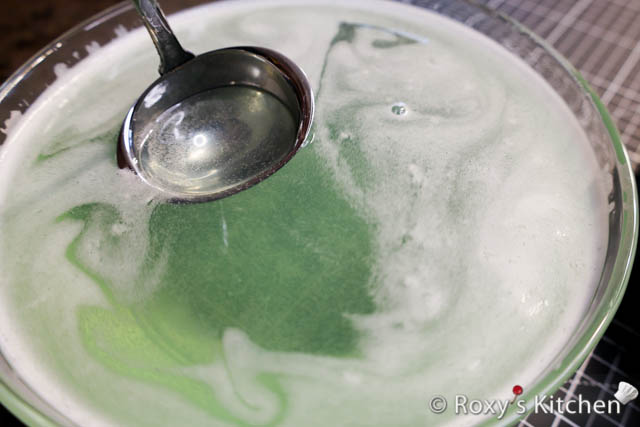
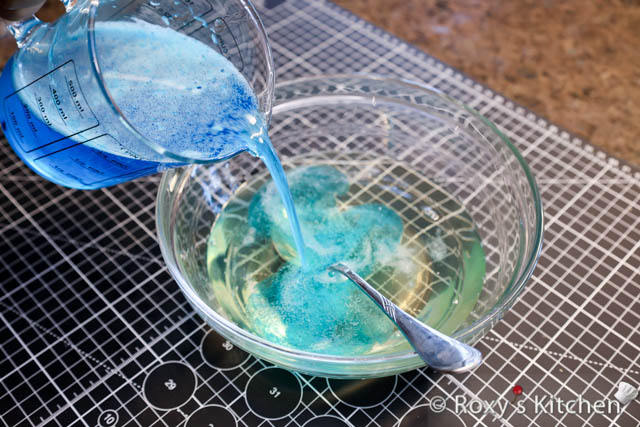
Melt the gelatine in the microwave until it reaches 140°F (60°C). Add the sugar over and mix until it’s fully dissolved. Slowly pour 1/5 of the melted gelatine over the Sprite mixture while mixing. Then, combine everything with the rest of the melted gelatine.
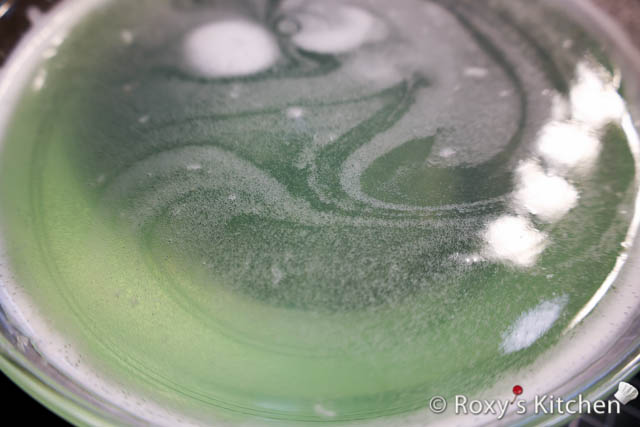
Pour the gelatine water (using a laddle might be easier) in the cake cavity but only once it cools off. It needs to feel cold to the touch and around 80-81°F (26-27°C) but still liquid and not set. Keep mixing the gelatine until it cools off, otherwise the gelatine on the top will start setting and you will have blobs of gelatine once you mix it and pour it. I had a bit of this for the first version of the cake.
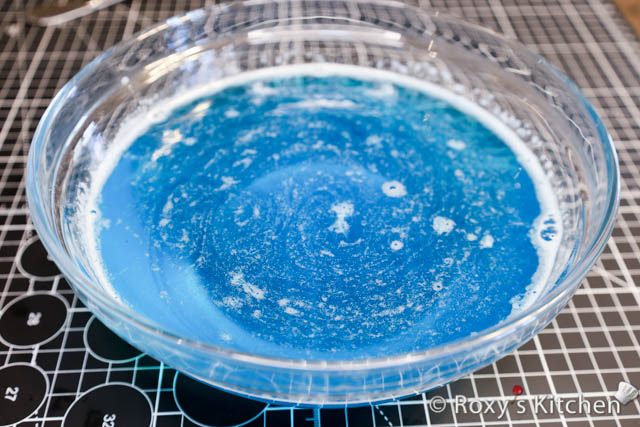
If you mix it too much, there will be too many bubbles and fuzziness from the Sprite. I had this happen when I made the second version of the cake.
Note that the fuzzy bubbles from the soda will make your water cloudier / less transparent. Lessons learned for me. The next time I’ll be making a cake like this, I will try a few other things:
- replacing the Sprite with water, or
- opening the can of Sprite 30 minutes before using it so that most of the gas escapes while also trying to not mix the gelatine as much or as fast while the gelatine & Sprite mixture cools off
Place your cake in the fridge and let the gelatine set for at least 4-5 hours or overnight.
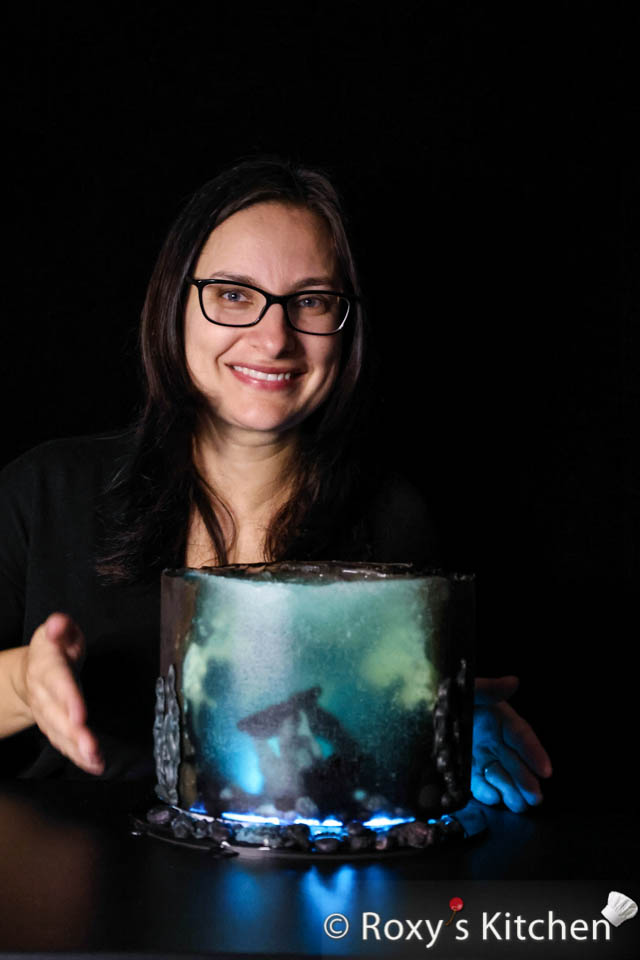
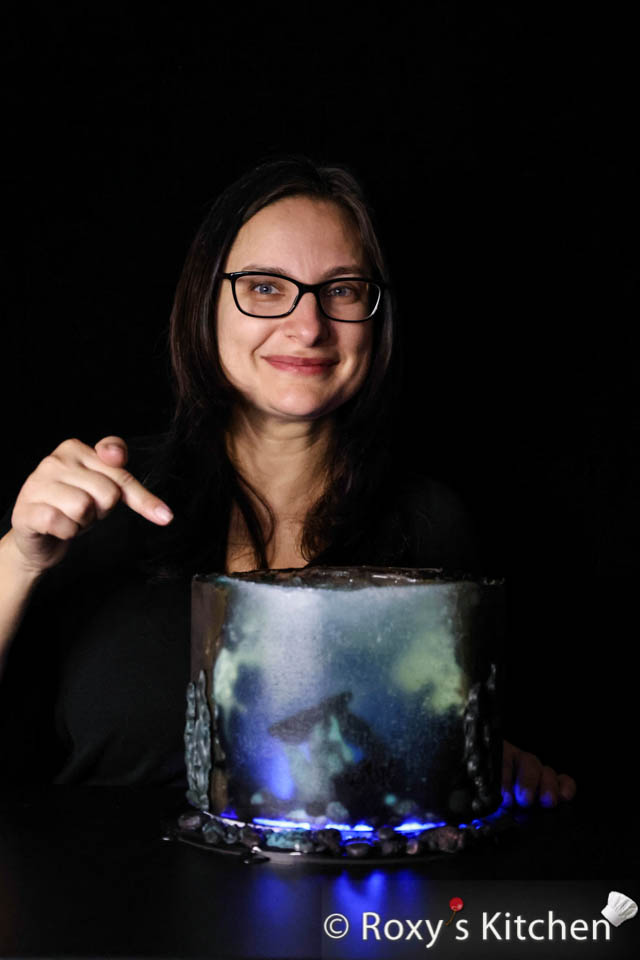
Make Your Underwater Sharks Cake Glow/Illuminated
Remove the cake from the fridge and remove the cake ring. Then, slowly remove the teflon sheet. This won’t stick to your cake but you have to slowly remove it from one side to the other.
Place your rolled colour changing silicone flexible neon strip on the bigger cake board or platter. Carefully lift your cake and place it on the neon strip.
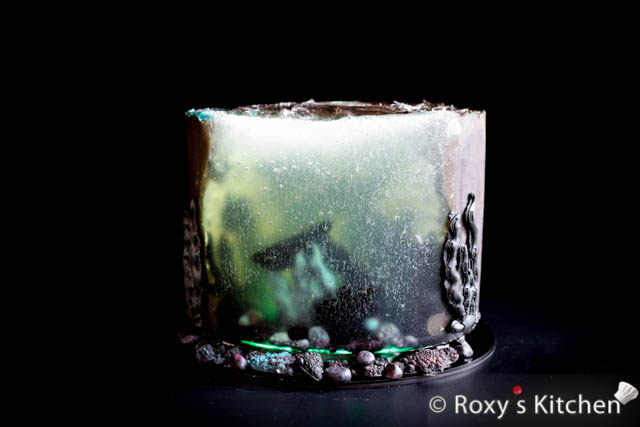
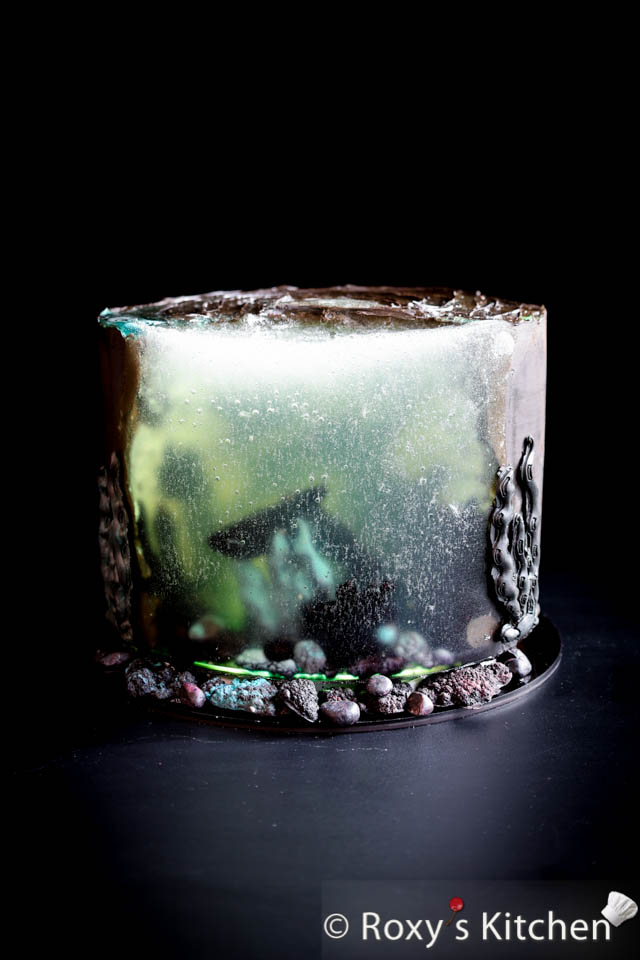
The look of the first version of the cake, with more blue food colouring, during daytime:

The look of the second version of the cake, with less blue food colouring, during daytime:
The look of the second version of the cake, with less blue food colouring, during nighttime and a small photography light just so that I can take pictures:

The lights are pretty fun to play with to give your cake such different looks and shades. And, as you can imagine, the light will be much more visible during the nighttime.
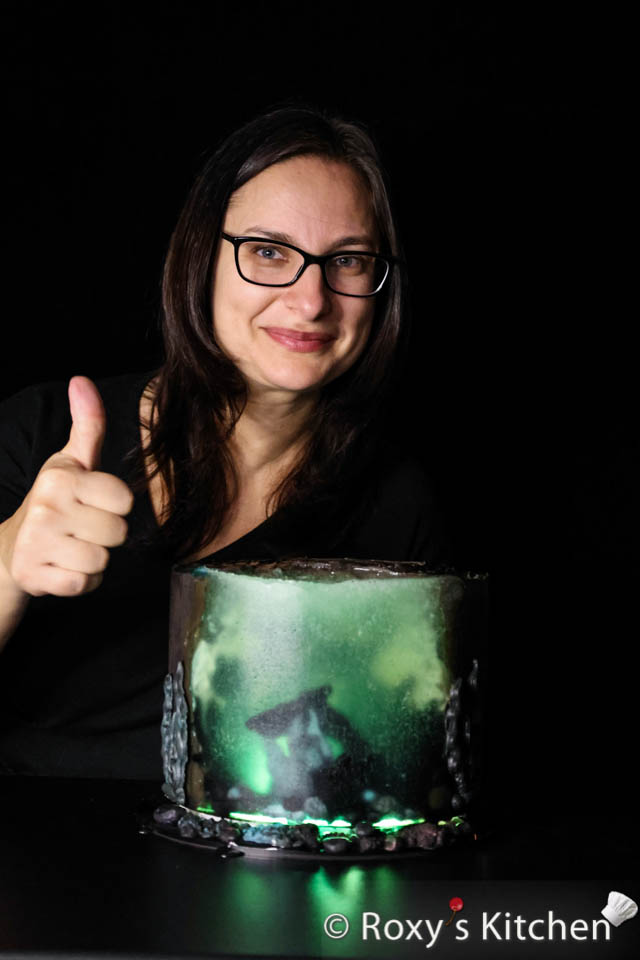
The small sharks at the back are not really visible as the water was a bit fuzzy and/or cloudy. So use the tips I provided above when making the gelatine and you will get even better results that I did ☺️.
I hope you found this tutorial useful. Leave your comments below if you have any thoughts or questions.
Videos – Illuminated Underwater Sharks Cake
This post contains Amazon.com affiliate links for products I used to make this cake.

