• Home
  • About
    • Contact
    • Terms & Conditions
  • Shop
  • Go to Cart

Roxy's Kitchen

Follow Roxy on: FacebookFollow Roxy on: PinterestFollow Roxy on: E-mailFollow Roxy on: YouTubeFollow Roxy on: Instagram
  • Holidays & Events
    • Themed Parties
      • Beach / Nautical
      • Cars
      • Characters
      • For Her
      • For Him
      • Love, Marriage & Family
      • Puppy / Dog
      • Robots
      • Soccer
      • Safari / Jungle
      • Superheros
      • Trains
    • Christmas
    • Easter
    • Halloween
    • Thanksgiving
    • Valentine’s Day
  • How To’s
    • Fondant, Chocolate & Icing Decorations
    • Cake Flavours
    • Cake Frosting & Fillings
    • Breads
    • Pie & Pasta Dough
    • Canning & Preserving
    • AI-Powered Apps & Virtual Assistants
    • Others / Tips & Tricks
  • Recipes by Category
    • 5licious
    • Appetizers & Snacks
    • Breakfast
    • Bites on Boards
    • Cakes
    • Desserts
    • Drinks
    • Kid Friendly & Funny
    • Main Course
    • Salads
    • Side Dishes
    • Soups & Stews
  • Roxy’s Cakes
  • FREE & Cheap Printables

How to Use a Chocolate Spray Gun on Cakes – Sand, Turf, Velvet Effect 

January 26, 2024 by Roxy

How to Use a Chocolate Spray Gun on Cakes - Sand, Turf or Velvet Effect - Soccer Cake, Spider Cake, Blue/Navy Wedding Anniversary Cake

Transforming a simple cake into a work of art is every baker’s dream, and the secret lies in the details. Enter the magical world of chocolate spray guns – your passport to creating stunning cake designs that are bound to impress. In this post, I’ll show you how to use a chocolate spray gun and the techniques you can use to achieve captivating sand, turf, or velvet effects on your cakes. Whether you’re a seasoned baker or just starting your culinary journey, these chocolate spray gun tricks will elevate your cake decorating skills to a whole new level. 

Ingredients/Tools

  • 100 g white chocolate 
  • from 1 tsp powdered cocoa butter up to 50 g of powdered cocoa butter; less for a thicker mixture and a larger spray gun nozzle and more cocoa butter for a more fluid mixture and a smaller spray gun nozzle 
  • oil-based food colouring of your choice (optional)

Note: All chocolate should be a good-quality baking or couverture chocolate. I use Callebaut chocolate.

Directions

Read the instructions below or watch this video to see how to use a chocolate spray gun:

Preparing the Cake

Before you start preparing the chocolate, you need your frosted cakes ready. I usually cover them in Chocolate Ganache or a Chocolate Ganache Buttercream Frosting but you can use other frostings too, like regular buttercream.

You must refrigerate the cake for at least 6-8 hours before spraying the chocolate on it. Some people even freeze it for 20-30 minutes after refrigerating it overnight; I don’t, I just keep the cakes in the fridge only. Note that if you’re in a rush, you can also freeze the cake for about three hours right after frosting it. 

Melting the Chocolate

Melt 100 g of white chocolate until it reaches 42°C (107°F). This is enough to cover a 25 cm (10 inch) round cake. You can use the microwave to melt the chocolate 5-10 seconds at a time, stirring it each time. Or, you can melt it using a double boiler. 

Colour the chocolate using green oil-based food colouring.

Allow the chocolate to cool at room temperature to 33°C (91°F).

Then, for each 100 grams of chocolate, add from half a teaspoon up to 9 tablespoons (i.e. 50 grams) of cocoa butter powder (less for a thicker mixture and a larger spray gun nozzle and more cocoa butter for a more fluid mixture and a smaller spray gun nozzle). Add the cocoa butter powder one teaspoon at a time and mix it in very well until there are no more traces of cocoa butter. 

The chocolate should have a temperature of 30-32°C (86-89°F) when you work with it. So place it in the spray gun container when it’s 1-2 degrees warmer as, by the time you start spraying the cake, it will cool off. 

If it cools off too much while you’re working with it, re-heat it in the microwave for a few seconds again. 

How to Use the Chocolate Spray Gun 

Take your cake out of the fridge or freezer, place it on a turntable and work with it right away. Do not let any condensation form! 

Note that I used some cardboard boxes to create a shield and protect my kitchen from all the chocolate I’m about to spray around the cake. Those empty Amazon boxes must be good for something!

Keep the spray gun straight and screw the container onto it.

Always test the spray gun on a cardboard before you start spraying the chocolate on the cake.

Spray a thin layer of melted chocolate on while making a smooth up-and-down or cross-wise motion and rotating your cake as you go. Make sure to hold the spray gun at an even distance of approximately 30-40 cm (11-15 in) to the cake. 

Make sure to spray a thin layer: a layer that’s too thick is inclined to crack. If you want a thicker layer applied, it’s better to apply a thin coat then refrigerate the cake so that the chocolate hardens and then apply another coat. 

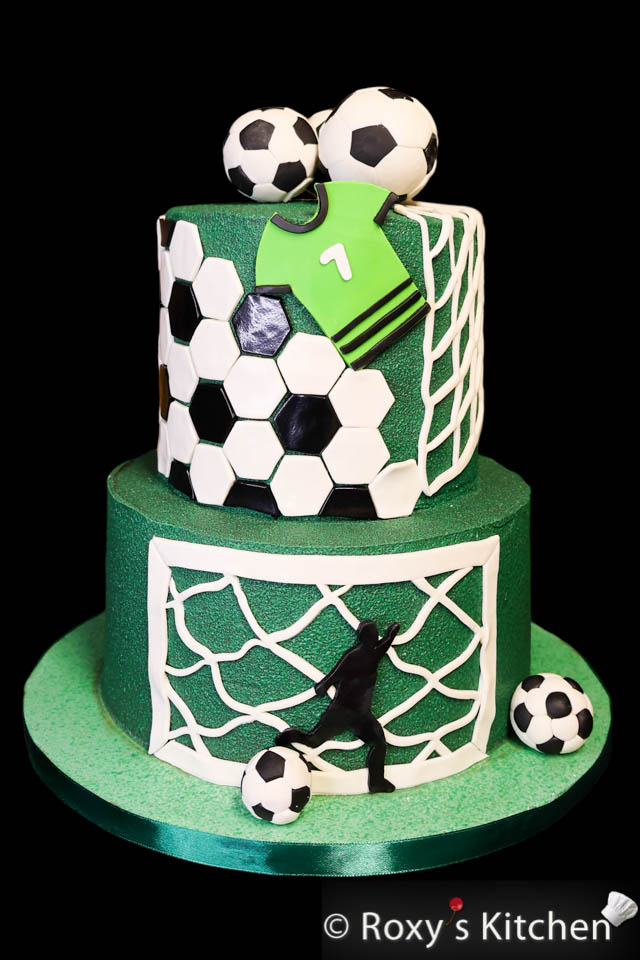
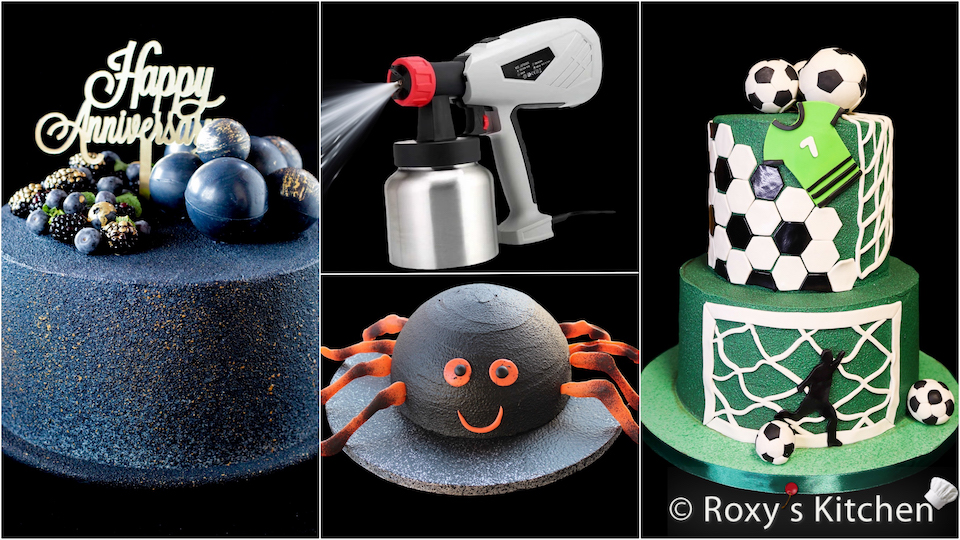
Note that for this soccer cake I used less cocoa butter powder in the chocolate mixture… and that is 1 teaspoon for 200 grams of chocolate.

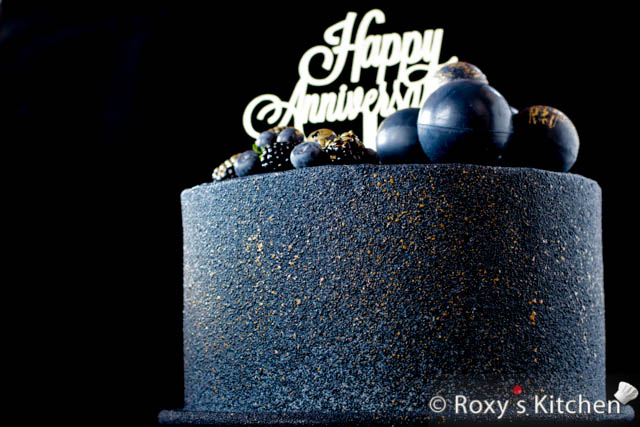
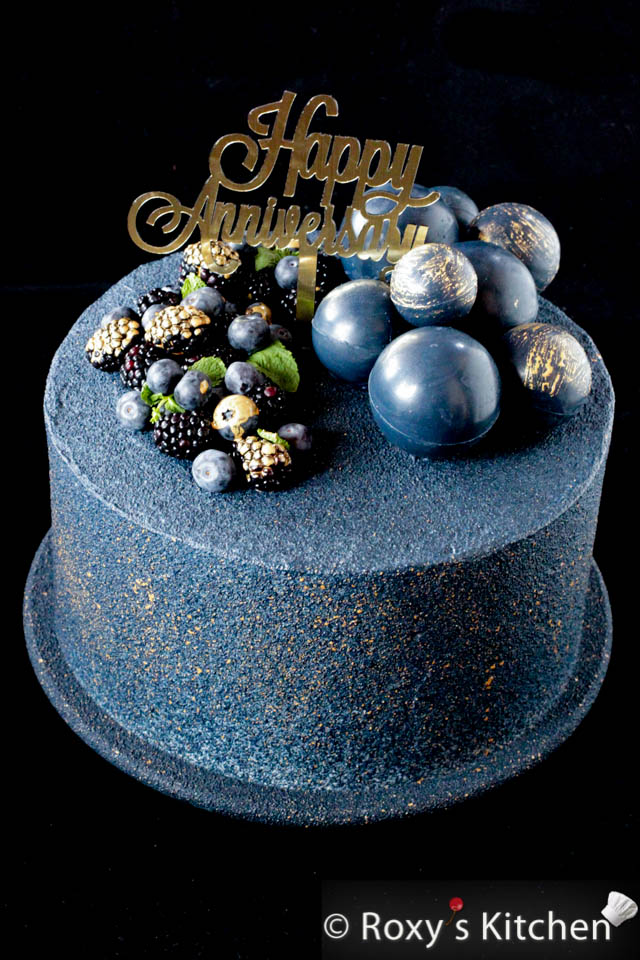
For this blue wedding anniversary cake I used a little more cocoa butter powder in the chocolate mixture… and that is 4 teaspoons (16 grams) of cocoa butter powder for 100 grams of chocolate.

Place the cake in the refrigerator for at least one hour so that the chocolate sets.

Soccer-themed cake with green turf effect made out of chocolate using a chocolate spray gun
Spider cake with grey/black speckled effect made out of chocolate using a chocolate spray gun
Wedding anniversary cake with blue velvet texture made out of chocolate using a chocolate spray gun
Print Friendly, PDF & Email

YOU MAY ALSO LIKE:

Catalina’s Bachelorette Party

101 Spring Cake Designs

Pikachu Cake Tutorial

Soccer-Themed Cakesicles 

Share this:

  • Print (Opens in new window) Print
  • Email a link to a friend (Opens in new window) Email
  • Tweet
  • Share on Reddit (Opens in new window) Reddit
  • Share on Tumblr

Filed Under: Chocolate, Roxy's Cakes, Uncategorized Tagged With: cakes, green cake, soccer cake, spider cake, wedding anniversary cake

FREE & Cheap Printables

  • Sale Product on sale
    Black & Gold Happy Birthday Cake & Cupcake Toppers
    Black & Gold Happy Birthday Cake & Cupcake Toppers
    $5.00 Original price was: $5.00.$2.50Current price is: $2.50.
    Add to cart
  • Sale Product on sale
    Colorful Happy Birthday Cake & Cupcake Toppers
    Colorful Happy Birthday Cake & Cupcake Toppers
    $5.00 Original price was: $5.00.$2.50Current price is: $2.50.
    Add to cart
  • Sale Product on sale
    Printable Ice Hockey Cake & Cupcake Toppers
    Ice Hockey Cake & Cupcake Toppers
    $12.24 Original price was: $12.24.$9.52Current price is: $9.52.
    Buy product
  • Ice Hockey Coffee Mug
    Ice Hockey Coffee Mug
    $19.99
    Buy product
  • Sale Product on sale
    Ice Hockey Cupcake Toppers (2'') - 12 Designs
    Ice Hockey Cupcake Toppers (2”) – 12 Designs
    $10.20 Original price was: $10.20.$5.10Current price is: $5.10.
    Buy product
  • Sale Product on sale
    Ballerina Cake & Cupcake Toppers
    Ballerina Cake & Cupcake Toppers
    $8.16 Original price was: $8.16.$6.12Current price is: $6.12.
    Buy product
  • Dancing Ballerina Coffee Mug
    Dancing Ballerina Coffee Mug
    $19.99
    Buy product
  • Valentine's Day Cake & Cupcake Toppers
    Valentine’s Day Cake & Cupcake Toppers
    $6.00
    Add to cart

Themed Birthday Parties

Mickey Mouse Cakes & Party Ideas

Mickey Mouse Cakes & Party Ideas

How To Make Safari / Jungle Animals Fondant Cupcake Toppers – Tiger, Zebra, Giraffe, Elephant, Monkey, Hippo, Bear, Lion

Tutorial with Step by Step Photos - How To Make Safari / Jungle Animals Cupcake Toppers – Tiger, Zebra, Giraffe, Elephant, Monkey, Hippo, Bear, Lion

How to Make a Car Cake with Remote-Controlled Headlights

How to Make a Car Cake with Remote-Controlled Headlights

Stylish Girl Cake – How to Make the Easiest Doll Cake

Stylish Girl Cake

More Posts from this Category

Recent Posts

Easiest Way to Make Number Cakes – No Special Pans & No Cake Waste

Easiest Way to Make Number Cakes - No Special Pans & No Cake Waste - Free 0 to 9 Number Templates Included

Quick & Easy Chocolate Mint Ice Cream

Quick & Easy Chocolate Mint Ice Cream

100+ Ballerina & Tutu-Themed Cake Designs

100+ Ballerina & Tutu-Themed Cake Designs

How to Naturally Dye Easter Eggs Blue

How to Naturally Dye Easter Eggs Blue

Copyright © 2026 · Lifestyle Pro Theme on Genesis Framework · WordPress · Log in